
Subscribe to Our Youtube Channel
Related Manuals for Adec 200


Summary of Contents for Adec 200
- Page 1 All manuals and user guides at all-guides.com nstructIons for A-dec 200 Dental Chair, Delivery and Support Systems, Cuspidor, Dental Light...
- Page 2 Performer, Preference, Preference Collection, Preference ICC, and Radius are trademarks of A-dec Inc. and are registered in the United States and other countries. A-dec 200, Preference Slimline, and reliablecreativesolutions are also trademarks of A-dec Inc. None of the trademarks or trade names in this document may be reproduced, copied, or manipulated in any manner without the express, written approval of the trademark owner.
- Page 3 All manuals and user guides at all-guides.com ConTenT MAP QuICk START SPeCIfICATIonS/ WARRAnTy 28, 29 86.0024.00 Rev C...
- Page 4 All manuals and user guides at all-guides.com A-dec 200 Instructions For Use QuICk START Turn the system on. Turn the knob counterclockwise to disengage the flexarm brake and adjust the height. Turn the knob clockwise to lock the position. Check the water bottle and fill if near empty.
- Page 5 All manuals and user guides at all-guides.com Use the manual or programmable buttons to position the chair. For complete programming instructions, see page 8. Programmable Buttons Manual Buttons Programmable Buttons Manual Buttons Use the touchpad to activate the dental light and cuspidor functions. For complete programming instructions, see pages 20 and 23. Dental Light Cupfill Bowl...
- Page 6 All manuals and user guides at all-guides.com A-dec 200 Instructions For Use Quick Start Flip the dental light toggle switch or press the dental light bu tton Control cupfill and bowl rinse functions from the cuspidor tower. on the touchpad to turn the light on high or low intensity*.
-
Page 7: Table Of Contents
All manuals and user guides at all-guides.com A-deC 200 RefeRenCe SeCTIon Chair and Delivery System ..6 Assistant’s Instrumentation ..15 Cuspidor ......20 Dental Light ......23 Specifications ......28 Warranty ......29 86.0024.00 Rev C... -
Page 8: Chair And Delivery System
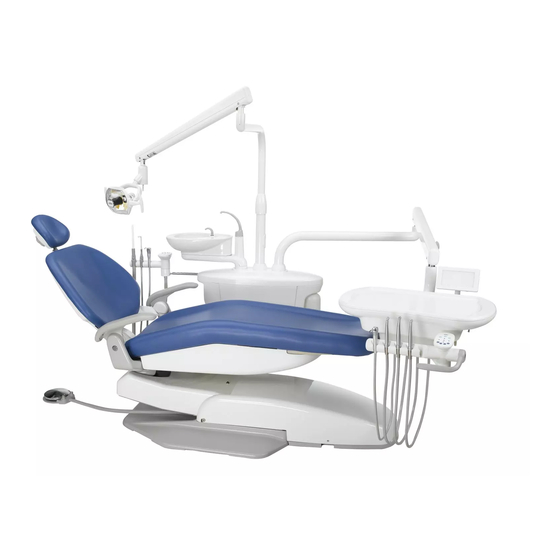
All manuals and user guides at all-guides.com A-dec 200 Instructions For Use denTAl ChAIR And delIveRy SySTeM Upholstery Care Flexarm Control Head Doctor’s Touchpad Instrument Master Holder Headrest Toggle Oil Collector Utilities Water/Air Coolant Flow Tubing Controls Delivery Flush System... - Page 9 All manuals and user guides at all-guides.com Power and System Status The chair and system power is controlled by the Master toggle on the Master Toggle delivery system. To save energy, turn the power off at the end of the work day and during longer periods of non-use.
- Page 10 All manuals and user guides at all-guides.com A-dec 200 Instructions For Use Dental Chair and Delivery System Programmable Chair Positions noTe Please follow standard patient care precautions when using Program the chair preset position functions. Button Treatment 1 Treatment 2 You can operate the chair manually or by using programmed presets from the footswitch or optional touchpad.
- Page 11 All manuals and user guides at all-guides.com X-Ray/Rinse Chair Position The x-ray/rinse preset button moves the chair and patient into an X-Ray/ upright position for x-rays or cuspidor access. If you’d like to change Rinse this function to an additional programmable chair position, contact Position your authorized A-dec dealer.
- Page 12 All manuals and user guides at all-guides.com A-dec 200 Instructions For Use Dental Chair and Delivery System Water/Air Coolant Adjustment Use the two adjustment knobs to customize water and air coolant flow to your handpieces. The blue knob adjusts water coolant flow to all handpieces.
- Page 13 All manuals and user guides at all-guides.com Instrument holder Adjustment The instrument holders rotate independently to allow customized positioning for each handpiece. Pull the holder slightly away from the adjacent one, rotate to the desired position, and then release. Twisting the holder without pulling it away from the CAuTIon Assistant-Side adjacent one will damage the mechanism.
- Page 14 All manuals and user guides at all-guides.com A-dec 200 Instructions For Use Dental Chair and Delivery System Tension Adjustments flexarm Rotation If the control head flexarm begins to drift right or left, use a 3/32" hex key to adjust the tension setscrew. Turn the screw clockwise to tighten or counterclockwise to loosen the tension.
- Page 15 All manuals and user guides at all-guides.com Touch and Transfer Surfaces Touch surfaces are those areas that come into contact with hands and become potential cross-contamination points during dental procedures. Transfer surfaces are those surfaces that are contaminated by contact with instruments and other inanimate objects.
- Page 16 All manuals and user guides at all-guides.com A-dec 200 Instructions For Use Dental Chair and Delivery System To check for a clogged air or water filter: Filter Housing 1. Turn on the Master toggle. Filter 2. While watching the air pressure gauge, press the syringe air button. If the O-Ring system air pressure drops by more than 15 psi, replace the air filter.
-
Page 17: Assistant's Instrumentation
All manuals and user guides at all-guides.com ASSISTAnT’S InSTRuMenTATIon And SuPPoRT CenTeR Optional (high-volume evacuator) Assistant’s Syringe Saliva Ejector Support Center Optional Assistant’s Touchpad A-dec ICX Waterline Treatment Tablets Solids Collector Doctor’s Syringe Self-Contained Water Bottle 86.0024.00 Rev C... - Page 18 All manuals and user guides at all-guides.com A-dec 200 Instructions For Use Assistant’s Instrumentation and Support Center Self-Contained Water System The 2-liter self-contained water bottle supplies water to handpieces, syringes, and the cuspidor cupfill. To remove the bottle, turn off the Master toggle, and rotate the bottle to the left.
- Page 19 All manuals and user guides at all-guides.com Waterline Maintenance Protocol A consistent waterline maintenance protocol is required to maintain good water quality in your system. A-dec’s recommendation for waterline maintenance is based on continuous use of the A-dec ICX waterline treatment tablet. ICX is intended for use with potable water and should be used in conjunction with regular dental unit water monitoring and shock treatments (when necessary).
- Page 20 All manuals and user guides at all-guides.com A-dec 200 Instructions For Use Assistant’s Instrumentation and Support Center Syringe Tip Cleaning and Sterilization Do not attempt to remove the syringe body. The syringe CAuTIon is permanently attached to the tubing and cannot be removed for sterilization.
- Page 21 All manuals and user guides at all-guides.com hve and Saliva ejector Asepsis If you use barrier film to protect the main body of the HVE and saliva ejector, clean and sterilize these instruments weekly, or more frequently Saliva Ejector as needed. If you do not use barrier film, or if you perform oral surgery, clean and sterilize these instruments after each patient.
-
Page 22: Cuspidor
All manuals and user guides at all-guides.com A-dec 200 Instructions For Use CuSPIdoR The cuspidor cupfill and bowl rinse functions are dependent on your Cupfill Button specific configuration. Bowl Rinse Cupfill Button Spout Standard Cuspidor Press and hold the cupfill button on the cuspidor for the desired amount of water. - Page 23 All manuals and user guides at all-guides.com Programming (only systems with doctor’s touchpad) TIP Press twice in less than two seconds to activate the continuous operation mode. Press the button once to end the continuous bowl rinse mode. Program To reprogram the timed cupfill or bowl rinse functions: Button 1.
- Page 24 All manuals and user guides at all-guides.com A-dec 200 Instructions For Use Cuspidor Cleaning and Maintenance Cuspidor Bowl The contoured spouts and smooth bowl of the cuspidor provide for quick and easy cleaning. Remember to empty and clean the bowl screen every time you clean the cuspidor.
-
Page 25: Dental Light
Tension Adjustment The A-dec 200 dental light can be operated from the manual 3-position switch or the optional touchpad. The dental light is always off when the manual switch is in the center location. To turn the light on from the touchpad, press and release the dental light button. - Page 26 All manuals and user guides at all-guides.com A-dec 200 Instructions For Use Dental Light Auto on/off The optional auto on/off feature turns the light on when the chair back reaches a treatment position. Press , and the dental light turns off.
- Page 27 All manuals and user guides at all-guides.com Rotation Adjustments If the light head is difficult to position, moves too easily, or tends to slip out of position, you can adjust the diagonal and vertical rotation tension. diagonal Adjustment For diagonal rotation tension, adjust the setscrew on the pivot housing using a 5/64"...
- Page 28 All manuals and user guides at all-guides.com A-dec 200 Instructions For Use Dental Light Bulb Replacement Follow these steps when replacing the dental light bulb: Light Shield 1. Turn the light off and allow it to cool. WARnInG To avoid burning your fingers, allow the bulb to cool before removing.
- Page 29 All manuals and user guides at all-guides.com dental light Shield Maintenance For optimal performance and maximum life of your dental light shield, Use only soap and CAuTIon use only soap and water to clean the shield. Do not use alcohol-based water to clean the shield.
-
Page 30: Specifications
All manuals and user guides at all-guides.com A-dec 200 Instructions For Use SPeCIfICATIonS noTe Specifications are subject to change without notice. Some requirements may vary from country to country. For more informa- tion, contact your authorized A-dec dealer. Maximum Chair Capacity Dental Light Operating Specifications Patient Load: 181 kg (400 lbs.) -
Page 31: Warranty
All manuals and user guides at all-guides.com WARRAnTy A-dec warrants all products against defects in materials or workman- ship for one year from time of delivery. A-dec’s sole obligation under the warranty is to provide parts for the repair, or at its option, to provide the replacement product (excluding labor). - Page 32 All manuals and user guides at all-guides.com A-dec headquarters 2601 Crestview Drive Newberg, OR 97132 USA Tel: 1.800.547.1883 Within USA/Canada Tel: 1.503.538.7478 Outside USA/Canada Fax:1.503.538.0276 www.a-dec.com International Distribution Centers A-dec united kingdom A-dec Australia EU Authorized Representative Unit 8 Austin House, 11 Liberty Way 5-9 Ricketty Street ÍvÈ.ÇÂ8È.00=Î...
Need help?
Do you have a question about the 200 and is the answer not in the manual?
Questions and answers