Advertisement
Available languages
Available languages
Quick Links
Biertap
NL
Handleiding
Distributeur de bière
FR
Mode d'emploi
Bierzapfanlage
DE
Bedienungsanleitung
Model • Modèle • Modell • Modello • Modelo • Malli:
GE632-GE633_ML_A5_v1_20210423.indb 1
GE632-GE633_ML_A5_v1_20210423.indb 1
Distributore di Birra
13
IT
Manuale di istruzioni
Dispensador de cerveza
24
ES
Manual de instrucciones
Distribuidor de Cerveja
35
PT
Manual de instruções
GE632/GE633
Beer
Dispenser
Instruction manual
46
57
68
2021/4/23 13:26
2021/4/23 13:26
Advertisement

Related Manuals for Polar Electro GE632


Summary of Contents for Polar Electro GE632
- Page 1 Manuale di istruzioni Distributeur de bière Dispensador de cerveza Mode d'emploi Manual de instrucciones Bierzapfanlage Distribuidor de Cerveja Bedienungsanleitung Manual de instruções Model • Modèle • Modell • Modello • Modelo • Malli: GE632/GE633 GE632-GE633_ML_A5_v1_20210423.indb 1 GE632-GE633_ML_A5_v1_20210423.indb 1 2021/4/23 13:26 2021/4/23 13:26...
- Page 2 GE632-GE633_ML_A5_v1_20210423.indb 2 GE632-GE633_ML_A5_v1_20210423.indb 2 2021/4/23 13:26 2021/4/23 13:26...
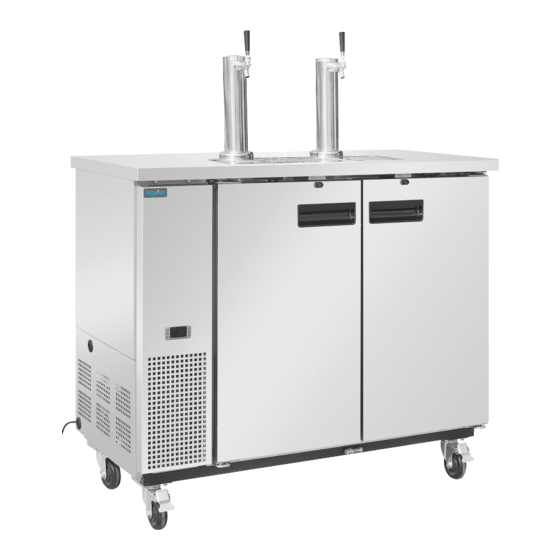
- Page 3 Product Description GE632 - Direct Draw Beer Dispenser (1 Keg 1 Tap) GE633 - Direct Draw Beer Dispenser (2 Keg 2 Tap) GE632-GE633_ML_A5_v1_20210423.indb 3 GE632-GE633_ML_A5_v1_20210423.indb 3...
- Page 4 5cm clearance on the top. NEVER LOCATE NEXT TO A HEAT SOURCE. Note: Before using the appliance for the first time, clean the interior with soapy water. GE632-GE633_ML_A5_v1_20210423.indb 4 GE632-GE633_ML_A5_v1_20210423.indb 4 2021/4/23 13:26 2021/4/23 13:26...
- Page 5 Beer line 7. Re-attach and fix the cover plate to the cabinet’s inner surface with bolts. Bolt Cover plate Black Beer tower Washer Beer line GE632-GE633_ML_A5_v1_20210423.indb 5 GE632-GE633_ML_A5_v1_20210423.indb 5 2021/4/23 13:26 2021/4/23 13:26...
- Page 6 Be gentle when locating CO cylinder and beer keg into the cabinet to avoid any damage. Beer keg Tee Joint for CO lines Keg tap regulator Beer line cylinder Beer tower line (#1) line line (#2) GE632-GE633_ML_A5_v1_20210423.indb 6 GE632-GE633_ML_A5_v1_20210423.indb 6 2021/4/23 13:26 2021/4/23 13:26...
- Page 7 Beer keg layout: Model GE632 Warning: • Make sure that all fittings in system are tight. Always keep the CO cylinder in vertical position. The recommended pressure for the CO system is 8-10 psi. • Always handle the CO cylinder with care.
- Page 8 Operation Beer keg layout: Model GE633 Control Panel For GE632: The control panel is located on the rear wall inside the cabinet. For GE633: The control panel is located on the front of the appliance. To lock/unlock the keyboard, press together for more than 3 seconds.
- Page 9 • Ensure that the cleaning products are washed prior to the 90-day period. Thus the condenser coil off fully and that the steel is left dry. should be cleaned more frequently. GE632-GE633_ML_A5_v1_20210423.indb 9 GE632-GE633_ML_A5_v1_20210423.indb 9 2021/4/23 13:26 2021/4/23 13:26...
- Page 10 If your floor is not level this can also cause drain problems. Make sure all drain lines are free of obstructions, or blocked drain lines will cause water to back up and overflow the drain pans. GE632-GE633_ML_A5_v1_20210423.indb 10 GE632-GE633_ML_A5_v1_20210423.indb 10...
- Page 11 Temperature Dimensions Weight Model Voltage Power Current Refrigerant Range H x W x D mm (kg) GE632 230V~ 50Hz 150W 1.1A 2°C ~ 8°C R600a (55g) 1312 x 612 x GE633 230V~ 50Hz 250W 1.6A 2°C ~ 8°C R290 (95g) 1438 x 1247 x GE632-GE633_ML_A5_v1_20210423.indb 11...
- Page 12 POLAR. Every effort is made to ensure all details are correct at the time of going to press, however, POLAR reserve the right to change specifications without notice. GE632-GE633_ML_A5_v1_20210423.indb 12 GE632-GE633_ML_A5_v1_20210423.indb 12 2021/4/23 13:26...
- Page 13 • Indien de stroomkabel beschadigd raakt, dient men deze door een POLAR technicus of een aanbevolen vaktechnicus te laten vervangen om gevaarlijke situaties te verhinderen. GE632-GE633_ML_A5_v1_20210423.indb 13 GE632-GE633_ML_A5_v1_20210423.indb 13 2021/4/23 13:26 2021/4/23 13:26...
- Page 14 • Waarschuwing: Gebruik geen elektrische apparaten binnen het voedsel opbergvakken van het apparaat, tenzij ze het type aanbevolen door de fabrikant. Productbeschrijving GE632 - Biertap met directe tap (1 vat 1 kraan) GE633 - Biertap met directe tap (2 vaten 2 kranen) GE632-GE633_ML_A5_v1_20210423.indb 14 GE632-GE633_ML_A5_v1_20210423.indb 14...
- Page 15 5 cm aan montagevoorschriften opvolgt, de bovenkant. PLAATS NOOIT NAAST EEN vervalt uw garantie. WARMTEBRON. Let op: Voordat u het apparaat de eerste keer gebruikt, moet u het interieur reinigen met een sopje. GE632-GE633_ML_A5_v1_20210423.indb 15 GE632-GE633_ML_A5_v1_20210423.indb 15 2021/4/23 13:26 2021/4/23 13:26...
- Page 16 3. Haal de grote zwarte sluitring door de bierslang, die uit de biertoren komt. Bierslang 7. Bevestig de afdekplaat met bouten opnieuw aan de binnenkant van de kast. Bout Afdekplaat Zwarte Biertoren sluitring Bierslang GE632-GE633_ML_A5_v1_20210423.indb 16 GE632-GE633_ML_A5_v1_20210423.indb 16 2021/4/23 13:26 2021/4/23 13:26...
- Page 17 Wees voorzichtig bij het plaatsen van de -fles en het biervat in de bierkast om schade te voorkomen. Biervat T-verbindingsstuk voor CO2-slangen Tapkraantje -drukregelaar Bierslang -fles Biertoren -slang (#1) -slang -slang (#2) GE632-GE633_ML_A5_v1_20210423.indb 17 GE632-GE633_ML_A5_v1_20210423.indb 17 2021/4/23 13:26 2021/4/23 13:26...
- Page 18 CO Lay-out van het biervat: Model fles aan te sluiten. Zorg ervoor, GE633 dat u voor daadwerkelijke aansluitingen de instructies van de fabrikant opvolgt, die bij de -fles zijn geleverd. GE632-GE633_ML_A5_v1_20210423.indb 18 GE632-GE633_ML_A5_v1_20210423.indb 18 2021/4/23 13:26 2021/4/23 13:26...
- Page 19 Bediening Lay-out van het biervat: Model GE633 Bedieningspaneel Voor GE632: Het bedieningspaneel bevindt zich op de achterwand in de bierkast. Voor GE633: Het bedieningspaneel bevindt zich aan de voorzijde van het apparaat. Te ontgrendelen / vergrendelen van het toetsenbord drukt samen gedurende 3 seconden.
- Page 20 • ervoor zorgen dat de reinigingsproducten 90 dagen. In dat geval moet de condensorspoel volledig worden afgespoeld en dat het staal vaker worden gereinigd. droog achter blijft. GE632-GE633_ML_A5_v1_20210423.indb 20 GE632-GE633_ML_A5_v1_20210423.indb 20 2021/4/23 13:26 2021/4/23 13:26...
- Page 21 Als uw vloer niet waterpas is, kan dit afvoerproblemen veroorzaken. Zorg ervoor dat alle afvoerleidingen vrij zijn van verstoppingen, anders zullen verstopte afvoerleidingen ertoe leiden dat water terugstroomt en de afvoerbakken overlopen. GE632-GE633_ML_A5_v1_20210423.indb 21 GE632-GE633_ML_A5_v1_20210423.indb 21 2021/4/23 13:26...
- Page 22 (Kg) GE632 230V~ 150W 1,1A 2°C ~ 8°C R600a 1312 x 612 x 50Hz (55g) GE633 230V~ 250W 1,6A 2°C ~ 8°C R290 1438 x 1247 x 50Hz (95g) GE632-GE633_ML_A5_v1_20210423.indb 22 GE632-GE633_ML_A5_v1_20210423.indb 22 2021/4/23 13:26 2021/4/23 13:26...
- Page 23 Wij hebben er alles aan gedaan om er zeker van te zijn dat op publicatiedatum van de handleiding alle details correct zijn, desondanks, behoudt POLAR het recht voor om specificaties zonder aankondiging te wijzigen. GE632-GE633_ML_A5_v1_20210423.indb 23 GE632-GE633_ML_A5_v1_20210423.indb 23 2021/4/23 13:26...
- Page 24 POLAR ou un technicien qualifié recommandé, pour éviter tout danger. • Les enfants ne doivent pas jouer avec l’appareil. • Nettoyage et entretien de l’utilisateur ne peut être faite par des enfants sans surveillance. GE632-GE633_ML_A5_v1_20210423.indb 24 GE632-GE633_ML_A5_v1_20210423.indb 24 2021/4/23 13:26 2021/4/23 13:26...
- Page 25 à moins qu’ils soient du type recommandé par le fabricant. Description du produit GE632 - Distributeur de bière à tirage direct (1 fût 1 robinet) GE633 - Distributeur de bière à tirage direct (2 fûts 2 robinets) GE632-GE633_ML_A5_v1_20210423.indb 25 GE632-GE633_ML_A5_v1_20210423.indb 25...
- Page 26 5 cm sur le dessus. NE JAMAIS PLACER À les instructions d’installation, PROXIMITÉ D’UNE SOURCE DE CHALEUR. votre garantie sera annulée. Remarque : Avant d’utiliser l’appareil pour la première fois, nettoyer l’intérieur avec de l’eau savonneuse. GE632-GE633_ML_A5_v1_20210423.indb 26 GE632-GE633_ML_A5_v1_20210423.indb 26 2021/4/23 13:26 2021/4/23 13:26...
- Page 27 7. Remontez et fixez le couvercle de plaque à la surface intérieure de la cabine à l’aide de Ligne de boulons. bière Boulon Plaque du couvercle Rondelle Tour à bière noire Ligne à bière GE632-GE633_ML_A5_v1_20210423.indb 27 GE632-GE633_ML_A5_v1_20210423.indb 27 2021/4/23 13:27 2021/4/23 13:27...
- Page 28 Joint en T pour les lignes de C0 Robinet de fût Régulateur de C0 Ligne de bière Bouteille de C0 Tour de bière Ligne de C0 (#l) Ligne C0 Ligne C0 (#2) GE632-GE633_ML_A5_v1_20210423.indb 28 GE632-GE633_ML_A5_v1_20210423.indb 28 2021/4/23 13:27 2021/4/23 13:27...
- Page 29 Disposition du fût de bière : Modèle bouteille de C0 à distance, utilisez le GE633 schéma ci-dessous à titre de référence. Pour les connexions réelles, veillez à suivre les instructions du fabricant fournies avec la bouteille de C0 GE632-GE633_ML_A5_v1_20210423.indb 29 GE632-GE633_ML_A5_v1_20210423.indb 29 2021/4/23 13:27 2021/4/23 13:27...
- Page 30 Disposition du fût de bière : Modèle GE633 Panneau de configuration Pour GE632 : le panneau de commande est situé sur la paroi arrière à l’intérieur de l’armoire. Pour GE633 : Le panneau de commande est situé sur le devant de l’appareil.
- Page 31 90 jours. Dans ce spécialement conçus pour l’inox cas, le serpentin du condenseur doit être nettoyé • Veiller à bien rincer les produits de nettoyage plus fréquemment. et à essuyer l’inox GE632-GE633_ML_A5_v1_20210423.indb 31 GE632-GE633_ML_A5_v1_20210423.indb 31 2021/4/23 13:27 2021/4/23 13:27...
- Page 32 Si votre sol n’est pas de niveau, cela peut également causer des problèmes de drainage. Assurez-vous que toutes les conduites d’évacuation ne sont pas obstruées, ou si elles sont bloquées, l’eau remontera et débordera les bacs d’évacuation. GE632-GE633_ML_A5_v1_20210423.indb 32 GE632-GE633_ML_A5_v1_20210423.indb 32 2021/4/23 13:27...
- Page 33 (kg) GE632 230V~ 150W 1,1A 2°C ~ 8°C R600a (55g) 1312 x 612 x 50Hz GE633 230V~ 250W 1,6A 2°C ~ 8°C R290 (95g) 1438 x 1247 x 50Hz GE632-GE633_ML_A5_v1_20210423.indb 33 GE632-GE633_ML_A5_v1_20210423.indb 33 2021/4/23 13:27 2021/4/23 13:27...
- Page 34 Nous nous efforçons, par tous les moyens dont nous disposons, de faire en sorte que les détails contenus dans le présent mode d’emploi soient corrects en date d’impression. Toutefois, POLAR se réserve le droit de changer les spécifications de ses produits sans préavis. GE632-GE633_ML_A5_v1_20210423.indb 34 GE632-GE633_ML_A5_v1_20210423.indb 34 2021/4/23 13:27...
- Page 35 POLAR-Mitarbeiter oder empfohlenen qualifizierten Elektriker erneuert werden. • Kinder dürfen nicht mit dem Gerät spielen. • Reinigung und Wartung durch den Benutzer dürfen nicht von Kindern ohne Aufsicht durchgeführt werden. GE632-GE633_ML_A5_v1_20210423.indb 35 GE632-GE633_ML_A5_v1_20210423.indb 35 2021/4/23 13:27 2021/4/23 13:27...
- Page 36 • Warnung: Verwenden Sie keine elektrischen Geräte innerhalb des Lebensmittellagerraumes betreiben, sofern sie nicht der Typ, der vom Hersteller empfohlen wird. Produktbeschreibung GE632 - Bierzapfanlage mit Direktentnahme (1 Fass 1 Zapfhahn) GE633 - Bierzapfanlage mit Direktentnahme (2 Fass 2 Zapfhahn) GE632-GE633_ML_A5_v1_20210423.indb 36 GE632-GE633_ML_A5_v1_20210423.indb 36...
- Page 37 Mindestabstand von 5 cm eingehalten der ordnungsgemäßen wird. NIEMALS IN DER NÄHE EINER Installationsanweisungen WÄRMEQUELLE. erlischt der Garantieanspruch. Hinweis: Bevor Sie das Gerät zum ersten Mal nutzen, reinigen Sie es innen mit einer Seifenlauge. GE632-GE633_ML_A5_v1_20210423.indb 37 GE632-GE633_ML_A5_v1_20210423.indb 37 2021/4/23 13:27 2021/4/23 13:27...
- Page 38 3. Fädeln Sie die große schwarze Unterlegscheibe durch die Bierleitung, die vom Bierturm kommt. 7. Bringen Sie die Abdeckplatte wieder an und Bierleitung befestigen Sie sie mit Bolzen an der Innenseite des Schranks. Bolzen Abdeckplatte Bierturm Bierleitung GE632-GE633_ML_A5_v1_20210423.indb 38 GE632-GE633_ML_A5_v1_20210423.indb 38 2021/4/23 13:27 2021/4/23 13:27...
- Page 39 Gehen Sie beim Einsetzen der CO -Flasche und des Bierfasses in den Schrank vorsichtig vor, um Beschädigungen zu vermeiden. Bier-Fass T-Stück für CO -Leitungen Zapfhahn -Regler Bierleitung -Flasche Bierturm -Leitung (#1) -Leitung -Leitung (#2) GE632-GE633_ML_A5_v1_20210423.indb 39 GE632-GE633_ML_A5_v1_20210423.indb 39 2021/4/23 13:27 2021/4/23 13:27...
- Page 40 Bierfass-Layout: Modell GE632 Warnung: • Stellen Sie sicher, dass alle Verschraubungen im System dicht sind. Halten Sie die CO -Flasche immer in vertikaler Position. Der empfohlene Druck für das CO -System beträgt 8-10 psi. • Behandeln Sie die CO -Flasche immer mit Vorsicht.
- Page 41 Betrieb Bierfass-Layout: Modell GE633 Bedienfeld Für GE632: Das Bedienfeld befindet sich an der Rückwand im Schrankinneren. Für GE633: Das Bedienfeld befindet sich vorne am Gerät. Zum Entsperren / Sperren der Tastatur drücken Sie zusammen für 3 Sekunden. Anzeige blinkt PON (entsperrt) / POF (gesperrt).
- Page 42 Darauf achten, dass die Reinigungsprodukte eine große Menge an Ablagerungen und Staub vollständig abgewaschen werden und der Stahl oder Fett angesammelt hat. Daher sollte das anschließend trocken ist. Verflüssigerregister häufiger gereinigt werden. GE632-GE633_ML_A5_v1_20210423.indb 42 GE632-GE633_ML_A5_v1_20210423.indb 42 2021/4/23 13:27 2021/4/23 13:27...
- Page 43 Wenn Ihr Boden nicht eben ist, kann dies ebenfalls zu Abflussproblemen führen. Stellen Sie sicher, dass alle Abflussleitungen frei von Hindernissen sind. Verstopfte Abflussleitungen führen dazu, dass sich Wasser zurückstaut und die Abflusswannen überlaufen. GE632-GE633_ML_A5_v1_20210423.indb 43 GE632-GE633_ML_A5_v1_20210423.indb 43 2021/4/23 13:27...
- Page 44 (kg) GE632 230V~ 150W 1,1A 2°C ~ 8°C R600a (55g) 1312 x 612 x 50Hz GE633 230V~ 250W 1,6A 2°C ~ 8°C R290 (95g) 1438 x 1247 x 50Hz GE632-GE633_ML_A5_v1_20210423.indb 44 GE632-GE633_ML_A5_v1_20210423.indb 44 2021/4/23 13:27 2021/4/23 13:27...
- Page 45 Fotokopieren, Aufnahme oder andere Verfahren - vervielfältigt oder übertragen werden. Es werden alle Anstrengungen unternommen um sicherzustellen, dass alle Angaben bei der Drucklegung korrekt sind. POLAR behält sich jedoch das Recht vor, Spezifikationen ohne Vorankündigung zu ändern. GE632-GE633_ML_A5_v1_20210423.indb 45 GE632-GE633_ML_A5_v1_20210423.indb 45 2021/4/23 13:27...
- Page 46 POLAR o da un tecnico qualificato al fine di prevenire eventuali rischi. • I bambini non giocherà con l’apparecchio. • Pulizia e manutenzione utente non deve essere effettuata da parte di bambini senza sorveglianza. GE632-GE633_ML_A5_v1_20210423.indb 46 GE632-GE633_ML_A5_v1_20210423.indb 46 2021/4/23 13:27 2021/4/23 13:27...
- Page 47 Descrizione dei prodotti GE632 - Distributore di Birra a Tiraggio Diretto (1 Fusto 1 Rubinetto) GE633 - Distributore di Birra a Tiraggio Diretto (2 Fusti 2 Rubinetti) GE632-GE633_ML_A5_v1_20210423.indb 47 GE632-GE633_ML_A5_v1_20210423.indb 47...
- Page 48 NON POSIZIONARE MAI garanzia. VICINO A UNA FONTE DI CALORE. Nota: Prima di usare lo strumento per la prima volta, pulire l’interno con acqua e sapone. GE632-GE633_ML_A5_v1_20210423.indb 48 GE632-GE633_ML_A5_v1_20210423.indb 48 2021/4/23 13:27 2021/4/23 13:27...
- Page 49 Linea della 7. Riattaccare e fissare il coperchio sulla superficie birra interna del mobile con i bulloni. Bullone Coperchio Torre della Guarnizione Nera birra Linea della birra GE632-GE633_ML_A5_v1_20210423.indb 49 GE632-GE633_ML_A5_v1_20210423.indb 49 2021/4/23 13:27 2021/4/23 13:27...
- Page 50 Giunto a T per le linee di CO2 Rubinetto del fusto Regolatore di CO2 Linea della birra Cilindro di CO2 Torre della birra Linea di CO2 (#1) Linea di CO2 Linea di CO2 (#2) GE632-GE633_ML_A5_v1_20210423.indb 50 GE632-GE633_ML_A5_v1_20210423.indb 50 2021/4/23 13:27 2021/4/23 13:27...
- Page 51 CO2, utilizzare il diagramma Struttura del fusto di birra: modello sottostante per riferimento. GE633 Assicurarsi, per tutti i collegamenti effettivi, di seguire le istruzioni del produttore fornite con il cilindro di CO2. GE632-GE633_ML_A5_v1_20210423.indb 51 GE632-GE633_ML_A5_v1_20210423.indb 51 2021/4/23 13:27 2021/4/23 13:27...
- Page 52 Funzionamento Struttura del fusto di birra: modello GE633 Pannello di controllo Per il GE632: il pannello di controllo è localizzato sul retro della parete interna del mobile. Per il GE633: Il pannello di controllo è posizionato sul lato anteriore dell’apparecchio.
- Page 53 Se l’accumulo sulla serpentina consiste solo • Assicurarsi di sciacquare completamente i di polvere e detriti leggeri, la serpentina del detergenti e che l’acciaio sia lasciato asciutto. GE632-GE633_ML_A5_v1_20210423.indb 53 GE632-GE633_ML_A5_v1_20210423.indb 53 2021/4/23 13:27 2021/4/23 13:27...
- Page 54 Se il tuo pavimento non è a livello, questo può anche causare problemi di drenaggio. Assicurati che tutte le linee di drenaggio siano libere da ostruzioni, altrimenti le linee di drenaggio bloccate provocheranno un ristagno e trabocco dell’acqua nelle vaschette di drenaggio. GE632-GE633_ML_A5_v1_20210423.indb 54 GE632-GE633_ML_A5_v1_20210423.indb 54 2021/4/23 13:27...
- Page 55 (Kg) GE632 230V~ 150W 1,1A 2°C ~ 8°C R600a (55g) 1312 x 612 x 50Hz GE633 230V~ 250W 1,6A 2°C ~ 8°C R290 (95g) 1438 x 1247 x 50Hz GE632-GE633_ML_A5_v1_20210423.indb 55 GE632-GE633_ML_A5_v1_20210423.indb 55 2021/4/23 13:27 2021/4/23 13:27...
- Page 56 POLAR. Le informazioni contenute sono corrette e accurate al momento della stampa, tuttavia POLAR si riserva il diritto di modificare le specifiche senza preavviso. GE632-GE633_ML_A5_v1_20210423.indb 56 GE632-GE633_ML_A5_v1_20210423.indb 56 2021/4/23 13:27 2021/4/23 13:27...
- Page 57 POLAR o un técnico cualificado recomendado para evitar cualquier riesgo. • Los niños no deben jugar con el aparato. • Limpieza y mantenimiento de usuarios, no podrán ser realizadas por los niños sin supervisión. GE632-GE633_ML_A5_v1_20210423.indb 57 GE632-GE633_ML_A5_v1_20210423.indb 57 2021/4/23 13:27 2021/4/23 13:27...
- Page 58 Descripción del Producto GE632 - Dispensador de cerveza de extracción directa (1 barril 1 grifo) GE633 - Dispensador de cerveza de extracción directa (2 barriles 2 grifos) GE632-GE633_ML_A5_v1_20210423.indb 58 GE632-GE633_ML_A5_v1_20210423.indb 58...
- Page 59 5 cm en la parte superior. NUNCA UBICAR AL debidas invalidará su garantía. LADO DE UNA FUENTE DE CALOR. Nota: Antes de utilizar el aparato por primera vez, limpie el interior con agua jabonosa. GE632-GE633_ML_A5_v1_20210423.indb 59 GE632-GE633_ML_A5_v1_20210423.indb 59 2021/4/23 13:27 2021/4/23 13:27...
- Page 60 Tubo de 7. Vuelva a unir y fijar la tapa en la superficie cerveza interior del armario con tornillos. Tornillo Tapa Torre de Arandela cerveza Tubo de negra cerveza GE632-GE633_ML_A5_v1_20210423.indb 60 GE632-GE633_ML_A5_v1_20210423.indb 60 2021/4/23 13:27 2021/4/23 13:27...
- Page 61 Junta para los tubos de CO2 Grifo del barril Regulador de CO2 Tubo de cerveza Cilindro de CO2 Torre de cerveza Tubo de CO2 (#1) Tubo de CO2 Tubo de CO2 (#2) GE632-GE633_ML_A5_v1_20210423.indb 61 GE632-GE633_ML_A5_v1_20210423.indb 61 2021/4/23 13:27 2021/4/23 13:27...
- Page 62 Disposición del barril de cerveza: Advertencia: Modelo GE632 • Asegúrese de que todos los accesorios del sistema están bien ajustados. Mantenga siempre el cilindro de CO2 en posición vertical. La presión recomendada para el sistema de CO2 es 8-10 psi.
- Page 63 Funcionamiento Disposición del barril de cerveza: Modelo GE633 Panel de Control Para GE632: El panel de control está situado en la pared trasera de dentro del armario. Para GE633: El panel de control se encuentra en el frontal del aparato.
- Page 64 Asegúrese de que los productos de limpieza antes del período de 90 días. De ser así, el muelle se quiten por completo lavando y que el acero condensador se deberá limpiar con más frecuencia. quede seco. GE632-GE633_ML_A5_v1_20210423.indb 64 GE632-GE633_ML_A5_v1_20210423.indb 64 2021/4/23 13:27 2021/4/23 13:27...
- Page 65 Si su suelo no está nivelado, podría también causar problemas de drenaje. Asegúrese de que los tubos del desagüe no tienen obstrucciones, ya que unos tubos de desagüe bloqueados harían que el agua retrocediese y que las bandejas del desagüe se desbordasen. GE632-GE633_ML_A5_v1_20210423.indb 65 GE632-GE633_ML_A5_v1_20210423.indb 65 2021/4/23 13:27...
- Page 66 (Kg) GE632 230V~ 150W 1,1A 2°C ~ 8°C R600a (55g) 1312 x 612 x 50Hz GE633 230V~ 250W 1,6A 2°C ~ 8°C R290 (95g) 1438 x 1247 x 50Hz GE632-GE633_ML_A5_v1_20210423.indb 66 GE632-GE633_ML_A5_v1_20210423.indb 66 2021/4/23 13:27 2021/4/23 13:27...
- Page 67 Se ha hecho todo lo posible para garantizar que todos los datos son correctos en el momento de su publicación; sin embargo,POLAR se reserva el derecho a modificar las especificaciones sin que medie notificación previa. GE632-GE633_ML_A5_v1_20210423.indb 67 GE632-GE633_ML_A5_v1_20210423.indb 67 2021/4/23 13:27...
- Page 68 POLAR ou um técnico qualificado recomendado. • A limpeza e a manutenção do utilizador não devem ser feitas por crianças a menos que sejam supervisionadas. GE632-GE633_ML_A5_v1_20210423.indb 68 GE632-GE633_ML_A5_v1_20210423.indb 68 2021/4/23 13:27 2021/4/23 13:27...
- Page 69 Descrição do produto GE632 - Distribuidor de Cerveja com Saída Direta (1 barril, 1 torneira) GE633 - Distribuidor de Cerveja com Saída Direta (2 barris, 2 torneiras) GE632-GE633_ML_A5_v1_20210423.indb 69 GE632-GE633_ML_A5_v1_20210423.indb 69...
- Page 70 5 cm na parte superior. NUNCA LOCALIZE AO LADO DE UMA FONTE DE CALOR. Nota: Antes de utilizar o aparelho pela primeira vez, limpe o interior com água ensaboada. GE632-GE633_ML_A5_v1_20210423.indb 70 GE632-GE633_ML_A5_v1_20210423.indb 70 2021/4/23 13:27 2021/4/23 13:27...
- Page 71 7. Recoloque e fixe a placa de cobertura na superfície interna da estrutura usando os Linha da parafusos. cerveja Parafuso Placa da tampa Torre de Arruela cerveja Preta Linha da cerveja GE632-GE633_ML_A5_v1_20210423.indb 71 GE632-GE633_ML_A5_v1_20210423.indb 71 2021/4/23 13:27 2021/4/23 13:27...
- Page 72 Junta em T para as linhas de CO2 Torneira do barril Regulador de CO2 Linha de cerveja Cilindro de CO2 Torre de cerveja Linha de CO2 (# 1) Linha de CO2 Linha de CO2 (# 2) GE632-GE633_ML_A5_v1_20210423.indb 72 GE632-GE633_ML_A5_v1_20210423.indb 72 2021/4/23 13:27 2021/4/23 13:27...
- Page 73 CO2 remoto, use Layout do barril de cerveja: Modelo o diagrama abaixo como referência. Para uma boa GE633 conexão, certifique-se de seguir as instruções fornecidas pelo fabricante juntamente com o cilindro de CO2. GE632-GE633_ML_A5_v1_20210423.indb 73 GE632-GE633_ML_A5_v1_20210423.indb 73 2021/4/23 13:27 2021/4/23 13:27...
- Page 74 Funcionamento Layout do barril de cerveja: Modelo GE633 Painel de controlo Para GE632: O painel de controlo está localizado na parede traseira dentro da estrutura. Para GE633: O painel de controlo está localizado na parte da frente do aparelho. Para bloquear / desbloquear o teclado, pressione juntos durante 3 segundos.
- Page 75 90 dias. Assim, a • Certifique-se de que os produtos de limpeza serpentina do condensador deve ser limpa com são totalmente lavados e que o aço fica seco. mais frequência. GE632-GE633_ML_A5_v1_20210423.indb 75 GE632-GE633_ML_A5_v1_20210423.indb 75 2021/4/23 13:27 2021/4/23 13:27...
- Page 76 Certifique-se de que todas as linhas de drenagem estejam livres de obstruções. Caso contrário, as linhas de drenagem bloqueadas farão com que a água suba e transborde os recipientes de drenagem. GE632-GE633_ML_A5_v1_20210423.indb 76 GE632-GE633_ML_A5_v1_20210423.indb 76 2021/4/23 13:27...
- Page 77 (kg) GE632 230V~ 150W 1,1A 2°C ~ 8°C R600a (55g) 1312 x 612 x 50Hz GE633 230V~ 250W 1,6A 2°C ~ 8°C R290 (95g) 1438 x 1247 x 50Hz GE632-GE633_ML_A5_v1_20210423.indb 77 GE632-GE633_ML_A5_v1_20210423.indb 77 2021/4/23 13:27 2021/4/23 13:27...
- Page 78 POLAR. Nós nos esforçamos para que no dia de publicação deste manual todos os pormenores sejam correctos, no entanto, a POLAR tem o direito de alterar as especificações sem aviso prévio. GE632-GE633_ML_A5_v1_20210423.indb 78 GE632-GE633_ML_A5_v1_20210423.indb 78 2021/4/23 13:27 2021/4/23 13:27...
- Page 79 • Tipo di apparecchiatura • Tipo de equipo • Tipo de equipamento • Modelo • Malli Direct Draw Beer Dispenser (1 Keg, 1 Tap) GE632 (-E & -A) Direct Draw Beer Dispenser (2 Keg, 2 Tap) GE633 (-E & -A) Application of Territory Legislation &...
- Page 80 +44 (0)845 146 2887 Eire 040 – 2628080 01 60 34 28 80 BE-NL 0800-29129 BE-FR 0800-29229 0800 – 1860806 901-100 133 vendas@nisbets.pt GE632-GE633_ML_A5_v1_20210423.indb 80 GE632-GE633_ML_A5_v1_20210423.indb 80 2021/4/23 13:27 2021/4/23 13:27...
- Page 81 GE632-GE633_ML_A5_v1_20210423.indb 81 GE632-GE633_ML_A5_v1_20210423.indb 81 2021/4/23 13:27 2021/4/23 13:27...
- Page 82 GE632-GE633_ML_A5_v1_20210423.indb 82 GE632-GE633_ML_A5_v1_20210423.indb 82 2021/4/23 13:27 2021/4/23 13:27...
- Page 83 GE632-GE633_ML_A5_v1_20210423.indb 83 GE632-GE633_ML_A5_v1_20210423.indb 83 2021/4/23 13:27 2021/4/23 13:27...
- Page 84 GE632-GE633_ML_A5_v1_20210423 GE632-GE633_ML_A5_v1_20210423.indb 84 GE632-GE633_ML_A5_v1_20210423.indb 84 2021/4/23 13:27 2021/4/23 13:27...
Need help?
Do you have a question about the GE632 and is the answer not in the manual?
Questions and answers