
Subscribe to Our Youtube Channel
Related Manuals for Thommen STRATOTIMER ST3


Summary of Contents for Thommen STRATOTIMER ST3
- Page 1 Installation and Operating Manual Stratotimer ST3 INSTALLATION AND OPERATING MANUAL STRATOTIMER ST3 ATA 31-20-01 Revision: 1.00 12/06/2020 THOMMEN AIRCRAFT EQUIPMENT AG Hofackerstrasse 48, CH-4132 Muttenz, Switzerland...
- Page 2 Installation and Operating Manual Stratotimer ST3 INTENTIONALLY BLANK 31-20-01 TITLE PAGE Revision: 1.00 Page 2 12/06/2020...
- Page 4 Installation and Operating Manual Stratotimer ST3 INTENTIONALLY BLANK 31-20-01 RECORD OF REVISIONS Revision: 1.00 Page 2 12/06/2020...
- Page 5 Installation and Operating Manual Stratotimer ST3 SERVICE BULLETIN LIST SB No. Subject Rev. Date 31-20-01 SERVICE BULLETIN LIST Revision: 1.00 Page 1 12/06/2020...
- Page 6 Installation and Operating Manual Stratotimer ST3 INTENTIONALLY BLANK 31-20-01 SERVICE BULLETIN LIST Revision: 1.00 Page 2 12/06/2020...
- Page 7 Installation and Operating Manual Stratotimer ST3 LIST OF EFFECTIVE PAGES SECTION PAGE REV. DATE SECTION PAGE REV. DATE Title Page 12/06/20 Description and Operation 12/06/20 12/06/20 12/06/20 12/06/20 12/06/20 12/06/20 Record of Revisions 12/06/20 12/06/20 12/06/20 12/06/20 12/06/20 12/06/20 12/06/20...
- Page 8 Installation and Operating Manual Stratotimer ST3 SECTION PAGE REV. DATE SECTION PAGE REV. DATE Fault Isolation 12/06/20 Adjustment / Test 12/06/20 12/06/20 12/06/20 Maintenance Practices 12/06/20 12/06/20 12/06/20 12/06/20 Removal / Installation 12/06/20 12/06/20 12/06/20 12/06/20 31-20-01 LIST OF EFFECTIVE PAGES 1.00...
-
Page 9: Table Of Contents
Installation and Operating Manual Stratotimer ST3 TABLE OF CONTENTS RECORD OF REVISIONS SERVICE BULLETIN LIST LIST OF EFFECTIVE PAGES TABLE OF CONTENTS INTRODUCTION 1. Purpose of this Manual 2. Manual Description 3. Revisions 4. Warnings, Cautions and Notes Warnings Cautions Notes 5. -
Page 10: Table Of Contents
Installation and Operating Manual Stratotimer ST3 Clock Sync Function 4.10 Maintenance Function FAULT ISOLATION 1. General 2. Failure Codes MAINTENANCE PRACTICES 1. Installation Considerations General Unpacking and Inspection Pre-installation Check Electrical Grounding 2. Battery Replacement 3. Storage General Environmental Conditions... -
Page 11: Introduction
Purpose of this Manual This Installation and Operating Manual (INSOP) gives a description and operation of the Stratotimer ST3 and the necessary procedural steps to remove/install, inspect and maintain the equipment. It also gives the necessary mechanical and electrical characteristics to make sure that the aircraft is compatible with it. -
Page 12: Technical Support
The Document / Equipment Defect Report (on the next page) gives the customer a way to inform Thommen Aircraft Equipment AG about any defects regarding the equipment or discrepancies in the technical documentation. This feedback will help Thommen Aircraft Equipment AG to make continued improvements to the equipment and/or the technical documentation. - Page 13 Operator Date Reported By Contact Details Document / Equipment: Description of Defect: Corrective action taken to continue operation: Please send to: THOMMEN AIRCRAFT EQUIPMENT AG Hofackerstrasse 48 CH-4132 Muttenz Switzerland Telephone: +41 (0)61 965 22 22 Email: tech-support@thommen.aero 31-20-01 INTRODUCTION Revision: 1.00...
-
Page 14: List Of Abbreviations
Installation and Operating Manual Stratotimer ST3 10. List of Abbreviations Abbreviation Description 3-ATI 3 Inch Air Transport Indicator Aircraft Maintenance Manual ARINC Aeronautical Radio Incorporated Air Transport Association Built-In Test CBIT Continuous Built-In Test CHRON Chronograph Component Maintenance Manual Cyclic Redundancy Check... - Page 15 Installation and Operating Manual Stratotimer ST3 Abbreviation Description Local Time Manual Management Handbook MIL-STD Military Standard MTBF Mean Time Between Failures Maintenance Time in Hours Not Applicable NVIS Night Vision Imaging System PBIT Power-up Built-In Test Pulse Width Modulation Qualification Test Procedure...
- Page 16 Installation and Operating Manual Stratotimer ST3 INTENTIONALLY BLANK 31-20-01 INTRODUCTION Revision: 1.00 Page 6 12/06/2020...
-
Page 17: Description And Operation
General This section gives a description of the functionality and operation of the Stratotimer ST3. The Stratotimer ST3 can be easily installed in all aircraft types with a nominal 28VDC power supply. A high resistance to environmental conditions including shock, vibration and mechanical impact is guaranteed by compliance with DO-160G, MIL-STD-202G and MIL-STD-810G qualification tests. -
Page 18: Description
An internal battery makes sure that the Stratotimer ST3 continues to keep time when aircraft power is not available. The battery can be easily replaced by opening a cover at the rear of the Stratotimer ST3 (refer to Maintenance Practices, page block 201). - Page 19 Installation and Operating Manual Stratotimer ST3 Figure 1 – Stratotimer ST3 Assembly 31-20-01 DESCRIPTION AND OPERATION Revision: 1.00 Page 3 12/06/2020...
-
Page 20: Specifications And Equipment Data
The relevant specifications and standards, which are the basis of the approvals for the Stratotimer ST3, are given in the Equipment Specification document (ST-SPE-100). 3.2 Environmental Qualification The environmental qualification for the Stratotimer ST3 is in accordance with the specifications and criteria given in the Qualification Test Procedure document (ST-QTP-100). 31-20-01 DESCRIPTION AND OPERATION Revision: 1.00... -
Page 21: Equipment Identification
Installation and Operating Manual Stratotimer ST3 3.3 Equipment Identification The Stratotimer ST3 can be identified with six codes, indicated on the identification label: • Model code • Part number • Manufacturer’s code • Serial number • Manufactured date • MOD code 3.3.1 Part Number... -
Page 22: Identification Label
Installation and Operating Manual Stratotimer ST3 3.3.3 Serial Number The serial number is a unique six-digit code for each device, written in the following format: 123456 3.3.4 Manufactured Date The manufactured date is written in the following format: MMM/YYYY, for example JAN/2020. -
Page 23: Mechanical Characteristics
NOTE: Mounting For the possibility of alternative mounting of the Stratotimer ST3 with the bezel flush with the aircraft panel, the dimensions of the inner profile of the bezel are identical to the housing. (Refer to Figure 3, Mechanical Dimensions.) Table 3 –... - Page 24 Installation and Operating Manual Stratotimer ST3 Figure 3 – Mechanical Dimensions 31-20-01 DESCRIPTION AND OPERATION Revision: 1.00 Page 8 12/06/2020...
-
Page 25: Electrical And Display Characteristics
Installation and Operating Manual Stratotimer ST3 3.5 Electrical and Display Characteristics Input Voltage 18 to 32 VDC Power Consumption 7W (250 mA) maximum at 28 VDC input voltage 15W average (3A maximum) at temperature below minus 20°C for 5 to 10 minutes. - Page 26 Installation and Operating Manual Stratotimer ST3 The pin assignments for the 26-pin electrical connector are given in the table below: Pin Assignments Pin No. Electrical Characteristics (MIL-C-26500) Remote chronograph switch 1 (DCI 1) Remote chronograph switch 2 (DCI 2) S-video (intensity)
-
Page 27: Operational Limitations, Range And Tolerances
+/- 1 second per 24 hours. The product life of the Stratotimer ST3 shall be a minimum of 40 000 flight hours. The Stratotimer ST3 Mean Time Between Failures (MTBF) shall be a minimum of 20 000 hours of operation. -
Page 28: Operation
Operation 4.1 Button Controls The Stratotimer ST3 is controlled using the four push-buttons and the push / turn control knob located below the display screen (refer to Figure 4). The four push-buttons have the following functions (from left to right): •... -
Page 29: Background Light Options
Installation and Operating Manual Stratotimer ST3 4.2 Background Light Options The display of the Stratotimer ST3 has three modes: • Day mode (colour, high light intensity) • Night mode (colour, low light intensity) • NVIS green The light intensity of each of the three modes can be adjusted automatically with the light sensors or manually. -
Page 30: Overview Of S-Video And Timer Functions
Installation and Operating Manual Stratotimer ST3 4.3 Overview of S-video and Timer Functions Access and control of the different video and timer functions is done using the four push- buttons and the push / turn control knob (refer to Figure 5). - Page 31 Installation and Operating Manual Stratotimer ST3 Figure 5 – Timer Functions 31-20-01 DESCRIPTION AND OPERATION Revision: 1.00 Page 15 12/06/2020...
-
Page 32: Setting The Date, Utc And Lt
Installation and Operating Manual Stratotimer ST3 4.4 Setting the Date, UTC and LT The date, the universal time coordinated (UTC) and the local time (LT) are displayed in the top section of the display screen (refer to Figure 6). The date can be displayed by turning the control knob counter-clockwise. Turn the control knob one increment clockwise to display local time (LT), then another increment to display universal time coordinated (UTC). -
Page 33: Setting The Flight Timer (Ft) And Flight Timer Alarm
Installation and Operating Manual Stratotimer ST3 4.5 Setting the Flight Timer (FT) and Flight Timer Alarm The flight timer (FT) and flight timer alarm are displayed in the middle section of the display screen (refer to Figure 7). The flight timer (FT) can be set to either manual (MAN), automatic (AUTO) or chronometer (CHRON) (refer to Main Menu Options, section 4.7):... - Page 34 Installation and Operating Manual Stratotimer ST3 Figure 7 – Middle Section of Display Screen 31-20-01 DESCRIPTION AND OPERATION Revision: 1.00 Page 18 12/06/2020...
-
Page 35: Setting The Elapsed Timer (Et), Elapsed Timer Down (Etd) And Elapsed Timer Down (Etd) Alarm
Installation and Operating Manual Stratotimer ST3 4.6 Setting the Elapsed Timer (ET), Elapsed Timer Down (ETD) and Elapsed Timer Down (ETD) Alarm The elapsed timer (ET) and elapsed timer down (ETD) are displayed in the bottom section of the display screen (refer to Figure 8). - Page 36 Installation and Operating Manual Stratotimer ST3 Figure 8 – Bottom Section of Display Screen 31-20-01 DESCRIPTION AND OPERATION Revision: 1.00 Page 20 12/06/2020...
-
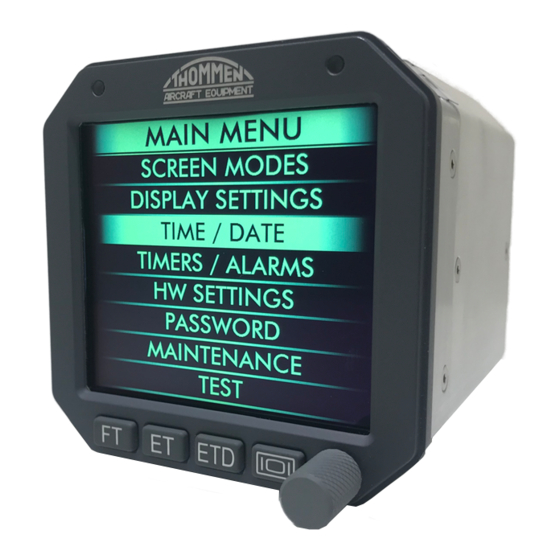
Page 37: Main Menu Options
Installation and Operating Manual Stratotimer ST3 4.7 Main Menu Options Access to the main menu (refer to Figure 9) is done with a long-press (more than 2 seconds) of the control knob. The top-level of the main menu has the following options: •... - Page 38 Installation and Operating Manual Stratotimer ST3 Figure 9 – Main Menu Options NOTE: The main menu options shown in Tables 6 to 9 are colour coded according to accessibility: Pilot (user) Maintenance (airline) Administrator (TAE) Locked 31-20-01 DESCRIPTION AND OPERATION Revision: 1.00...
- Page 39 Installation and Operating Manual Stratotimer ST3 Level Level Level Stratotimer Main Screen Style Digital Dial ETD White Sections ETD White Green Color Theme Screen Modes Amber White Custom Video Input Back Auto Brightness Mode Input Manual Auto Day / Night Input...
- Page 40 Installation and Operating Manual Stratotimer ST3 Level Level Level UTC Time HH : MM : SS UTC Date DD : MM : YY Time Zone UTC ± HH : MM Time Format Time / Date GPS Input Master Function Master...
- Page 41 Installation and Operating Manual Stratotimer ST3 Level Level Level 12.5 KBaud ARINC 429 Out Speed 100 KBaud 12.5 KBaud ARINC 429 In Speed 100 KBaud Video Input 5V DC 14V DC 28V DC 5V AC Brightness Input 14V AC 28V AC...
- Page 42 Installation and Operating Manual Stratotimer ST3 Level Level Level Pilot Current Profile Maintenance Administrator Password Enter Login ********** Enter Password ********** Back FW Version *.**.*** FW CRC ********** 3ATI Display Type 2ATI System Color FT Alarm Color Menu Color Color To Change...
-
Page 43: S-Video
The Stratotimer ST3 can connect with a second Stratotimer ST3 in a master and slave combination. The slave Stratotimer ST3 will take the UTC and date from the master Stratotimer ST3. All other functionalities can be changed independently. The ARINC 429 Out pins from the master unit must be connected to the ARINC 429 In pins of the slave unit. - Page 44 Installation and Operating Manual Stratotimer ST3 INTENTIONALLY BLANK 31-20-01 DESCRIPTION AND OPERATION Revision: 1.00 Page 28 12/06/2020...
- Page 45 (CBIT) function and an initiated built-in test (IBIT) function. If the status of either PBIT, CBIT or IBIT is Fail, the Stratotimer ST3 switches to failure mode and a record of the failure is written to the BIT history file.
- Page 46 Installation and Operating Manual Stratotimer ST3 Failure Description Action Code FC01 Program CRC error (SBIT, IBIT) FC02 Settings CRC error (SBIT, IBIT, CBIT) Return the unit to FC03 External watchdog error (IBIT) Control PCB temperature sensor errors (SBIT, IBIT, CBIT) - I...
- Page 47 The Stratotimer ST3 equipment does not require any pre-installation adjustment. All adjustments procedures are done by the manufacturer. A 3ATI ARINC clamp (optional supply) must be used to install the Stratotimer ST3 in the aircraft. A 26-pin female connector (optional supply) must be used to connect the aircraft wiring to the Stratotimer ST3.
- Page 48 Stratotimer ST3 Battery Replacement The battery (CR2450 (3V)) for the Stratotimer ST3 must be replaced every 10 years or when failure code FC12 is displayed in the top RH corner of the display. To remove the battery, do the following steps (refer to Figure 201): Remove the Stratotimer ST3 from the aircraft instrument panel (refer to Removal / Installation, page block 401).
- Page 49 Installation and Operating Manual Stratotimer ST3 Figure 201 - Battery Replacement 31-20-01 MAINTENANCE PRACTICES Revision: 1.00 Page 203 12/06/2020...
- Page 50 ESD desiccant bag - DIN 55473 - Type B (dust-proof) Local supply Table 201 - Storage 3.2 Environmental Conditions The Stratotimer ST3 must be stored according to the following environmental conditions: • Temperature range: between +10°C and +30°C • Humidity: 70% RH maximum 3.3 Packaging Conditions...
- Page 51 1.6 Removal Refer to Figure 401. Loosen the two adjusting screws (3) that hold the Stratotimer ST3 (1) in the clamp (2). NOTE: The adjusting screws (3) are larger than the mounting screws (4). Do not loosen the mounting screws (4).
- Page 52 Installation and Operating Manual Stratotimer ST3 Figure 401 – Stratotimer ST3 Removal / Installation 31-20-01 REMOVAL / INSTALLATION Revision: 1.00 Page 402 12/06/2020...
- Page 53 Operation (page block 1), Electrical and Display Characteristics (section 3.5). Clean the inside surfaces of the 3ATI clamp (2) and the mating surface of the housing of the Stratotimer ST3 (1) in accordance with the applicable aircraft procedures to ensure good electrical conductivity for grounding.
- Page 54 If necessary, remove the protective caps from the electrical connectors of the aircraft and the Stratotimer ST3 (1). Make sure that the electrical connectors for the Stratotimer ST3 and the aircraft are clean and undamaged. Connect the Stratotimer ST3 (1) with the aircraft electrical connector.
- Page 55 2.4 Expendable Parts None 2.5 Preparation Install the Stratotimer ST3 in the aircraft (ref. page block 401). If necessary, clean the Stratotimer ST3 using a lint-free cloth made damp with either clean water or isopropyl alcohol. 31-20-01 ADJUSTMENT / TEST Revision: 1.00...
- Page 56 Installation and Operating Manual Stratotimer ST3 2.6 Procedure Make sure that aircraft power is ON (ref. AMM, Chapter 24). Make sure each of the four push-buttons work correctly. Make sure that the push / turn control knob works correctly. Navigate through the menu structure and make sure that each of the functions operate correctly (ref, Description and Operation, page block 1, section 4.7, Main Menu...
Need help?
Do you have a question about the STRATOTIMER ST3 and is the answer not in the manual?
Questions and answers