Advertisement
Quick Links
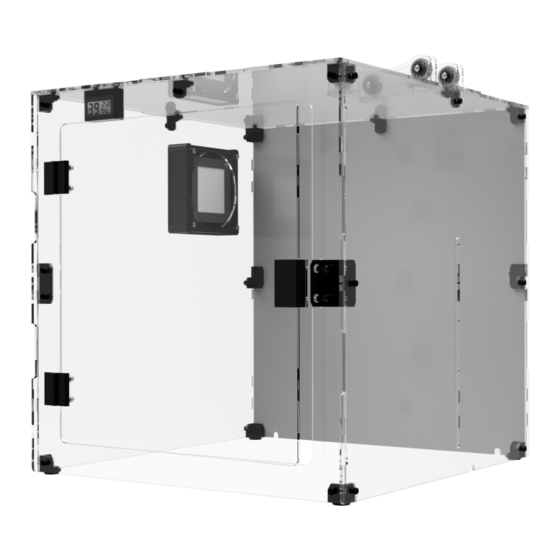
TF Acrylic - 3D Printer Enclosure Kit
CZ Návod k sestavení
EN Assembly Instructions
pro/for:
Prusa MINI/MINI+
with Combined
HEPA & Ac�vated Carbon Air Filter
Stavebnice krytu pro 3D �skárny Prusa MINI/MINI+
3D Printer Enclosure Kit for Prusa MINI/MINI+
designed & made in Czech Republic
TUKKARI.CZ
TUKKARI.COM
Advertisement

Related Manuals for TUKKARI TF Acrylic

Summary of Contents for TUKKARI TF Acrylic
- Page 1 TF Acrylic - 3D Printer Enclosure Kit CZ Návod k sestavení EN Assembly Instructions designed & made in Czech Republic pro/for: Prusa MINI/MINI+ with Combined HEPA & Ac�vated Carbon Air Filter Stavebnice krytu pro 3D �skárny Prusa MINI/MINI+ 3D Printer Enclosure Kit for Prusa MINI/MINI+ TUKKARI.CZ...
- Page 2 Důležité informace / Important Informa�on Děkujeme, že jste si vybrali pro svou 3D �skárnu kryt naší výroby. Thank you very much for choosing our enclosure for your 3D printer. The following text contains important informa�on. Please, do not Následující text obsahuje důležité informace. Před zahájením stavby a použiváním krytu se prosím seznamte se všemi start to assemble and use this product un�l you have read and informacemi a upozorněními v tomto návodu.
- Page 3 Díly z plexiskla / Acrylic Parts Co je třeba vědět o dílech z plexiskla Things You Should Know About Acrylic Parts Díly z plexiskla mohou po nařezání laserem Odstranění ochranné fólie z obou stran dílů K čištění používejte pouze vlhký hadr. Nikdy zapáchat.
- Page 4 Přehled dílů / Part List 8 mm Plochý klíč není součástí balení. Wrench is not included. 2,5 mm 3 mm 7 mm...
- Page 5 Přehled dílů / Part List...
- Page 6 Stavba / Assembly Instalace dveří: levá varianta Left Hand Door Installation Důležité: šrouby v tento okamžik neutahujte a nechte je volné. Important: Leave bolts loose at this point. Instalace dveří: pravá varianta Right Hand Door Installation Důležité: šrouby v tento okamžik neutahujte a nechte je volné. Important: Leave bolts loose at this point.
- Page 7 Stavba / Assembly Důležité: šrouby v tento okamžik neutahujte a nechte je volné. Important: Leave bolts loose at this point. Důležité: šrouby v tento okamžik neutahujte a nechte je volné. Important: Leave bolts loose at this point.
- Page 8 Stavba / Assembly Důležité: šrouby v tento okamžik neutahujte a nechte je volné. Important: Leave bolts loose at this point.
- Page 9 Stavba / Assembly...
- Page 10 Stavba / Assembly Dotáhněte všech 8 šroubů. Následně dotáhněte i všechny ostatní černé šrouby, které jste instalovalli v předchozích krocích. Tighten all 8 bolts. Subsequently �ghten all other black bolts you installed in previous steps.
- Page 11 Stavba / Assembly...
- Page 12 Stavba / Assembly Instalace dveří: levá varianta Left Hand Door Installation...
- Page 13 Stavba / Assembly Instalace dveří: pravá varianta Right Hand Door Installation...
- Page 14 Volitelné instalace / Op�onal Installa�on Volitelná instalace 120 mm ventilátoru (ventilátor není součástí) Optional 120 mm Fan Installation (Fan Not Included)
- Page 15 Hmotnost a rozměry / Weight and Dimensions © CZEKO GROUP, s.r.o. - info@tukkari.com - Czech Republic V08/2022...
Need help?
Do you have a question about the TF Acrylic and is the answer not in the manual?
Questions and answers