thermotouch 4.3dC Installation & User Manual
Dual control thermostat
Hide thumbs
Also See for 4.3dC:
- Installation & user manual (28 pages) ,
- Installation & user manual (28 pages)

Related Manuals for thermotouch 4.3dC


Summary of Contents for thermotouch 4.3dC
- Page 1 5245 / 5246 Thermotouch 4.3dC Dual Control Thermostat Installation & User Guide D U A L C O N T R O L S Y S T E M...
-
Page 2: Table Of Contents
Contents Compatability What’s in the box? Before you start Installing Thermotouch Wiring diagram User interface Settings Heating modes Set the time and date Heating schedule Appliance controls Advanced settings Energy saving features Factory reset Locking keypad Troubleshooting guide Technical data... -
Page 3: Compatability
Compatibility Thermotouch 4.3dC is compatible with almost all electric Underfloor Heating (UFH) systems available. Thermotouch can replace your existing Underfloor Heating thermostat and is compatible with many of the most popular thermostat brands’ floor sensor probes including those rated at: •... -
Page 4: What's In The Box
What’s in the box? Check you’ve got everything: • Thermotouch 4.3dC thermostat • Floor sensor probe (2m) • Floor sensor conduit (3m) • Fixing screws • Installation and user guide You will also need: • Electrical screwdriver • Standard electrical plate... -
Page 5: Before You Start
Before you start Thermotouch 4.3dC should be: • Installed at least 1.2m from the floor • On an interior wall • In an area outside any wet zones (IP30) • Installed on a RCD protected circuit • Away from drafts or heat influences •... -
Page 6: Installing Thermotouch
Installing Thermotouch 1. Switch off mains power You will be installing Thermotouch as part of a high voltage mains electrical circuit. CAUTION To ensure your safety and to protect the High Voltage thermostat, switch off the mains power Cables before you start the installation. - Page 7 Installing Thermotouch 2. Choose a location At this stage it its likely that a RCD protected electric Underfloor Heating system has been installed and an electrical plate is already in place. The Underfloor Heating cold tail should be pulled up through the electrical plate, and the sensor probe installed (in the conduit provided) within the wall cavity or pre chased channel in a solid wall.
- Page 8 Installing Thermotouch 3. Maximum distances Thermotouch can be installed up to 50m away from the Underfloor Heating system it is controlling, provided that the floor sensor is used to control the temperature. Underfloor Heating cold tails and floor sensor probes can be extended up to 50m.
-
Page 9: Wiring Diagram
Installing Thermotouch 4. Wiring diagram Connect Thermotouch to the Underfloor Heating (UFH) cold tail, Heated Towel Rail (or another additional appliance), power supply and floor temperature sensor. The floor temperature sensor is not polarity sensitive. UFH Live (16A) UFH Neutral (16A) - Page 10 Insert a small flat screwdriver in the groove on the underside to lever the face plate away from the back plate. Carefully disconnect the ribbon cable and align the Thermotouch with the mounting positions on the pre installed electrical plate.
-
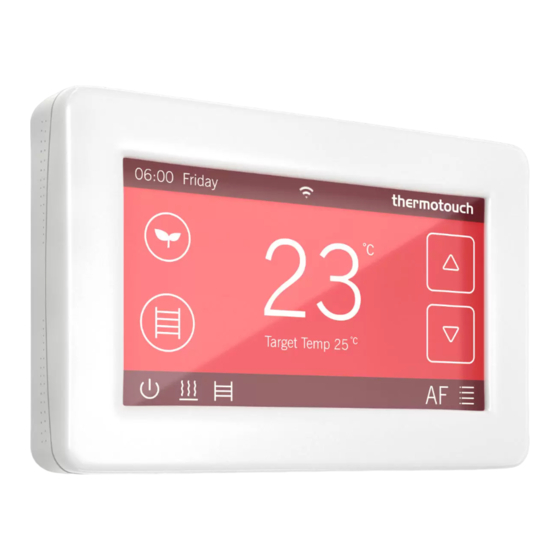
Page 11: User Interface
User interface 06:00 Fri 01-01-2022 Schedule Temp 25 1. Time & date 7. Measured temperature 2. Underfloor Heating mode 8. Target temperature 3. Heated Towel Rail mode 9. Sensor mode icon 4. Power button Menu button 5. UFH ‘ON’ icon 11. -
Page 12: Settings
Settings Time & date Set the current date and time. See page 16 for further details. Heating schedule Set the automatic schedule for your Underfloor Heating and a Heated Towel Rail. See page 17 for further details. Display settings Change the backlight timer as well as the minimum brightness. - Page 13 Settings Pre set temperatures Pre set comfort, eco and holiday temperatures. See page 14 & 15 for further details. Sensor mode Select either floor, ambient or ambient with floor limit sensor modes. For best results it is recommended to use either the floor sensor or the ambient temperature.
-
Page 14: Heating Modes
Heating modes Thermotouch 4.3dC has several preset heating modes that can be adjusted in the settings menu. Schedule Thermotouch will adjust your Underfloor Heating according to your pre set heating schedule. You can manually override the schedule using the up and down arrows to select a different temperature. - Page 15 Heating modes Maintains a low temperature, usually between 15-20°C, to save money on energy bills while keeping the chill off your floor. Comfort Maintains a higher temperature, usually between 20-28°C, that will keep you warm on a cold day! Both of these modes can be set to stay on forever until you change it, for a 1 ,2 or 4...
-
Page 16: Set The Time And Date
Set the time and date When you first switch Thermotouch on, you will need to set the current time and date. You can do this by pressing Menu then Date & Time Use the arrows to select the right date and time and then press confirm to save. -
Page 17: Heating Schedule
Heating schedule Setting up a schedule ensures energy efficiency and convenience by automatically changing the temperature of your Underfloor Heating system. There are 6 heating events for every day. Most people treat them as 3 on/off cycles. All 7 days are programmed independently. If you don't want to use all the heating events you can skip events by setting it to the same temperature as the previous event. - Page 18 Heating schedule Press menu Press schedule Press UFH schedule Press Monday The first heating event for the day is already selected. Set the time you want your heating to come on in the morning and the temperature you want your floor to heat up to, using the up and down arrows.
- Page 19 Heating schedule Use the arrows on the left hand side of the screen (next to all the event times) to select the second heating event. Now use the arrows to set your ‘OFF’ time and the Eco temperature. This is a low temperature that means your heating is effectively off.
- Page 20 Heating schedule Now you need to set the heating schedule for the rest of the and then select Tuesday. week. Press back Repeat steps 5 - 11 to set the on/off times and temperatures for Tuesday. Press confirm to save your settings. Press back , select the next day and repeat the steps to set a heating schedule for all days of the week.
- Page 21 Heating schedule The copy function is to copy the times from the Underfloor Heating schedule across to the Heated Towel Rail schedule. This does not copy from one day to the next. Each day does need to be programmed individually. When only using some of the on/off periods (i.e.
-
Page 22: Appliance Controls
Appliance controls You can control another appliance, such as an electric Heated Towel Rail from the home screen. The appliance will stay on until you turn it off again. Schedule The appliance will switch on and off according to the appliance heating schedule Appliance boost Switches the appliance on for 1 hour, 2 hours... - Page 23 Appliance schedule The appliance relay is completely separate to the Underfloor Heating relay which allows you to have two completely separate schedules and allowing one to be on without the other. However, if you want the towel rail on at the same times as your Underfloor Heating.
- Page 24 Appliance schedule Alternatively, to setup an separate schedule for the appliance relay follow the below steps: 1. Press menu 2. Please schedule 3. Please HTR schedule As per the UFH schedule, use the arrows to adjust the times of your schedule and select ‘ON’ and ‘OFF’ for each time selected. Please note all times need to be consecutive even if these periods are set to ‘OFF’.
-
Page 25: Advanced Settings
Advanced Settings To access the settings press Menu, then the green Settings icon. In this menu you can set up and control all of the more advanced settings for your Thermotouch Thermostat. Description Range Default High Temp. Protection 20°C - 40°C 27°C... -
Page 26: Energy Saving Features
24°C at 07:00. No need to set the heating to come on early! Thermotouch starts learning from the first time you enable the heating schedule. It turns on an hour early to start with and gradually optimises the heat up time over 7 days. -
Page 27: Factory Reset
Factory Reset Factory Reset To do a factory reset on the unit navigate to the menu screen and select the green advanced settings box. Use the arrows to move to page 3 of the settings. Use the smaller arrows next to Restore to change from 'NO' to 'Yes'. -
Page 28: Locking Keypad
To unlock the advanced settings you will need to be on the menu screen. Then press and hold the Thermotouch logo in the top right hand corner of the screen until the padlock on the green settings box disappears. -
Page 29: Troubleshooting Guide
Troubleshooting guide Problem Possible causes Things to try Very high temperature Software issue Factory reset (see p26) reading Use a multimeter set to 20KΩ to test the resistance of the sensor probe. If the probe does not read between Incompatible sensor 8 to 12KΩ... - Page 30 Need a hand? Call us on 1300 368 631 Problem Possible causes Things to try Isolate power and check that a compatible NTC10K sensor probe is connected to terminals 6 & 7. 0°C Temperature If no sensor is installed you will need to have reading one installed or run the system on air/ambient temperature only...
-
Page 31: Technical Data
Technical data Supply voltage 230/240V 50/60Hz Maximum load 16A (20A combined) UFH relay 16A (3600W) Appliance relay 5A (1125W) Temperature range 5 ~ 35°C Ambient 0 ~ 50°C Compatible sensors 6.8k , 10k , 12k , 15k , 33k Accuracy ±0.5°C Warranty 3 years... - Page 32 Service and support Thermogroup PO Box 822 Leeton NSW 2705 AUSTRALIA Phone: 1300 368 631 Technical Line: 1300 989 464 www.thermogroup.com.au sales@thermogroup.com.au Watch the video guide on our website www.thermogroup.com.au...
Need help?
Do you have a question about the 4.3dC and is the answer not in the manual?
Questions and answers