Table of Contents
Advertisement
Quick Links
Advertisement
Table of Contents

Related Manuals for Powerx GAS

Summary of Contents for Powerx GAS
- Page 1 Water Heater...
- Page 2 WELCOME TO THE POWERX FAMILY Join us on our mission to save energy, water and the planet. community.powerx.co...
-
Page 3: Table Of Contents
Table of Contents What’s included Installation guide 1. Download the PowerX App & connect Hub 2. Connect to Wifi & add PowerX Water Heater 3. Mount PowerX Water Heater - Gas 4. Attach sensors 5. Connect PowerX Water Heater to power 6. -
Page 4: What's Included
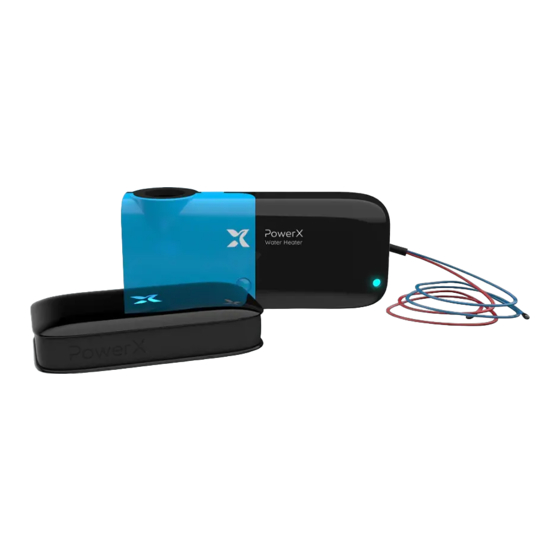
What’s included Water Heater PowerX Water Heater - Gas Set of temperature sensors 5 Zip Ties (Black, Blue, and Red) PowerX Hub 2 USB wall adapter and power cable Optional PowerX Mount Water leak detection cable Gas valve connection cable... -
Page 5: Download The Powerx App & Connect Hub
Download the PowerX App & connect Hub 1.1 Plug in the PowerX Hub Connect the PowerX Hub to the wall adapter and cable, and plug it in an electrical outlet. The Hub’s LED light will start to blink. PowerX Water Get the PowerX App 1.2 Download the PowerX App... -
Page 6: Connect To Wifi & Add Powerx Water Heater
Then scan the QR code on the bottom of the PowerX Water Heater - Gas sensor or ADD DEVICE type in the sensor’s ID SCAN QR CODE manually. CALIBRATION COMPLETE Enter code Validate If you need further help please go to help.powerx.co... - Page 7 Step by step guide to installing PowerX Water Heater - Gas...
-
Page 8: Mount Powerx Water Heater - Gas
Mount PowerX Water Heater - Gas 3.1 Install PowerX Mount Use the provided zip ties to carefully secure the PowerX Mount to the cold water pipe on your water heater. cold pipe... - Page 9 Mount PowerX Water Heater - Gas 3.2 Insert PowerX Water Heater - Gas Insert the PowerX Water Heater - Gas unit into the PowerX Mount.
-
Page 10: Attach Sensors
Attach sensors 4.1 Insert temperature sensor Gently insert the black temperature sensor into the small opening between the tank and the temperature and pressure relief valve (T&P Valve). Be sure to insert the sensor by a distance of 1 inch or more if possible. Secure the black sensor cable to the T&P valve pipe using a zip tie. - Page 11 Attach sensors 4.2 Secure hot/cold temperature sensors Secure the blue temperature sensor cold pipe to the cold water pipe using a zip tie. Likewise, secure the red temperature sensor to the hot water pipe. NOTE: Use caution when working near the hot water pipe. hot pipe...
- Page 12 Attach sensors 4.3 Connect to gas valve controller Connect PowerX Water Heater - Gas to the gas valve controller on the water heater using the Gas valve connection cable. gas valve controller...
-
Page 13: Connect Powerx Water Heater To Power
Connect PowerX Water Heater to power Ensure PowerX Water Heater - Gas is powered with 4AA batteries or plugged with the provided Micro USB connector according to your selection. option 1 AA batteries x4 option 2 Micro USB connector... -
Page 14: Confirm Connection
Confirm connection All done! PowerX App will notify you of successful connection. Your PowerX Water Heater - Gas is ready to use. Connection PowerX Water Heater - Gas successfully connected! -
Page 15: Add Water Leak Detection Cable (Optional)
Add water leak detection cable (optional) If your kit includes the water leak detection cable, attach it to the PowerX Water Heater - Gas unit and place the blue section in a location where any potential leak points exist. If your water heater has a drain pan, make... -
Page 16: Connectors
Connectors PowerX Water Heater - Gas Micro USB connector Set of temperature sensors (Black, Blue, and Red) Gas valve connection cable Water leak detection cable User button (optional) PowerX Hub Micro USB connector LAN connection User button (optional) -
Page 17: Product Specifications
Product specifications Note: This device requires that the water heater has an electronic gas valve. It is not compatible with water heaters with mechanical-style gas valves. Dimensions (LxWxH) PowerX Water Heater - Gas 7" x 3.1" x 1.7" PowerX Hub 5.2"... -
Page 18: Disclaimer
Disclaimer PowerX Water Heater - Gas falls under the definition of permitted power monitoring equipment given that: (i) it’s identified as a field-installable accessory, and (ii) the total area of conductors and equipment at any cross-section of the wiring space does not exceed 75 percent of the cross-sectional area of that space, as per section 312.8(B) of the 2017 National Electrical Code... -
Page 19: Powerx Suite
Suite PowerX is most effective as a Suite, including Water, Electricity and Water Heating measurement. We strongly recommend installing the full Suite for highest efficiency and optimization. - Page 20 powerx.co...
Need help?
Do you have a question about the GAS and is the answer not in the manual?
Questions and answers