
Related Manuals for Sportneer P110M

Summary of Contents for Sportneer P110M
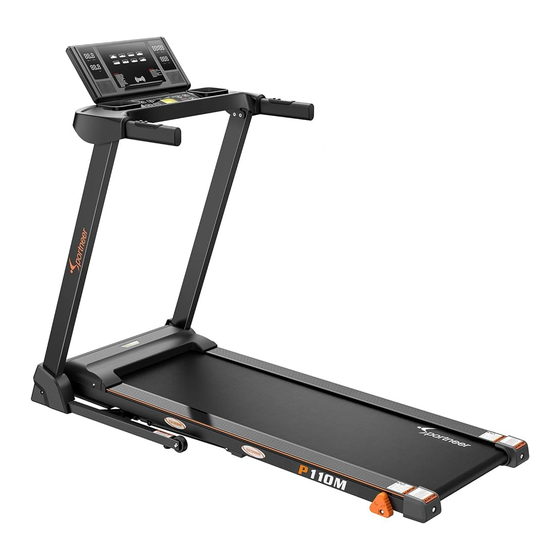
- Page 1 MOTORIZED TREADMILL Model: P110M User Manual Please read all precautions and instructions in the manual carefully before using this equipment and save it for future reference.
-
Page 2: Table Of Contents
CONTENTS 1. Safety Cautions ....................1 2. Specifications .......................5 3. Assembly Instructions ..................5 4. Operation Guide ....................10 5. Program Chart ....................22 6. How to Fold and Move ..................25 7. Suggested Stretching ..................26 8. Maintenance .......................28 9. Exploded Drawing ....................32 10. Parts List ......................33 11. -
Page 3: Safety Cautions
SAFETY CAUTIONS 1. IMPORTANT SAFETY INSTRUCTIONS WARNING –To ensure users can get the best performance from the treadmill, please read the user manual carefully before assembly and use, and keep it for future reference. * Users with heart or other health problems may catch serious physical injuries when using the device. Please consult a doctor before using the treadmill. - Page 4 board. The handrail with pulse sensor plate is used to test your heart rate once resting your hand on it, or to stabilize your body when you turn off the treadmill. * Put the clamp of the safety key on your clothes and make sure that the safety key is connected to the console. * Start the treadmill by standing on the plastic side rail instead of running belt.
- Page 5 Clear Space 2. GROUNDING INSTRUCTIONS The grounding operations must be accurate. In the event of failure or damage, grounding protection will reduce the risk of electric shock. This product is equipped with a grounding conductor and a grounding plug. The plug must be inserted into a suitable power socket, and its user should install grounding in accordance with local laws and regulations.
- Page 6 Canadian Department of Communications This digital device cannot exceed the type B radio noise set by the Communications Commission of Canada for radio interference. 4. STATIC ELECTRICITY As a large energy machine that may generates static electricity, the treadmill may cause some users to suffer from static shock.
-
Page 7: Specifications
If you feel the distance is too far before the safety switch is pulled off, you can reduce the length of the safety clip wire. NOTE: For your safety, NEVER lengthen the safety clip wire. Always use a safety clip when running on a treadmill. If the safety switch is pulled out, the running belt will stop suddenly and the treadmill will go into pause mode. - Page 8 2. Open The Box And You Can Find All Parts Below. Main Frame Console Console Frame Upright Tube Base Cover L Base Cover R Button Head Hexagon Socket Screw M10*45 2PCS Button Head Hexagon socket screw Large Cross Flat Head Screw Countsunk Head Hexagon Socket M8*15 M5*12...
- Page 9 STEP 2 Lift the master carton cover as shown in the picture and remove all the protective foams inside. STEP 3 Take out the treadmill from the box, and lay it on a flat floor. WARNING! Do not cut the straps before taking the product out of box. NOTICE: Be aware of the risk of hands pinching when taking out the treadmill.
- Page 10 STEP 4.1 Lift the left and right upright tubes upward with both hands. Note: Do not place your hands in the bottom rotation position to avoid being clamped. STEP 4.2 * Use the 6mm wrench to fasten the L and R upright tubes onto both sides of the base frame with 2 M10*45 bolts and 2 M10 flat washers.
- Page 11 STEP 5 Use the cross socket wrench to fasten the base cover-L and base cover-R with 2 M5*12 large cross flat head screws onto both sides of the base frame. M5*12 Cross Socket Wrench M5*12 Cross Socket Wrench STEP 5.1 Lift the console up as pictures below: STEP 5.2 Use the 5mm wrench to install the console rack onto left upright tube and right upright tube with 2 M8*15...
-
Page 12: Operation Guide
STEP 5.3 Turn the console upward slightly to expose the mounting hole, then use the adjusting knob bolt to fix the console onto the console rack. Adjusting Knob OPERATION GUIDE NOTE: For your safety and comfort, please check whether all screws are tightened. Congratulation! A brand new motorized treadmill has been successfully assembled! - Page 13 STEP 1 Before to start the treadmill, please check whether all screws are tightened, all cables are connected correctly, and nothing blocks the movement of the running belt. As shown in the picture, plug in the power cord and toggle the power switch to ON position. Grounding Methods Grounded PIN Grounded Outlet...
- Page 14 STEP 2. Manual Inclining Adjustment There are 3 manual inclining levels available. You can adjust to the desired level number against the ground as following pictures. (Note: You should adjust to the same level on both sides). STEP 3 HOW TO SHIFT BETWEEN METRIC AND ENDLISH UNIT Remove the safety key, and press P+M buttons for 3 seconds to shift between Metric and English Unit.
- Page 15 STEP 4 Once clip the clamp of the safety key onto your clothes and put the other end of safety key to the fixed position on the console, the treadmill will enter “STANDBY” state. KM/ H KM/ H MP H MP H Safety Key NOTE:...
- Page 16 C. If the user falls off the treadmill, the safety key will come off the console and the treadmill will stop at once to prevent further injuries. D. Do not stand on the walking belt while starting the treadmill. Straddle the belt and stand on the plastic foot rails. E.
- Page 17 DISPLAY FUNCTION Part Name Function SPEED Displays the current belt speed from starting ranging at 0.6 ~ 7.5 MPH. DISTANCE Accumulates total workout distance from 1.0 to 99.0 kilometers by count-up. TIME Accumulates total workout time from 0:00 to 99:00 minutes. CALORIE Accumulates calorie consumption (Max.
- Page 18 NO-LOAD STOP FUNCTION When the user off the working running belt over 60 s , the treadmill will stop moving automatically GETTING STARTED Simply press the button on the console to begin belt movement after count-down from 3 to 1. Press buttons on the console to adjust the speed.
- Page 19 To switch the mode to DIS (Distance) count-down when the belt is moving, please double press the button on the console until the data is cleared and then double press the button until the DIS (Distance) icon is blinking. The default distance was set as 1.0 Mile. Press button on the console to set count- down distance from 1.0-99 Miles.
- Page 20 KM/ H KM/ H MP H MP H PROG Mode PROG Mode WEIGHT-LOSS INTERVAL CARDIO TRAINING ROLLING FAT BURNING MOUNTAIN CLIMBING POWER WALK HILL RUN STEP 1: Press the button to select a specific program among 8 preset options (from P1 to P8). STEP 2: Press the button to select the intensity level from Level 1 to Level 8.
- Page 21 User-Defined Programs (U01-U02-U03) There are 3 user-defined programs according to user's training goals. The default workout time of each program is 30 minutes, but it can be adjusted from 5:00 to 99:00 minutes by pressing button on the console. All the user-defined programs are composed of 18 time-based segments. The workout time of 18 segments on each program will be automatically arranged according to the workout time you set.
- Page 22 STEP 3: Press the button again, then the left window will display F2 (representing AGE), and the default data on the right window will display 25. You can press button on the console to set the age from 10-99. Then press button to go to the next step.
- Page 23 : The result given by the body fat calculator can be a reference for your physical condition (see the chart below). Body Condition Result BMI > 30 Overweight 26 < BMI < 30 19 < BMI < 25 Thin BMI < 19 USING THE PULSE FUNCTION 1.
-
Page 24: Program Chart
STEP 1: Activate wireless pairing function of your smart phone, search for other wireless connection supportive devices until the name “P110M” appears, and click to connect this device. STEP 2: After being successfully connected, the voice of smart phone will be delivered by the speaker on the console. - Page 25 P2. CARDIO TRAINING SPEED CHANGES Level 1 (Mile/H) 0.6 0.6 1.2 1.2 1.8 2.5 3.1 3.7 3.7 4.3 4.3 3.7 3.7 2.5 1.8 1.2 0.6 0.6 Level 2 (Mile/H) 0.6 1.2 1.2 1.8 2.5 3.1 3.7 4.3 4.3 4.3 4.3 3.1 2.5 1.2 1.2 0.6 Level 3 (Mile/H) 0.6 1.2 1.8 2.5 3.1 3.7 4.3...
- Page 26 P5. INTERVAL SPEED CHANGES Level 1 (Mile/H) 0.6 1.2 2.5 1.2 2.5 1.2 2.5 1.2 2.5 1.2 2.5 1.2 2.5 1.2 2.5 1.2 2.5 1.2 Level 2 (Mile/H) 0.6 1.2 3.1 1.2 3.1 1.2 3.1 1.2 3.1 1.2 3.1 1.2 3.1 1.2 3.1 1.2 3.1 1.2 Level 3 (Mile/H) 0.6 1.2 3.7 1.2 3.7 1.2 3.7 1.2 3.7 1.2 3.7 1.2 3.7 1.2 3.7 1.2 3.7 1.2...
-
Page 27: How To Fold And Move
P8. HILL RUN SPEED CHANGES Level 1 (Mile/H) 1.2 1.2 1.2 1.8 1.8 1.8 3.1 3.1 4.3 4.3 5.6 5.6 6.2 3.7 2.5 1.2 Level 2 (Mile/H) 1.2 1.2 1.2 2.5 2.5 2.5 3.7 3.7 3.7 6.2 6.2 3.7 2.5 1.2 Level 3 (Mile/H) 1.2 1.2 2.5 2.5 2.5 3.7 3.7 3.7... -
Page 28: Suggested Stretching
③ . When you want to unfold the treadmill, please lift the frame up slightly with both hands, and then use one of your feet to push forward the cylinder gently, when the frame starts to fall automatically , release your feet and stand beside of treadmill. ... - Page 29 3. Head Rolls Rotate your head to the right for one count until you feel the stretching of the left side of your neck. Next, rotate your head back for one count, stretching your chin to the ceiling. Rotate your head to the left for one count, and finally, drop your head to your chest for one count (picture ③...
-
Page 30: Maintenance
MAINTENANCE WARNING! Before performing any maintenance to your treadmill, always unplug the power cord from the power outlet. CLEANING: Routine cleaning of your treadmill will extend the its lifespan. WARNING! To prevent electrical shock, ensure to turn off the treadmill and unplug its power plug from the wall electrical outlet before attempting any cleaning or maintenance. - Page 31 Put the safety key on the console and restart the treadmill , the running time will start to accumulate again from zero. If you need to check the accumulated running time, please remove the safety key and press for 2.5 seconds , the time window will show the accumulated running time.
- Page 32 3. Running Belt Tension Adjustment The treadmill has been adjusted and passed QC inspection before delivery. If there is a phenomenon of bias running belt, the possible reasons might be: A.The frame is not stably laid. B.The user is not running on the center of the running belt. C.The user’s two feet use uneven strength when running.
- Page 33 For bias which can not be fixed automatically, try the following methods to fix the belt (shown as the pictures): * If the belt tends to move to the right, you should turn the belt adjustment screw on the right in clockwise direction.
-
Page 34: Exploded Drawing
EXPLODED DRAWING... -
Page 35: Parts List
PARTS LIST PART NAME PART NAME BASE ROUND HEAD SCREW M4*8MM MAIN FRAME ROUND HEAD TAPPING SCREW M4*15MM LEFT UPRIGHT ROUND HEAD TAPPING SCREW M4*12MM RIGHT UPRIGHT ROUND HEAD TAPPING SCREW M3*6MM CONSOLE RACK M10 HEXAGON NYLON NUT HEXAGON SOCKET SCREW M10*100MM M8 HEXAGON NYLON NUT HEXAGON SOCKET SCREW M10*45MM M8 HEXAGON NUT... - Page 36 PART NAME PART NAME MANUAL INCLINE-R PRESS BUTTON PCB MOTOR BELT SAFETY KEY SIDE RAIL POWER CORD BASE FOOT PAD POWER SWITCH BLACK RUBBER CUSHION CIRCUIT BREAKER INCLINE MOVING WHEEL BROWN CABLE L=200MM HANDRAIL END CAP BLUE CABLE L=200MM HANDRAIL FOAM BROWN CABLE L=100MM CABLE GROMMET MAGNETIC RING...
-
Page 37: Troubleshooting
TROUBLESHOOTING ERROR CODE POSSIBLE REASONS SOLUTION 1. Ask for a professional technician to connect the 1. Communication defects between the cable again or replace the cable. console and the controller. 2. Ask for a professional technician to replace the Signal malfunction 2. -
Page 38: Fcc Statement
FCC STATEMENT Changes or modifications not expressly approved by the party responsible for compliance could void the user's authority to operate the equipment. This equipment has been tested and found to comply with the limits for a Class B digital device, pursuant to Part 15 of the FCC Rules.
Need help?
Do you have a question about the P110M and is the answer not in the manual?
Questions and answers