
Related Manuals for Sportneer P110M

Summary of Contents for Sportneer P110M
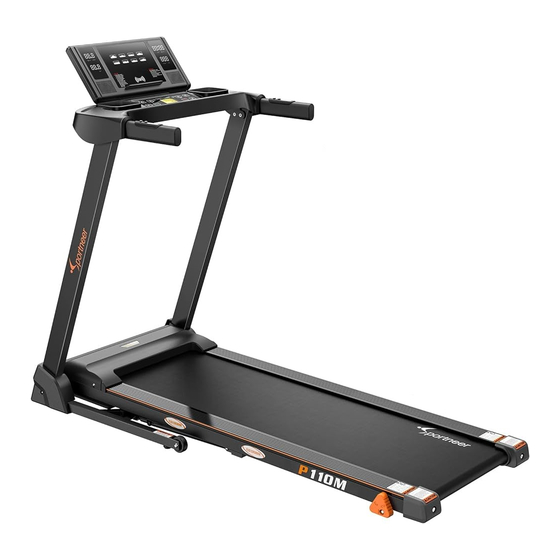
- Page 1 Sportneer MotorizedTreadmill User Manual Pleasereadallprecautionsandinstructionsinthemanualcarefully before using this equipment and save it forfuture reference.
-
Page 2: Table Of Contents
CONTENTS Contents SafetyCautions AssemblyInstructions 6-10 OperationGuide 11-24 Howto FoldandMove SuggestedStretching 26-27 Maintenance 28-29 ExplodedDrawing Parts List Troubleshooting... -
Page 3: Safetycautions
SAFETYCAUTIONS IMPORTANTSAFETYINSTRUCTIONS Warning – To ensure users can get the best performance from the treadmill, please read the user manual carefullybeforeassembly and use, andkeepit forfuturereference. * Userswithheart orother healthproblemsmaycatchseriousphysicalinjurieswhenusingthedevice.Pleaseconsult a doctor before using the treadmill. If you feel dizziness or breathing difficulties, please stopexercisingimmediately. * Please read, understand and carefully follow all warnings, instructions, and procedures on the treadmill and in thisusermanualbeforeuse. - Page 4 SAFETYCAUTIONS Don’t walk, jog, or run in opposite direction when the treadmill is turned on, and please pay high attention when placing it on inclined conditions. * Donotaccelerateordeceleratewithoutconnecting to poweranddonotstopthemachineabnormally. * Keepyourhandsawayfromthebottomorsidesofthemachinewhileitisrunning. * Don'tletpeopleinterferewiththeuserordevicewhileexercising. * Waituntiltherunningbeltstopscompletelybeforesteppingoffthetreadmill. * Unplugthepower cordafteruseandbeforecleaning. Toturnoffthetreadmill,first turnoffthepowerswitchandthenpulloutthepower pluggently.Donotpullthepowercordtoremove the power plugrudely.
- Page 5 SAFETYCAUTIONS GROUNDINGINSTRUCTIONS The grounding operations must be accurate.In the event of failure or damage, grounding protection will reducethe risk of electric shock.This product is equipped with a grounding conductor and a grounding plug.The plug must beinserted into a suitable power socket, andits user should install grounding in accordance with local laws and regulations.
- Page 6 SAFETYCAUTIONS CanadianDepartmentofCommunications This digital device cannot exceed the type B radio noise set by the Communications Commission of Canada for radiointerference. STATICELECTRICITY As a large energy machine that may generates static electricity, the treadmillmay cause some users to suffer from staticshock.Excessive static electricity can damage electronic components too.The following steps are to prevent static electricity.Ifyou stillcan'tsolve theproblem,please turnthetreadmillovertoaprofessional.
-
Page 7: Assemblyinstructions
ASSEMBLYINSTRUCTIONS Product Illustration... - Page 8 ASSEMBLYINSTRUCTIONS OPENTHEBOX ANDYOUCANFINDALLPARTSBELOW. 上图中所有的1PCS 去掉末尾的S 改成 COUNTERSUNK STEP Laythemastercartononaflatfloorandcutoffallstrapsasshowninthe picture below:...
- Page 9 ASSEMBLYINSTRUCTIONS STEP Lift the master carton cover as shown in the pictureand remove all theprotectivefoams inside. STEP Take outthetreadmillfromthebox, andlayitonaflatfloor. WARNING! : Do not cut the straps before taking the product out of box.NOTICE:Beawareoftheriskofhandspinchingwhentakingoutthetreadmill. Danger (右上角小标) Do not cut the zip ties before removing the treadmill out of the carton! ...
- Page 10 ASSEMBLYINSTRUCTIONS STEP4.2 Use the 6mm wrench to fasten the L and R upright tubes onto both sidesofthe baseframewith2M10*45boltsand2M10flatwashers. Use the 5mm wrench to fasten the L and R upright tubes onto both sidesofthe baseframewith 2M8*15boltsand2 M8flatwashers. STEP5 Use the cross socket wrench to fasten the base cover-L and base cover-Rwith 2 M5*12 large cross flat head screws ontoboth sides of thebaseframe.
- Page 11 ASSEMBLYINSTRUCTIONS STEP Lifttheconsoleup aspictures below: STEP usethe5mm wrenchtoinstall theconsolerackontoleftuprighttube andright uprighttube with2M8*15 countersunkheadscrews. STEP Turntheconsoleupwardslightlytoexposethemountinghole,thenuse the adjustingknobbolttofixtheconsoleontotheconsolerack.
-
Page 12: Operationguide
OPERATIONGUIDE NOTE: For your safety and comfort, please check whether all screws are tightened.Congratulation!Abrandnewmotorizedtreadmillhasbeensuccessfullyassembled! STEP1.Before to start the treadmill, please check whether all screws aretightened,all cablesareconnectedcorrectly, andnothingblocksthemovementoftherunningbelt. As shown in the picture, plug in the power cord and toggle the power switch to ON position. - Page 13 OPERATION GUIDE STEP2. ManualIncliningAdjustment There are 3 manual inclining levels available.You can adjust to the desiredlevel number against the ground as following pictures. (Note: You should adjust to thesamelevelonbothsides). STEP 3. Once clip the clamp of the safety key onto your clothes and put the otherend of safety key to the fixed position on the console, the treadmill will enter“STANDBY”...
- Page 14 OPERATIONGUIDE GENERALSAFETYTIPS A. Practice assembling and disassembling your treadmill before starting your workout. B. Attach one end of the safety key to the console (the treadmill will not runwithout safety key) andclip other onto yourclothingbeforeexercisingtoensurethetreadmillwillstopiftheuser accidentally walksoffthetreadmill. C. If the user falls off the treadmill, the safety key will come off theconsoleandthetreadmillwill stopatoncetopreventfurther injuries.
- Page 15 OPERATIONGUIDE CALORIE:Accumulatescalorieconsumption(Max.990kcal) duringexercise. PULSE:Whenpulsesignalisdetectedbygraspingbothstainlesssteelpick-upsonfronthandrails,it will display your current heart rate in beats per minute from 50 to 200 (The data is for referenceonlyandit shouldnotberegardedasmedicaldata.). PHONE:Whenthe treadmill is connected to your phone through Bluetooth,the“PHONE”willbe lightedand the treadmillcanstarttoplaymusic on your phone. Wireless Phone Charger: Put your wireless charging supportive device onto the console withchargingicon,then thedevicewillbecharged.
- Page 16 OPERATIONGUIDE OPERATIONGUIDE GETTINGSTARTED Simplypressthe buttonontheconsoletobeginbeltmovementaftercount-downfrom 3 to 1.Press buttonsontheconsoletoadjustthespeed.Certainly,youmaypressand hold thetwobuttons to continuously adjust the speed or button ontheconsoletoquicklysetthespecified speed. Count-downModes Whenyoupressthe button, one of TIME, DIS(Distance), and CAL(Calorie) canbesettocountdowntoreachtheparticularfitness goal, atthesametime,theothertwowillcountupduringtheworkout.Youcanalsoadjustthespeedbypressing buttonontheconsole. Pressthe button, the TIME window will display the default workout time as 30:00.Press the button on the console to set count-down time from 5:00 to99:00 minutes.Simplypressthe buttonontheconsoletobeginbeltmovement.Oncethecount-downreacheszero,thebeltwill stop moving.
- Page 17 OPERATIONGUIDE ToswitchthemodetoDIS(Distance)count-downwhenthebeltismoving,pleasedouble pressthe button on theconsoleuntilthedataisclearedandthendouble pressthe buttonuntiltheDIS(Distance)iconisblinking.Thedefaultdistancewassetas1.0Mile.Press button ontheconsoletosetcount-downdistancefrom1.0-99 Miles.Pressthe button on the console to begin belt movement. Once the DIS (Distance) count-down reaches zero, thebeltwill stop moving. ToswitchthemodetoCAL(Calorie)count-downwhenthebeltismoving,double pressthe buttonuntilthedataisclearedandthenpressthe buttonfor threetimesuntiltheCAL(Calorie)iconisblinking.Thedefaultcaloriewassetas50KCAL.Press buttontosetcount-downdistancefrom20KCALto990KCAL.Pressthebuttononthe console to begin belt movement. Once the CAL (Calorie) count-down reaches zero, the beltwill stop moving.
- Page 18 OPERATIONGUIDE 64PresetPrograms Tip:Pleasekindlynotethatthereare64presetprogramsto reach 8differenttraininggoals, each goalwith 8 different intensitylevels.Allthepreset programs are madeup of18time-basedsegments, with preset speedoneachsegment.Thedefaultworkouttimeofeachprogramis30 minutes,butitcanbeadjustedfrom5:00to99:00minutesbypressing button on the console.The workout time of 18 segments on each program willbe automatically arranged according to the workout time you set. The speed youset willonlybeeffectiveontheongoingsegment.After thesegmentcompletes,thespeedonthenextsegmentwillstillprocessatpresetvalue.
- Page 19 OPERATIONGUIDE Step1:Press the button to select a specific program among 8 preset options (from P1 to P8). Step2:Press the button to select the intensity level from Level 1 to Level 8. Step3:Press the button on the console to adjust the workout time. It can be adjustedfrom5:00to99:00minutes.
- Page 20 OPERATIONGUIDE BodyFatMeasurementFunction This function is to estimate your body fat according to your physical information. Please kindly note this estimateddatashouldnotbeusedformedicaldiagnosis. STEP1:Keep the buttonpressed untiltheconsoledisplaysFAT. STEP2:The left window will display F1 (representing GENDER) and the default data on the right window will display 1 (representing MALE).
- Page 21 OPERATIONGUIDE STEP5:Press the button once again, then the left window will display F4 (representing WEIGHT) andthedefaultdataontherightwindowwill show154.You can press button on theconsoletosetthe weightfrom44-330lbs.Thenpress button to go tonextstep. STEP6:Afterfinishingallthesettingsforthenecessaryphysicalinformation,please press button again.Then the left windowwilldisplayF5whiletherightwindowwilldisplay“---”,whichmeans the monitor is calculating. Please hold the pulse sensor on both handrails with yourhands.Afewsecondslater,thebodyfatresult(BMI)willbedisplayedontherightwindow.
- Page 22 OPERATIONGUIDE BodyCondition Result BMI>30 Overweight 26<BMI<30 19<BMI<25 Thin BMI<19 USINGTHEPULSEFUNCTION The PULSE/SPEED window on your console works in conjunction with the Pulse Sensors on both handrails.Whenyouarereadytoreadyourpulse, place both hands firmly on the Pulse Sensors. For the most accurate readings, please hold the handrails with both hands. 2.
- Page 23 OPERATIONGUIDE Tochecktheheartraterangeand select theexerciseprogramtheuserwishestoperform,look at the followingdiagram. Warning:Theuser'sheartratemustnotexceed90%ofthemaximumheartrate. CONNECTTO YOUR SMARTPHONE Ifthetreadmillis Bluetooth-enabled, connectit to your smartphoneasfollowingsteps: STEP1:ActivatetheBluetoothfunction ofyoursmartphone,searchfor other Bluetooth-enabled devices until the name “RUN MUSIC” appears,andclicktoconnectthisdevice. STEP2:Afterbeing successfullyconnected,thevoiceofsmartphone willbedelivered bythespeaker on the console.
- Page 24 PROGRAMCHART P1.WEIGHT-LOSS SPEEDCHANGES (Mile/H) Level1 (Mile/H) Level2 Level3 (Mile/H) (Mile/H) Level4 (Mile/H) Level5 (Mile/H) Level6 (Mile/H) Level7 (Mile/H) Level8 P2.CARDIOTRAINING SPEEDCHANGES Level1 (Mile/H) Level2 (Mile/H) Level3 (Mile/H) Level4 (Mile/H) Level5 (Mile/H) Level6 (Mile/H) Level7 (Mile/H) Level8 (Mile/H) P3.FATBURNING SPEEDCHANGES Level1 (Mile/H) Level2 (Mile/H)
- Page 25 PROGRAMCHART P5. INTERVAL SPEEDCHANGES Level1 (Mile/H) Level2 (Mile/H) Level3 (Mile/H) Level4 (Mile/H) Level5 (Mile/H) Level6 (Mile/H) Level7 (Mile/H) Level8 (Mile/H) P6.ROLLING SPEEDCHANGES Level1 (Mile/H) Level2 (Mile/H) Level3 (Mile/H) Level4 (Mile/H) Level5 (Mile/H) Level6 (Mile/H) Level7 (Mile/H) Level8 (Mile/H) P7.MOUNTAINCLIMBING SPEEDCHANGES Level1 (Mile/H) Level2...
-
Page 26: Howtofoldandmove
HOWTOFOLDANDMOVE HOWTOFOLDTHETREADMILL Warning: Onlyfold the treadmill when it completely stops running. Never operate a folded treadmill. Beforefoldingthetreadmill,unplugthepowercord. CAUTION: Only a person can safely lift 45pounds (20kg) can he/she raise, lower, or move the movethetreadmill. 1. Hold the treadmill with your hands in the positions shownattheright figure. -
Page 27: Suggestedstretching
SUGGESTEDSTRETCHING A successful exercise program consists of a warm-up, aerobic exercise, and acool-down. Do the entire program at least two to preferably three times a week,and rest for a day between workouts. After several months, increase yourworkoutstofourorfivetimesperweek. Warmingupisanimportantpartforyourworkout,andshould beginduring everysession.It makes your body prepared for more strenuous exercise by heating up and stretchingout your muscles, increasing your blood circulation and pulse rate, and delivering moreoxygen to your muscles. - Page 28 SUGGESTEDSTRETCHES 4. ShoulderLift Lift your right shoulder up toward your ear for onecount.Thenliftyourleftshoulderupforonecountasyou loweryourrightshoulder. 5. ToeTouch Slowly bend forward from your waist, and let your backand shoulders relax as you stretch toward your toes.Reachdownasfarasyoucanandholdfor15counts. 6. Calf and AchillesStretch Leanagainstawallwithyourleftleginfront of the right andyourarmsforward.Keepyourrightlegstraight and the left foot on the floor;...
-
Page 29: Maintenance
MAINTENANCE WARNING!Beforeperforminganymaintenancetoyourtreadmill,always unplug the powercordfromthepower outlet. CLEANING:Routinecleaningofyourtreadmillwillextendtheits lifespan. WARNING!Topreventelectricalshock,ensure to turn off the treadmill and unplug its power plug from the wall electrical outlet before attempting anycleaningormaintenance. AFTEREACHWORKOUT:Wipeofftheconsoleandothertreadmillsurfaceswith a clean, soft damp cloth to remove excessive perspiration. DO NOT USE CHEMICALS. WEEKLY CLEANING:Atreadmillmatisrecommendedto put on the walking belt foreaseofcleaning.Because dirt from your shoescontactsthebeltandeventuallyendsupunderneaththetreadmill,... - Page 30 MAINTENANCE RunningBeltTensionAdjustment The treadmill has been adjusted and passed QC inspection before delivery.Ifthereisa phenomenonofbiasrunningbelt,the possible reasons might be: A. Theframeisnotstably laid. B. Theuserisnotrunningonthecenteroftherunningbelt. C. Theuser’stwofeet use uneven strength when running. Forbiaswhichcannotbefixedautomatically,trythefollowingmethodsto fix the belt (shown as the pictures): If the belt tends to move to the right, you should turn the belt adjustmentscrewontherightinclockwisedirection.We recommend you turning 1/4 turn each time and checkhowitworks.Ifthebeltremainsslantingto the...
-
Page 31: Explodeddrawing
EXPLODEDDRAWING... -
Page 32: Partslist
PARTSLIST PART NAME PART NAME BASE MANUALINCLINE-L MAINFRAME MANUALINCLINE-R LEFTUPRIGHT MOTORBELT RIGHTUPRIGHT SIDERAIL CONSOLERACK BASEFOOTPAD HEXAGONSOCKETSCREWM10*100MM BLACKRUBBERCUSHION HEXAGONSOCKETSCREWM10*45MM INCLINEMOVINGWHEEL HEXAGONSOCKETSCREWM8*45MM HANDRAILENDCAP HEXAGONSOCKETSCREWM8*40MM HANDRAILFOAM HEXAGONSOCKETSCREWM8*28MM CABLEGROMMET HEXAGONSOCKETSCREWM8*15MM POWERCORD FASTENER HEXAGONSOCKETSCREWM8*65MM SIDERAILFASTENER HEXAGONSOCKETSCREWM8*35MM BASECUSHION HEXAGONSOCKETSCREWM8*12MM RUBBERPAD BOLTM8*50mm EVAPAD HEXAGONSOCKETSCREWM6*35MM RUNNINGDECK HEXAGONSOCKETSCREWM6*25MM RUNNINGBELT FLATHEADSCREWM5*12MM CABLECLIP FLATHEADSCREWM5*10MM... -
Page 33: Troubleshooting
TROUBLESHOOTING ERRORCODE POSSIBLEREASONS SOLUTION 1. Communicationdefectsb 1. Ask for a professional etween the console andthe technician to controller. Signalmalfunction connectthecableagainorreplace 2. Defectiveconsole. thecable. 3. Defectivecontroller. 2. Ask for a professional technician to replace theconsole. 3. Ask for a professional technician to replacethecontroller. - Page 34 1. The safetykeyis 1. Re-attachthe safetykey. The motordoes notwork. notattached correctly. 2. Ask for a professional 2. The connecting cable of technician to well connect the ofmotoris not being well connecting cable of motor connected. again. 3. The power cordisnot well 3.
Need help?
Do you have a question about the P110M and is the answer not in the manual?
Questions and answers