Advertisement
Quick Links
Aqua Map
Navionics Boating
Configuring Internet Access
Access to the internet is required to send position information from the DataHub to PredictWind.
Although a dedicated Internet connection is desired for real time updates to your tracking
website it is not required. DataHub will store acquired position reports internally for later
transmission if an Internet connection is not available. This for example might be used by
sailors sailing offshore away from cell phone coverage who do not own satellite phones.
Someone could cross the north Atlanic from Newfoundland, CA to Ireland while tracking their
voyage. Initially their tracks while cruising in coastal Canada will be updated in real time. As
they leave Canada and spend a full month offshore in the North Atlantic, position reports will be
stored in the DataHub's internal nonvolatile memory. Once the vessel arrives in Ireland and Cell
phone Internet access is arranged, all of the stored position reports will be uploaded to
Advertisement

Related Manuals for PREDICTWIND DataHub

Summary of Contents for PREDICTWIND DataHub
- Page 1 Navionics Boating Configuring Internet Access Access to the internet is required to send position information from the DataHub to PredictWind. Although a dedicated Internet connection is desired for real time updates to your tracking website it is not required. DataHub will store acquired position reports internally for later transmission if an Internet connection is not available.
- Page 2 Use a standard lightning iOS USB charging cable to connect your iPhone or iPad to the USB port on the DataHub. Once connected iOS will prompt you as to whether the DataHub should be trusted or not. Select “Trust. On the iOS device navigate to Settings->Settings->Personal hotspot and enable it as depicted...
- Page 3 The DataHub should now be connected to the Internet if your iOS device has Internet connectivity. See section below called “Verifying Internet Connectivity” to confirm that the device is connected to the Internet. Internet via Android To establish an internet connection via Android connect the devices USB charging cable to the...
- Page 4 You will need to repeat the process every time you disconnect and reconnect the Android device to the DataHub’s USB port. However, there is a good trick that allows you to automate this process so that the phone enters USB tethering mode automatically when you plug it in.
- Page 5 Now navigate to the WiFi tab...
- Page 6 You will note that its disabled and has a name “SSID: WiFi Client” with mode “Client”. Radio1 is the WiFi radio that you use are currently using to connect to the DataHub. Its the radio with “SSID: PW-Hub-XXXX” with mode “Master”. We will return to this radio later in the guide when we discuss how to password protect the WiFi connection to your DataHub and change its broadcast WiFi name or SSID.
- Page 7 On the following page review and hit “SAVE” at the bottom of the page. Don’t make any changes to this page unless you are an expert and know what you are doing. Back on the wireless overview page scroll to the bottom and push “SAVE & APPLY” to confirm your settings and activate them.
- Page 8 You know if you have successfully WiFi tethered to the remote access point by looking at the status in “Associated Stations”.
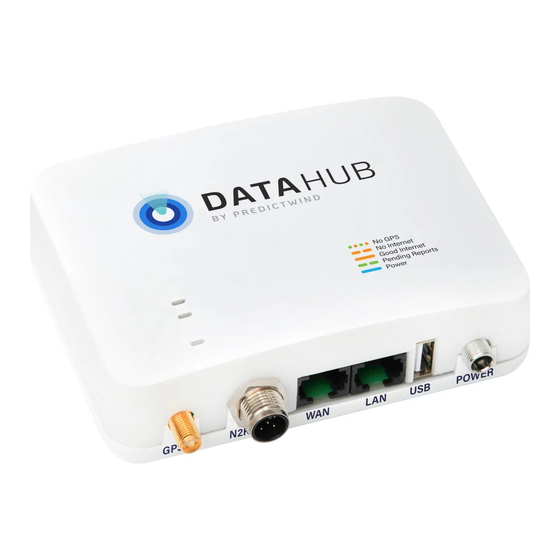
- Page 9 Internet connection to the DataHub. DataHub Status LEDs DataHub provides status LED on its top cover that rapidly allows you to know the status of the GPS feed, Internet connectivity, and if you have position reports stored on the device that have not yet been sent to PredictWind.
- Page 10 Try Google.com. If the page shows up then you are Internet connected. Alternatively a solid orange LED on the top of the DataHub indicates a valid Internet connection. There is a detailed Internet status page found under “Services->Settings” under the Internet Status tab.
- Page 11 “radio1” is the DataHubs WiFi device used by users to connect to it. Radio0 is used for tethering. Under the General tab in the next next page scroll towards the button and find the ESSID entry. The ESSID is the SSID that is broadcast by the DataHub. My vessel is called...
- Page 12 Bliss so I want my DataHub to advertise itself as “Bliss”. Change the ESSID entry to the desired broadcast name. Next click on the “Wireless Security” tab and select “WPA2-PSK (strong security)”, leave “cipher” on “auto”, and finally enter a password for WiFi. Scroll to the bottom of the page and push “SAVE”.
- Page 13 Note below that “Bliss” now shows up in a WiFi scan as encrypted when scanning on my Mac.
-
Page 14: Firmware Updates
“Services->Settings”. Select the Firmware tab and select “FLASH IMAGE…” at the bottom of the page and follow the prompts. You will need to browse for the software image you download to your computer, upload it to the DataHub, and then confirm that you wish to update the firmware. -
Page 15: Factory Reset
Factory Reset The DataHub can be returned to its original factory defaults (i.e. the way you originally received it) by one of two methods. Software If you are able to WiFi or Ethernet connect to the unit and can login to the web admin ui then browse to “Services->Settings”... - Page 16 . Consult the dealer or an experienced radio/TV technician for help. FCC Caution: To assure continued compliance, any changes or modifications not expressly approved by the party responsible for compliance could void the user's authority to operate this equipment. (Example - use only shielded interface cables when connecting to computer or peripheral devices).
Need help?
Do you have a question about the DataHub and is the answer not in the manual?
Questions and answers