Table of Contents
Advertisement
Quick Links
Advertisement
Table of Contents

Related Manuals for PREDICTWIND DATAHUB

Summary of Contents for PREDICTWIND DATAHUB
- Page 1 DataHub By PredictWind User Manual DataHub by PredictWind User Manual...
- Page 2 The DataHub can track, blog, save and broadcast all your onboard data sources including GPS and your NMEA 2000 instrumentation network. Additional features allow you to Broadcast WiFi, Broadcast GPS data via WiFi, Broadcast Wind Data, Log Data, create custom Boat Polars and access Remote Support.
-
Page 3: Table Of Contents
Tracking Logger NMEA Logger Polars Remote Support Securing The DataHub Changing the WiFi SSID and Securing with a Password Changing the Admin Password Firmware Updates Factory Reset Software Hardware Reset Switch Legal Table of Contents DataHub by PredictWind User Manual... -
Page 4: Powering The Datahub
To wire the DataHub directly to the vessel’s house battery, start by cutting the power lead off of the supplied AC/DC adapter. Connect a 1 amp fuse to the positive power lead (The black wire is positive, the wire with a white stripe is negative) and wire to the vessel’s switch panel. -
Page 5: Accessing The Web User Interface
Accessing the Web User Interface Once powered on, the DataHub needs to be configured to select the GPS data source, establish an internet connection, enable and set the tracking interval, and secure its WiFi with a password. Before you can start the configuration process, you must first establish a connection either via Ethernet or WiFi to log in to the web administrative interface. -
Page 6: Access Via Ethernet
Access via Ethernet To access the unit via a wired connection, run an ethernet cable between the RJ45 port on your laptop computer and the LAN port on the DataHub. The LAN port is the RJ45 port closest to the power connector. -
Page 7: Configuring The Datahub
DataHub is installed with the supplied GPS antenna and with good access to the GPS signal. The built-in GPS in the DataHub should only be used if you do not have an NMEA 2000 instrument system with external GPS. By interfacing with the NMEA 2000 instrumentation (with the optional PredictWind Cable/Tee) you will also be able to transmit Wind Speed and Direction from your instrumentation so friends and family can see the conditions you are experiencing. -
Page 8: Using Nmea 2000 For Gps
If using your vessels NMEA 2000 network (recommended), then connect the optional device cable from the M12 connector on the back of the DataHub to a tee on your NMEA 2000 backbone. NMEA 2000 device cables and tees can be purchased directly from PredictWind with your DataHub order. -
Page 9: Nmea 2000 To Nmea 183 Repeater Via Wifi
NMEA 2000 to NMEA 183 Repeater via WiFi One of the nice features of the DataHub is that it will broadcast NMEA0183 data via WiFi regardless of the GPS input source. This WiFi broadcast allows external navigation applications such as Aqua Map, GPS Nav X, Navionics Boating etc to use your vessel’s GPS for navigation. - Page 10 The following are the configuration settings for the iOS version of Aqua Map and Navionics Boating apps. Note that Aqua Map has a predefined configuration for the PredictWind Datahub. Aqua Map Navionics Boating Configuring the DataHub DataHub by PredictWind User Manual...
-
Page 11: Configuring Internet Access
Configuring Internet Access Access to the internet is required to send position information from the DataHub to PredictWind. Although a dedicated internet connection is desired for real-time updates to your tracking website it is not required. DataHub will store acquired position reports internally for later transmission if an internet connection is not available. - Page 12 On the iOS device, navigate to Settings > Personal Hotspot and enable it as depicted below. The DataHub should now be connected to the internet if your iOS device has internet connectivity. See section below called Verifying Internet Connectivity to confirm that the device is connected to the internet.
-
Page 13: Internet Via Android
You will need to repeat the process every time you disconnect and reconnect the Android device to the DataHub’s USB port. However, there is a good trick that allows you to automate this process so that the phone enters USB tethering mode automatically when you plug it in. Detailed instructions on configuring... - Page 14 Notice the SSID for this transmitter is listed as SSID: PW-Hub-XXXX where the Xs represent alphanumeric digits unique to the unit. This is the SSID that clients use to WiFi connect to the DataHub. We will return to this transmitter later in the guide when we discuss how to password protect the WiFi connection to your DataHub and change its broadcast WiFi name or SSID.
- Page 15 SAVE & APPLY to confirm your settings and activate them. You can push the UNSAVED CHANGES button at the top right of the page if you want to discard the session without connecting. Configuring Internet Access DataHub by PredictWind User Manual...
- Page 16 To confirm if you have successfully WiFi tethered to the remote access point, look at the status in Associated Stations and Connected Devices. Configuring Internet Access DataHub by PredictWind User Manual...
- Page 17 0 and some value and the RX/TX rates drop to zero. Note there are easier and better ways to know if you are connected to the internet as described in the Verifying Internet Connectivity section. Configuring Internet Access DataHub by PredictWind User Manual...
-
Page 18: Tracking And Blogging
The service posts tracks for your vessel and hosts blog posts with pictures of your travels. The tracking and blogging service requires a Standard or Professional forecast subscription, a DataHub or a satellite device compatible with the service, and a one- time setup and registration. -
Page 19: Setting Up Your Gps Tracking Page
Setting up your GPS Tracking page 1. Get started by scanning the QR code on the back of your DataHub device. This will take you to the tracking setup page for your DataHub. Tracking and Blogging DataHub by PredictWind User Manual... - Page 20 2. Select New Customer or Existing Customer. 3. Input your account email, vessel type and boat name (if you are a new customer). The mac address will be autofilled and is also on the back of the DataHub device. 000A5206E683...
- Page 21 NOTE: If you select Continue with Service if you require technical support with Onboarding Service you will be taken your DataHub set up or Continue without to payment and checkout. Onboarding Service 5. You will receive a confirmation that your GPS Tracking page has been successfully set up and an email with further instructions.
- Page 22 6. Once you have your tracking page set up, the next step is to enable tracking on the DataHub itself. To enable tracking, browse to the Services > Tracking page. Once there, check the Enable Tracking checkbox, note the Serial Number, and set the Tracking Interval to the desired value. The default tracking interval is 15 minutes per position report.
-
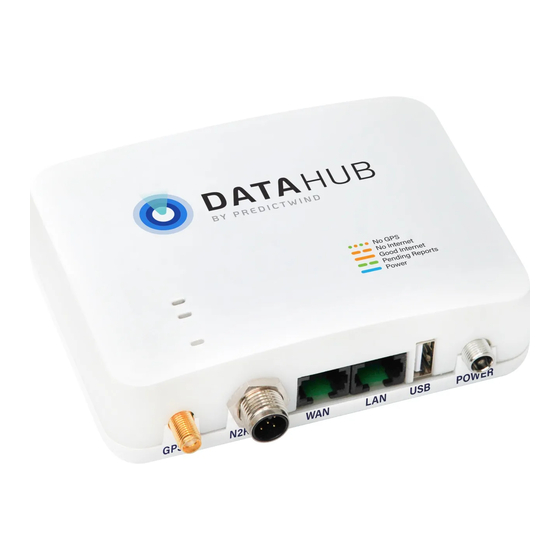
Page 23: Datahub Status Leds
DataHub Status LEDs DataHub provides a status LED on its top cover that rapidly allows you to know the status of the GPS feed, internet connectivity, and if you have position reports stored on the device that have not yet been sent to PredictWind. -
Page 24: Verifying Internet Connectivity
Try Google.com. If the page shows up, then you have an internet connection. Alternatively, a solid orange LED on the top of the DataHub indicates a valid internet connection. There is a detailed internet status page found under Services > Settings under the Internet Status tab. -
Page 25: Logging
Logging DataHub can log position reports and/or NMEA data and store it in its internal non-volatile storage for later analysis. Logged data can be viewed, downloaded, deleted, and (in the case of NMEA data) played back through the NMEA 2000 network. This feature allows race coordinators, for example, to use the remote support feature to download and analyze the vessels measured instrumentation data for analysis in real-time. -
Page 26: Tracking Logger
Enabling logging under Settings > Tracking > General causes the tracking application to log all position reports recorded by the DataHub. You will notice that once enabled, a new tab appears in the user interface under Services > Tracking called Logs. All of the tracking logs can be found under the Logs tab. -
Page 27: Nmea Logger
As with the Tracking Logger, the NMEA logs page is broken into two sections. The first section contains actions that apply to all the log files while the second section lists the log files in reverse chronological time order. Logging DataHub by PredictWind User Manual... - Page 28 Of note in the top section is the Import Logs action. This feature allows the import of NMEA data logs acquired on a different DataHub into the unit. As we will see shortly, the DataHub allows for playback of NMEA data. The import feature allows technicians to receive recorded NMEA data from a vessel at sea (via email, direct download, or another method), import them into their local DataHub, and then play the data back onto their local NMEA network as if they were on the vessel.
- Page 29 DataHub. Note that NMEA 2000 is a binary specification and can’t be directly viewed. The DataHub converts NMEA 2000 log data into text for viewing. So, with the DataHub it is possible to view and analyze NMEA 2000 data. Below is a sample display of NMEA 2000 data.
-
Page 30: Polars
“theoretical” polars for their boats. However, these are usually not that accurate and don’t adequately represent the capabilities of the vessel. DataHub along with services provided with PredictWind’s back end servers can aid in generating custom polars for the vessel. This is accomplished by sample wind, seas, and environmental conditions supplied by the vessels NMEA 2000 network and then uploading to www.predictwind.com... - Page 31 The bottom section of the interface is used to measure and upload the polars dataset to PredictWind. The first screen displays the status of the NMEA data coming into the unit and the current time along with the START button. Prepare your vessel and crew to sail at its maximum performance level on all wind tacks.
- Page 32 The UPLOAD button will upload the polars data set to your account at PredictWind and start the polars computation process. The resultant polar is stored in your account for use with all the performance routing and guidance features available at your subscription level.
- Page 33 Polars data sets are also stored and available in the NMEA log. Polars are stored under the name given to them at the time of acquisition. The screen above shows two polars acquired. One on Nov 2 and the other on Nov 8 of 2021. Polars DataHub by PredictWind User Manual...
-
Page 34: Remote Support
• ssh://remote.rdsensing.com:3751 The DataHub is accessible via these URLs in the same way as over WiFi on your vessel. Remote-service personnel will have access to the same features and services that you do on your vessel. Remote Support DataHub by PredictWind User Manual... -
Page 35: Securing The Datahub
By default, the DataHub’s WiFi is open and unencrypted and the administrator username and password is well known. Since the DataHub can provide internet access to any WiFi client connected to it, it is best to secure the WiFi connection to prevent unintended network access. - Page 36 DataHub restoring the original SSID and password (which by default is none). This is done as a safety precaution in the event you miss-typed in the password. The DataHub reminds you of this in the notice displayed right about the SAVE button.
-
Page 37: Changing The Admin Password
Note below, that the DataHub WiFi Bliss now shows up in a WiFi scan as encrypted when scanning on a Mac. Changing the Admin Password Connect to the DataHub via WiFi and login with username admin using the default password (admin). -
Page 38: Firmware Updates
PredictWind and store it on their computers. To upgrade the firmware, login to the DataHub via WiFi (or Ethernet/WAN), log in as admin and browse to Services > Settings. Select the Firmware tab and select FLASH IMAGE… at the bottom of the page and follow the prompts. -
Page 39: Factory Reset
Factory Reset The DataHub can be returned to its original factory defaults (i.e. the way you originally received it) by one of two methods. Software If you can WiFi or Ethernet-connect to the unit and can log in to the web admin UI then browse to Services >... -
Page 40: Legal
This device complies with Part 15 of the FCC Rules. Operation is subject to the following two conditions: (1) This device may not cause harmful interference, and (2) This device must accept any interference received, including interference that may cause undesired operation. Legal DataHub by PredictWind User Manual...
Need help?
Do you have a question about the DATAHUB and is the answer not in the manual?
Questions and answers