Table of Contents
Advertisement
Advertisement
Table of Contents
Troubleshooting

Related Manuals for KASEN K-8.0

Summary of Contents for KASEN K-8.0
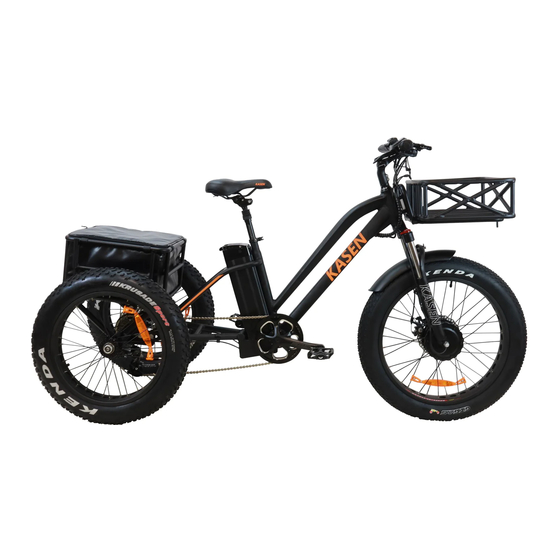
- Page 1 ETRIKE OWNER'S MANUAL GENERATING PURE EXCITEMENT...
- Page 2 We can't thank you enough for choosing to purchase an electric e-bike from Kasen Electric Bicycles. Our mission is to make sure our customers get the utmost enjoyment out of their e-bikes and enjoy them safely. We hope you'll have a great riding experience on your new e-bike. If you decide to snap some photos of you and your e-bike on your adventures, we'd love to add them to our website's photo gallery.
- Page 3 BEFORE YOU RIDE YOUR KASEN ETRIKE Please carefully read the following information. • User assumes all risks when using the Kasen eTrike e-bike. Read all instructions and warnings before use! If you have any questions about any instructions in this manual and the e-bike, please contact us at KasenBikeCustomerService@gmail.com...
- Page 4 • The e-bike is not meant to be towed behind a vehicle or any other product or system, motorized or not. • This Kasen Electric Bicycle is designed with a 21mph speed limit when using pedal assist (PAS), and 21mph on throttle assist only.
-
Page 5: Riding Tips
Such skills can be learned with this product, but care should be taken. It is recommended that any user know how to ride a bicycle before riding a Kasen Electric Bicycle. o Riding a bike that has a long wheelbase and can carry cargo will take getting used to. - Page 6 Kasen Electric Bicycle. • Weather – Your e-bike is designed to be water-resistant to rain and snow. It is not designed to be subjected to prolonged heavy rainfall or subjected to the increased water pressure that occurs when transporting an e-bike on a car or truck during rain or snow.
-
Page 7: Riding Instructions
RIDING INSTRUCTIONS • Check the e-bike before every use to make sure the e-bike and components, including, but not limited to, that wheels are secure, brakes work, and the frame is solid, to confirm they are in working order. • Check battery level before every use to confirm it is charged. General Components and use: •... - Page 8 Please ride within your limits. You agree not to hold Kasen Electric Bicycles liable for any injuries incurred due to riding above and beyond your limits and terrain abilities and speed.
- Page 9 (by setting the display to level zero) when you are not using it. The motor interrupt brake levers on Kasen e-bikes stop the motor from running when they are squeezed. This adds an additional measure of...
-
Page 10: Battery And Charging
Replacement batteries are available from Kasen to extend the life of your e-bike. When you install the battery on the eTrike, lock it into place with the supplied key. To remove the battery, pull the lever located under the saddle upwards and flip the saddle forwards. -
Page 11: Adjusting The Suspension Fork
ADJUSTING THE SUSPENSION FORK The eTrike features a mechanical suspension fork to help you ride with more comfort and control. You can use this adjustment to customize your riding experience. LOCKOUT The lockout knob is located on top of the right (from the rider's perspective) side of the fork crown. -
Page 12: Maintenance And Service
Before assembling your bike, please watch the "How To Assemble" video we've prepared for you. If you have questions during the assembly process, please contact Kasen at (909) 393-3799 or email KasenBikeCustomerService@gmail.com Once you're up and running, please make sure: •... - Page 13 Additionally, some jurisdictions require helmet use when riding Class II e-bikes like the eTrike. You should comply with local law when riding your Kasen bicycle. Your eTrike comes with reflectors and an LED reflective taillight; we encourage you not to remove them.
-
Page 14: Troubleshooting
It's actually designed to fail, sparing damage to the more expensive frame, and is inexpensive to replace for this reason. If you need more, they are available on Kasen.com or at partner bike shops. 4. If your bike powers up normally and shows no error messages but will not run when you turn the pedal assist on, check to ensure the cadence (PAS) sensor under the crank arm is plugged in. -
Page 15: Battery Troubleshooting
BATTERY TROUBLESHOOTING Your e-bike battery uses several sophisticated monitoring systems to prevent damage from overcharging, overheating, deep battery discharge, charging with the wrong voltage, and other errors. Please use the specific charger supplied with your bike. Other chargers may not supply the correct voltage required for charging. Even if another charger has the required voltage, it may not be programmed to initiate the charge cycle. - Page 16 Once charged, remove from wall power and check for proper operation. Under specific circumstances, you might see one single LED flashing constantly on the battery. One blinking LED is a warning of excessive strain on the battery for its charge level. To correct this issue: •...
-
Page 17: Warranty And Support
KasenBikeCustomerService@gmail.com or call us at: (909) 393-3977 to diagnose and repair your Kasen Electric Bicycle. This is an integrated and final statement of Kasen Electric Bicycles limited warranty. Kasen Electric Bicycles does not authorize or allow anyone to extend any other warranties, express or implied. - Page 18 NOTES This owner's manual is summary information and not an exhaustive list of every possible operation, fit, troubleshooting, or maintenance scenario. Your e-bike should be assembled, maintained, and serviced by a qualified person. If in doubt about your knowledge or capabilities, please consult a bicycle industry professional for guidance.
- Page 19 Product TFT LCD Display Mode TFT750C Abbreviation 750C Client Customer audit Supplier Tianjin APT Science and Technology Co., Ltd.
-
Page 20: Product Name
1. Product Name TFT LCD display Model: APT TFT 750C 2. Suppliers Tianjin APT Science and Technology Co., Ltd. Email : yzhao@aptdevelop.com apt@aptdevelop.com 2. Electrical Parameters 3.2inch IPS screen 24V/36V/48V/52V battery supply Rated operating current : 40mA Off leakage current < 1uA Max output current to controller : 100mA Operating temperature: -20~70℃, Storage temperature : -30~80℃... -
Page 21: Functional Description
High-contrast 3.2inch IPS colorful matrix screen. Ergonomic external button design, easy to operate. Speed display: AVG SPEED, MAX SPEED, SPEED (Real-time). Kilometer / Mile: Can be set according to customers’ habits. Smart battery indicator: Provide a reliable battery indicator. 9-level Assist : 3-level/5-level/9-level /UBE(6-level)optional. Mileage indicator: Odometer/ Trip distance/ Clock/ Riding time/ Range. - Page 22 0~9). *If the display has been set password power on, you need to input the right password before start. 6.2 Assist level operating Short press UP/DOWN button can change the assist level. Top assist level is 9, 0 for neutral. Level quantities can be adjusted according to the customer requirements. 6.3 Speed mode switch Short press MENU button can change the speed mode, Speed->AVG Speed->MAX Speed.
-
Page 23: Parameter Setting
* This fe atur e needs to be supported by controller. 6.7 Data cleanup Press and hold UP & DOWN buttons together for 1 second can reset several temporary data, temporary data include AVG Speed / MAX Speed / Trip / Time. * These temporary data can’t be erased by power off. - Page 24 darkness, ׀׀׀׀׀is brightness Display Setting Basic Setting Display Setting Basic Setting System Metric System Metric Brightness | | | | | Brightness Auto off Auto off Digital Scenes Digital Scenes Battery Ind Voltage Battery Ind Voltage > Clock > Clock EXIT EXIT 7.3 Auto off : Press UP/DOWN button to change the auto power off time, from 1 to 9,...
- Page 25 1 1 : 3 0 A M Power Km/h ASSIST - - - Trip 11.3 Pe rc nt oltage e age 7.6 Clock : Clock setting, press MENU button get into the clock setting menu, press UP/DOWN button to set Year/Month/Day/Hour/Min/Sec. Display Setting Display Setting Display Setting...
- Page 26 24V/36V/48V/UBE,UBE means user define value. 7.9 Start password : Press MENU button get into the password setting menu. If you had set Start input ON, you must input right password before power on, password is accorded to your setting. Display Setting Basic Setting Wheel 26.5 inch...
- Page 27 default password is ‘1919’. Assist levels Error code Speed limit 7.11 Speed limit: Press UP/DOWN will change speed limit, range 10km/h~60km/h. Default value is 25km/h. 7.12 Assist levels: This parameter can customize assist levels, options are 3/5/9/UBE, UBE represent factory default settings.
- Page 28 7.13 Factory setting: Press MENU button enter Restore Factory Settings item, set YES will restore all parameter to factory settings. Restore Restore Factory Settings Factory Settings BACK BACK Y E S Y E S . . . 7.14 Information: Show information of the E-bike. 7.15 Prod uct inf o: Get into this item can show hardware version software version…...
- Page 29 Error Code Error description Handle 0x04 Throttle turn back fault Check turn to connect. Throttle error Check turn to connect. 0x05 Under voltage protection Charge the battery 0x06 Overvoltage protection Charge the battery 0x07 Hall error Check the hall connection 0x08 0x09 three-phase power error...
- Page 30 Clamps suit for 3 size of handlebar, 31.8mm, 25.4mm, 22.2mm, there are transfer rings for (marked with L or R) 25.4mm and 22.2mm , transfer ring must be assembled with the special directions, pay attention to the green arrow below. 22.2 L Clamp L...
-
Page 31: Connector Descriptions
10. Connector descriptions Brown Orange Black Green White 1、 Brown wire : Anode(24v/36v/48V/52V) 2、 Orange wire : Power cord to the controller 3、 Black wire : 4、 Green wire : RxD (controller -> display) 5、 White wire : TxD (display -> controller) 11....
Need help?
Do you have a question about the K-8.0 and is the answer not in the manual?
Questions and answers