
Related Manuals for RIEXINGER BSM 631


Summary of Contents for RIEXINGER BSM 631
- Page 1 Translation of the original operating manual Operating manual Band-saw machine for plastic pipes Type BSM 631 / BSM 800 / BSM 1000...
- Page 2 Status April 2016 © Eugen Riexinger GmbH & Co. KG...
-
Page 3: Table Of Contents
3.1 General information 3.2 Delivery contents 3.3 Dimensions and weight 3.4 Equipment 3.5 Workpieces 3.6 Electrical connection 3.7 Pneumatic connection (optional) 3.8 Suction of saw shavings 3.9 Emissions 4. Setup and function BSM 631 / BSM 800 / BSM 1000... - Page 4 6.8 Initial operation 7. Operation 7.1 Before start-up 7.2 Protective equipment 7.3 Turning the BSM 631 / BSM 800 / BSM 1000 on and off 7.4 Control panel 7.5 Foot pedal (optional) 7.6 Setting the saw feed rate 7.7 Setting the sawing angle 7.8 Loading the machine...
- Page 5 9.2 Tensioning the saw band 9.3 Removing the saw band 9.4 Inserting the saw band 9.5 Greasing 9.6 Check safety equipment 9.7 BSM 631 / BSM 800 / BSM 1000 maintenance 10. Dismantling and disposal 10.1 Deactivation 10.2 Final shutdown 10.3 Disposal 11.
- Page 6 BSM 631 / BSM 800 / BSM 1000...
-
Page 7: Important Basic Information
The company Eugen Riexinger GmbH & Co. KG is not liable for damages resulting from non- or partial compliance with the operating manual. -
Page 8: Used Notation Styles
Professional Association for Health and Social Welfare Roule 3 Band saw machine Glass fibre-reinforced plastic Polyethylene (thermo-plastic synthetics) Polypropylene (partial crystalline thermo-plastic synthetics) Polyvinylidene fluoride (opaque, partial crystalline thermo-plastic fluorine syn- PVDF thetics) Accident Prevention Regulations BSM 631 / BSM 800 / BSM 1000... -
Page 9: Location Of Objects In The Room
1. Important basic information 1.6 Location of objects in the room The spatial information about locations of objects in the room in relation to the BSM 631 / BSM 800 / BSM 1000 always refer to the image below. BSM 631 / BSM 800 / BSM 1000... -
Page 10: Labelling On The Machine
Pneumatic pipe tension Warning of crushing between the fixed and (optional) moving machine parts Type label and CE marking of the BSM TYPE LABEL Switchboard cabinet 631 / BSM 800 / BSM 1000 BSM 631 / BSM 800 / BSM 1000... -
Page 11: Basic Safety Instructions
2.3 Usage according to regulations The BSM 631 / BSM 800 / BSM 1000 is exclusively designed for sawing pipes with the prop- erties and dimensions outlined in this operating manual (see Chap. 3.5 on p. 17). Proper usage... -
Page 12: Improper Usage
2. Basic safety instructions The BSM 631 / BSM 800 / BSM 1000 is exclusively intended for usage in industry, craft and trade. It is not intended for private usage. 2.4 Improper usage The BSM 631 / BSM 800 / BSM 1000 may not be - operated by more than one person (exceptions are described in the respective context);... - Page 13 Life-phase Instructed person Authorised person Transport – Installation – Activation – Operation Malfunction search Maintenance Storage – Deactivation – Dismantling – Disposal – BSM 631 / BSM 800 / BSM 1000...
-
Page 14: Informal Safety Measures
(e.g. locking the main switch). 2.8 Organizational measures The proprietor of the BSM 631 / BSM 800 / BSM 1000 is obligated to provide the required per- sonal protective equipment. The personal protective equipment includes: Work clothing... -
Page 15: Fire Hazard
2.9.3 Laser radiation (optional) Information! Important informations about the laser! The used laser is a laser class 1 according to DIN EN 60825-1:2008-05. The accessible laser radiation is harmless. BSM 631 / BSM 800 / BSM 1000... -
Page 16: Mechanical Hazards
2.9.6 Environmental hazards Attention! Plastic waste and used saw bands contaminate the environment! Dispose of all shavings, plastic waste and used saw bands according to locally applicable legal stipulations. BSM 631 / BSM 800 / BSM 1000... -
Page 17: Technical Data
Mitre area of 45 degrees on both sides with swivel-mounted saw bow (optimal for man- ufacturing curved segments) Visual cutting indicator for quick positioning of workpiece (optional) Automatic cutting depth limit Automatic air blow system to clean saw band (optional) control panel BSM 631 / BSM 800 / BSM 1000... -
Page 18: Delivery Contents
3. Technical data 3.2 Delivery contents The delivery contents of the BSM 631 / BSM 800 / BSM 1000consist of: BSM 631 2 Saw bands for polyester pipes control paneel 6 Screw feet 2 tension belts 1 Operating Manual 3.3 Dimensions and weight... -
Page 19: Workpieces
The workpiece must be tensioned sure. Attention! The BSM 631 / BSM 800 / BSM 1000 may only be used to saw glass fibre-rein- forced plastics when the GFP-dust is ventilated with a ventilation system. Dust is released into the air when sawing GFP, and this dust can very quickly shutdown mechanical components and electrical equipment of the BSM 631 / BSM 800 / BSM 1000. -
Page 20: Pneumatic Connection (Optional)
Adhere to the respective legal regulations and determined workplace threshold values for dust. The proprietor is obligated to install a ventilation system and provide the operator with a respiratory mask if workplace threshold values are exceeded. BSM 631 / BSM 800 / BSM 1000... - Page 21 80 dB (A). The BSM 631 / BSM 800 / BSM 1000 complies with protection requirements in regard to inter- ference immunity according to EN 61000-6-2:2005 (Interference immunity for industrial areas).
-
Page 23: Setup And Function
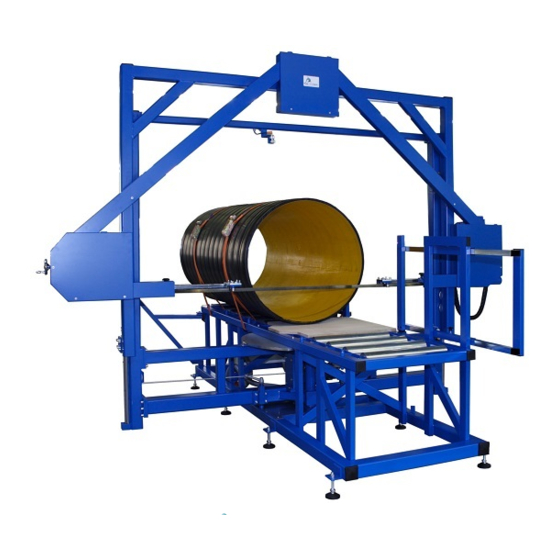
Saw frame Saw bow Switchboard cabinet Tensioning device for saw band Adjustment device for sawing angle Screw foot Control paneel Machine frame Quick clamping device for work pieces (optional) Motor saw band BSM 631 / BSM 800 / BSM 1000... -
Page 24: Functionality
4. Setup and function 4.2 Functionality The BSM 631 / BSM 800 / BSM 1000 saws plastic pipes - with varying diameters, made of various types of plastic, with an adjustable saw angle. The saw process is executed as follows: The desired saw angle is set The saw bow is raised. -
Page 25: Safety Button
4. Setup and function 4.3.2 Safety button According to valid APR the BSM 631 / BSM 800 / BSM 1000 must operate in jogging mode during processes that are dangerous for the operator. This means that the operator must press the buttons of the safety button with one hand while sawing. -
Page 27: Delivery, In-Company Transport And Storage
2) Check also if the delivery contents of the BSM 631 / BSM 800 / BSM 1000 are complete (see Chap. 3.2 on p. 16). - Page 28 Improper transport may cause damage to machine! The BSM 631 / BSM 800 / BSM 1000 may not be lifted and transported with lift- ing devices that are attached to machine parts (e.g. the saw bow) but only with a suitable forklift that lifts the frame of the machine.
-
Page 29: Setup And Activation
Transportation devices for transporting the BSM 631 / BSM 800 / BSM 1000 to the setup location The floor of the setup room for the BSM 631 / BSM 800 / BSM 1000 must have the following characteristics: Hard, level, without slope... -
Page 30: Setup Plan
6.3 Setup plan Bild 1. Setup plan: View from top Fig. similar Pos. Description Pneumatical connection (optional) Connection suction saw shavings Electrical connection (cable with plug) BSM 631 / BSM 800 / BSM 1000... -
Page 31: Setting Up The Machine
(see Chap. 4. on p. 21). 4) Remove the underlying wooden blocks. 5) Slowly place the BSM 631 / BSM 800 / BSM 1000 on the ground until it fully rests on the screw feet. BSM 631 / BSM 800 / BSM 1000... -
Page 32: Connect To Electrical Power Supply
Faulty connection values may cause material damage to machine! Therefore, observe the machine's connection values (see Chap. 3.6 on p. 17). 1) Ensure that the cables that connect the BSM 631 / BSM 800 / BSM 1000 are equipped with an appropriately dimensioned circuit breaker. -
Page 33: Connect To Suctioning (Optional)
1) Ensure that the parameters of suction system consist required values (see Chap. 3.8 on p. 18) 2) Connect the BSM 631 / BSM 800 / BSM 1000 to the suction system by connecting suction hose with extraction nozzle. - Page 34 8) Grease all blank machine guides (see Chap. 9.5 on p. 62). 9) Install a saw band if it has not yet been installed in the machine BSM 631 / BSM 800 / BSM 1000 (see Chap. 9.4 on p. 60) 10) Check all safety equipment (see Chap.
-
Page 35: Operation
Door of switchboard cabinet closed and locked? Sheet-metal cladding of saw-bow guides fastened with 6 screws (see Chap. 9.5 on p. 62)? 7.3 Turning the BSM 631 / BSM 800 / BSM 1000 on and off Pos. Description Main switch Switchboard cabinet Fig. -
Page 36: Control Panel
7. Operation Turning the BSM 631 / BSM 800 / BSM 1000 off 1) Turn the BSM 631 / BSM 800 / BSM 1000 off by turning the main switch at the front switch- board cabinet clockwise to the 3 o'clock position. -
Page 37: Foot Pedal (Optional)
Always turn the dial Lift speed back to 1 before sawing. If you are sure that the initially set saw feed rate can be increased, do so slowly and in small increments during operation. BSM 631 / BSM 800 / BSM 1000... - Page 38 Saw feed rate mm/sec. Material Wall thickness, mm 12,0 15,0 18,0 21,0 24,0 27,0 30,0 BSM 1000 DOWN SPEED Saw feed rate mm/sec. Material Wall thickness, mm 11,2 14,0 16,8 19,6 22,4 25,2 28,0 BSM 631 / BSM 800 / BSM 1000...
-
Page 39: Setting The Sawing Angle
The operator must ensure that saw band is above the workpiece. Mitre cuts The BSM 631 / BSM 800 / BSM 1000 has a mitre range of 45 degrees on both sides.This allows the operator to e.g. saw pipe segments without having to turn or move the workpiece. -
Page 40: Loading The Machine
3) Release both tension belts and remove them from the workpiece and remove the workpiece and offcut from the machine with the help of a suitable lifting device and possibly another per- son. 4) Unlock the emergency-off button. BSM 631 / BSM 800 / BSM 1000... - Page 41 Clamping workpiece as close as possible to the Tension arm right (adjustable) cutting line Thumb screw tension arm right Andjust tension arm right Support rolls Support for the workpiece Foot pedal Close and open tension device BSM 631 / BSM 800 / BSM 1000...
- Page 42 Falling, offcut workpieces may injure the operator! Secure workpiece offcuts that are not clamped in (e.g. with suitable lifting gear) so that these pieces do not fall from the table after sawing. BSM 631 / BSM 800 / BSM 1000...
- Page 43 8) If the workpiece can not bee safely clamped with minimum two tension belts, rotate the work- piece by 180 degrees in order to clamp it securely to the longer side. or take a longer workpiece. BSM 631 / BSM 800 / BSM 1000...
-
Page 44: Space Between Saw-Band Guide And Workpiece
If the blade guides are set incorrectly, this can cause damage to the workpiece and the machine! Adjust the saw-band guide before sawing so that they may not collide with the workpiece during the sawing operation. BSM 631 / BSM 800 / BSM 1000... -
Page 45: Sawing
The saw bow with the running saw band will move downward and execute the saw cut. The motors stop automatically once the workpiece has been sawed and the saw bow has arrived at the bottom position. BSM 631 / BSM 800 / BSM 1000... - Page 46 10) Begin again with Step 2) to execute another cut. Information If you want to interrupt the sawing process, just release the buttons for the Safe Ball The motors stop and the saw bow remains in the current position. BSM 631 / BSM 800 / BSM 1000...
-
Page 47: Finding And Repairing Malfunctions
3.7 on p. 18) The clamping arms of Press the lower foot switch up to Lower foot switch is not locked the quick clamping the stop, so that it locks into place BSM 631 / BSM 800 / BSM 1000... -
Page 48: Repair Electrical Malfunctions
Emergency off button pressed Emergency off button The saw-band motor or saw-bow motor cannot be Check motor protection Motor protection switch of the activated. switch -3F1 of saw-band saw band triggered motor BSM 631 / BSM 800 / BSM 1000... -
Page 49: Check Saw-Band Motor
7) Re-tighten the Allen safety screws after preforming the adjustment. 8) Mount the removed saw-band cover at the right location. 9) Turn on the machine with the main switch. BSM 631 / BSM 800 / BSM 1000... -
Page 50: Setting Lower Limit Switch
(see Chap. 1.1 on p. 1) If the workpiece is now completely cut off, the limit switch is set correctly. 8) If the work is still not completely sawn through, repeat steps 1 to 7 BSM 631 / BSM 800 / BSM 1000... -
Page 51: Set Optical Cut Indicator (Optional)
The used laser is a laser class 1 according to DIN EN 60825-1:2008-05. The accessible laser radiation is harmless. Pos. Bezeichnung Upper saw band cover fixing screw Laser diode fixing screw Fig. similar BSM 631 / BSM 800 / BSM 1000... -
Page 52: Guarantee
Wearing parts such as drive belts, saw bands and carbon brushes of the motors and belt straps of the belt-lifting-system. The manufacturer of the BSM 631 / BSM 800 / BSM 1000 is not liable for the quality of man- ufactured parts.The proprietor alone is responsible for quality control and the quality of parts manufactured with the machine. -
Page 53: Error Report
Temperature range from ....degrees C to ....degrees C □ □ □ Error occurs Constantly Seldom Only when ........□ Probably lightning strike or surge damage Date Name / Technician Phone number BSM 631 / BSM 800 / BSM 1000... -
Page 55: Maintenance
Examination according to IndSafReg Time limits according to § 3 Request service technician or §10 (2) (or according to national reg- Section 3 (Risk assessment) authorised person ulation) BSM 631 / BSM 800 / BSM 1000... -
Page 56: Cleaning The Machine
The machine may be damaged as a result. Attention! Plastic waste contaminates the environment! Dispose of all shavings and plastic waste according to locally applicable legal stipulations. Pos. Description Guide roll Saw band Guide roll Fig. similar BSM 631 / BSM 800 / BSM 1000... -
Page 57: Tensioning The Saw Band
Adhere to the optimal tensioning values. Use original saw bands from the machine's manufacturer as it cannot be ensured that saw bands from other manufacturers are safe for usage or have the proper strain capability. BSM 631 / BSM 800 / BSM 1000... - Page 58 Warning of material damage to machine or workpiece! Ensure an optimal tensioning of the saw band as it might otherwise tear or jump off the guide wheels and damage either the machine or the workpiece. How to tension the saw band of the BSM 631 Pos. Bezeichnung...
- Page 59 3) If the saw band tension is too strong (saw band breaks), then turn the knob counter-clockwise until it is perfectly tensioned. BSM 631 / BSM 800 / BSM 1000...
-
Page 60: Removing The Saw Band
Running saw band may cause serious severance injury! Descending saw bow may pinch the operator! The assisting person mentioned below may only enter the hazard- or working area after deactivating the machine with the main switch. BSM 631 / BSM 800 / BSM 1000... - Page 61 10) Coil up the old saw band to safely dispose of it. 11) Remove all saw dust with a brush or vacuum cleaner from where the saw band used to run. The installation of a new saw band is explained in Chap. 9.4 BSM 631 / BSM 800 / BSM 1000...
-
Page 62: Inserting The Saw Band
Attention! After sawing the hot saw band may burn the operator! The saw band poses an injury risk! Always wear protective gloves when working on the saw band. Fig. similar BSM 631 / BSM 800 / BSM 1000... - Page 63 13) Mount the removed saw-band covers at the right location and close the door of the housing on both sides. Diagonal saw band covers front and rear (each 2 screws) Upper saw band cover (2 screws) Lower saw band covers front and rear (each 3 screws) BSM 631 / BSM 800 / BSM 1000...
-
Page 64: Greasing
Lower saw bow guides back and front (grease S1, S4 monthly fittings) Upper saw bow guides back and front (grease fit- S2, S5 monthly tings) S3, S6 linear guides, back and front monthly BSM 631 / BSM 800 / BSM 1000... - Page 65 9. Maintenance Pos. Description Rear rope cover below Rope cover on the gearbox 3, 6 saw bow Rear rope cover above Front rope cover above Front rope cover below BSM 631 / BSM 800 / BSM 1000...
-
Page 66: Check Safety Equipment
Safe Ball with one hand. Sawing begins 4) Press the Emergency-Off-Button Sawing must stop immediately. 5) Press the button Lift up Lift down. It should not be possible to start the saw-band motor. BSM 631 / BSM 800 / BSM 1000... - Page 67 7) If the drives can be started while the emergency-off is activated or if the drives do not stop immediately, turn off the machine with the main switch and contact the manufacturer's customer service (see Chapter 1.1 on p.1). BSM 631 / BSM 800 / BSM 1000...
-
Page 68: Bsm 631 / Bsm 800 / Bsm 1000 Maintenance
9. Maintenance 9.7 BSM 631 / BSM 800 / BSM 1000 maintenance Serial number of BSM 631 / BSM 800 / BSM 1000: ........Please record the maintenance activities in the table according to the sample entry! Next Date Activity... - Page 69 9. Maintenance Next Date Activity Name: maintenance BSM 631 / BSM 800 / BSM 1000...
-
Page 71: Dismantling And Disposal
Only an authorised person may deactivate the machine (see Chap. 2.5 on p. 10). How to deactivate the BSM 631 / BSM 800 / BSM 1000: 1) If a workpiece is still in the machine, remove it (see Chap. 7.8 on p. 38). - Page 72 10. Dismantling and disposal Information! Saw bow to deposite! The BSM 631 / BSM 800 / BSM 1000 is equipped with a saw bow to deposite. Lay down the saw bow when disposing the machine. There are usually no climb- ing aids necessary.
-
Page 73: Annex
Email info@riex.de Internet www.riex.de Tell us about your experience with the BSM 631 / BSM 800 / BSM 1000 or make some sug- gestions for improving either the BSM 631 / BSM 800 / BSM 1000 or this operating manual. - Page 74 11. Annex BSM 631 / BSM 800 / BSM 1000...
-
Page 75: Ec Conformity Declaration
Markus Theobald (Business Manager), Eugen Riexinger GmbH & Co. KG, Egartenring 2, 75378 Bad Lie- benzell Description of machine: Band-saw machine for plastic pipes of type BSM 631 / BSM 800 / BSM 1000 A conformity declaration is also made for other valid product-relevant guidelines. Guideline 2014/30/EU (EMC guideline) - Page 76 11. Annex BSM 631 / BSM 800 / BSM 1000...
-
Page 77: Dimenson Sheets
11. Annex 11.3 Dimenson sheets 11.3.1 Dimension sheet BSM 631 BSM 631 / BSM 800 / BSM 1000... - Page 78 11. Annex BSM 631 / BSM 800 / BSM 1000...
-
Page 79: Dimension Sheet Bsm 800
11. Annex 11.3.2 Dimension sheet BSM 800 BSM 631 / BSM 800 / BSM 1000... - Page 80 11. Annex BSM 631 / BSM 800 / BSM 1000...
-
Page 81: Dimension Sheet Bsm 1000
11. Annex 11.3.3 Dimension sheet BSM 1000 BSM 631 / BSM 800 / BSM 1000... - Page 82 11. Annex BSM 631 / BSM 800 / BSM 1000...
-
Page 83: Circuit Diagram
11. Annex 11.4 Circuit diagram The following pages contain the electrical circuit diagrams for the BSM 631 / BSM 800 / BSM 1000. BSM 631 / BSM 800 / BSM 1000... -
Page 84: Pneumatic Diagram (Optional)
11. Annex 11.5 Pneumatic diagram (optional) BSM 631 / BSM 800 / BSM 1000... -
Page 85: Other Informations
12. Other informations 12. Other informations The following pages contain the lubricating instructions for linear guideways and ballscrews of HIWIN Lineartechnologie for the BSM 631 / BSM 800 / BSM 1000. BSM 631 / BSM 800 / BSM 1000...
Need help?
Do you have a question about the BSM 631 and is the answer not in the manual?
Questions and answers