Table of Contents
Advertisement
Quick Links
4 in 1
Anemometer, Humidity
Light Meter, Thermometer
Your purchase of this 4 in 1 METER marks a step
forward for youinto the field of precision measurement.
Although this METER is a complex and delicate
instrument, its durable structure will allow many years
of use if proper operating techniques are developed.
Please read the following instructions carefully and
always keep this manual within easy reach.
Advertisement
Table of Contents

Related Manuals for SUNWE LM-8000P


Summary of Contents for SUNWE LM-8000P
- Page 1 4 in 1 Anemometer, Humidity Light Meter, Thermometer Your purchase of this 4 in 1 METER marks a step forward for youinto the field of precision measurement. Although this METER is a complex and delicate instrument, its durable structure will allow many years of use if proper operating techniques are developed.
-
Page 2: Table Of Contents
TABLE OF CONTENTS 1. FEATURES..............1 2. SPECIFICATIONS............2 3. FRONT PANEL DESCRIPTION........4 3-1 Power Button............4 3-2 Hold Button............4 3-3 Max. / Min. Button..........4 3-4 Unit / Zero Button..........4 / , Lux/Ft-cd button........℃ ℉ 3-6 Function Button...........4 3-7 Air Flow Sensor........... -
Page 3: Features
1. FEATURES * 4 in 1 professional measuring instrument: Anemometer, Hygrometer, Thermometer, and Light meter. * Tiny bone shape with lightweight and small size case design are suitable for handling with one hand. * Wristlet design provides extra protection to the instrument especially for user one hand operation. -
Page 4: Specifications
2. SPECIFICATIONS 2-1 General Specifications Display 8 mm LCD display Measurement Anemometer, Humidity, Temperature. Light Operating Max. 80% RH. Humidity Operating 0 to 50° C (32 to 122° F) Temperature Over Input Indication of "- - - - " Display Power Supply 006P DC 9V battery (Heavy duty type) Power Approx. - Page 5 Measurement Range Resolution Humidity % RH 10 to 95 %RH 0.1 %RH Temperature 32 to 122 ℉ 0.1 ℉ 0 to 50 ℃ 0.1 ℃ ( Semiconductor) Light 0 to 2,200 Lux 1 Lux 1,800 to 20,000 Lu10 Lux * auto range Ft-cd 0 to 204.0 Fc 0.1 Ft-cd...
-
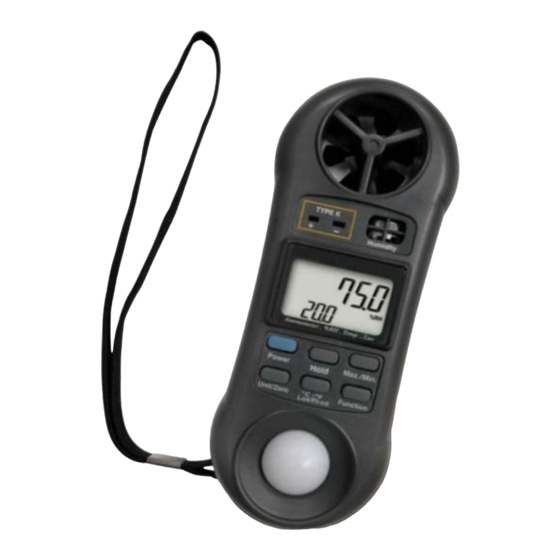
Page 6: Front Panel Description
3. FRONT PANEL DESCRIPTION Fig. 1 3-1 Power Button 3-7 Air Flow Sensor 3-2 Hold Button 3-8 Thermocouple Input Socket 3-3 Max. / Min. Button 3-9 R.H. Sensor 3-4 Unit / Zero Button 3-10 Light Sensor Button 3-11 LCD display ℃... -
Page 7: Measuring Procedures
4. MEASURING PROCEDURE 4-1 Air Velocity Measurement 1) Power on the instrument by pressing the " Power Button " ( 3-1, Fig. 1 ). 2) Select the Anemometer function by pressing " Function Button " ( 3-6, Fig. 1 ). 3) Press the "... -
Page 8: Relative Humidity Measurement
* The temperature difference between thermocouple probe and thermometer will cause an inaccurate measuring result. Therefore, for the best measuring and accuracy performance, whenever change a probe or plug a new probe, thermal equivalent between probe plug and meter's input socket is a necessary condition. Thermal equivalent procedure may take few minutes and apply only when the probe has been exposed to an ambient temperature different from the meter. -
Page 9: Change Temp. Unit
Zero Offset Adjustment of Light Function : * For best results zero the light sensor prior to use in a dark environment. Placing the light sensor end of the meter under a desktop or flat surface so as to block any light can accomplish this. -
Page 10: Battery Replacement
With the REC symbol on the display : (a) Press the " Max./Min. Button " ( 3-3, Fig. 1 ) once and the " Max " symbol along with the maximum value will appear on the display. (b) Press the " Max./Min. Button " again, the " Min " symbol along with the minimum value will appear on the display. -
Page 11: Other Accessories
7. OPTIONAL TEMPERATURE PROBE AND OTHER ACCESSORIES Thermocouple Probe * Measuring Range : -40 to 250 ℃ (Type K) TP-01 ( -40 to 482 ℉ * Max. short-term operating temperature: * It's an ultra fast response naked-bead thermocouple suitable for many general purpose application.
Need help?
Do you have a question about the LM-8000P and is the answer not in the manual?
Questions and answers