
Related Manuals for ChillaxBaby DM640


Summary of Contents for ChillaxBaby DM640
- Page 1 USER’S GUIDE ® 4.3" Wi-Fi Video Baby Monitor MODELS: Daily Baby DM640, DM640-2, DM640-3, DM640-4...
- Page 2 Welcome... ® to your new Chillax Wi-Fi Video Baby Monitor ! Thank you for purchasing the Wi-Fi® Video Baby Monitor. Now you can see and hear your baby sleeping. Our Connected Baby Monitor let you see your baby from the hand-held viewer, or from your smartphone. Watch over and communicate with your baby from anywhere in the world.
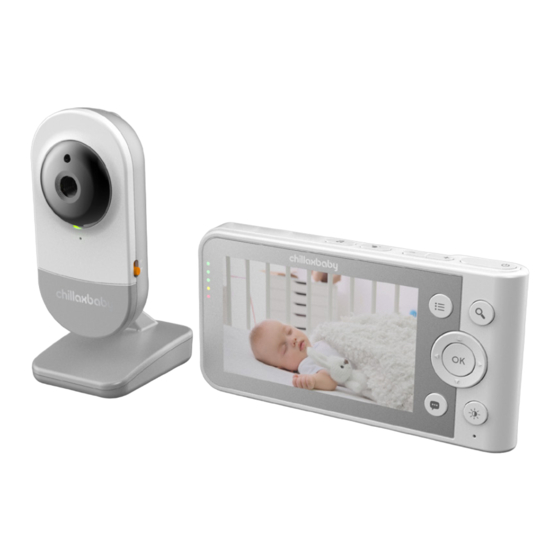
- Page 3 Overview of Parent Unit Display (LCD screen) Brightness button Parent Unit ON/OFF Press to adjust the LCD brightness level (up to 8 levels). Short press to switch on when unit is off. 2-Way Talk button Long press to switch off when unit Press and hold to speak to your is on.
- Page 4 Parent unit menu icons Signal Level (5 Levels). Night Vision Mode (Video also changes to Black/White). Talk Mode On. Indicates the screen off timer is set. Set Screen Off Timer (Off, 5 mins, 30 mins, 60 mins). Volume Level Control (8 Levels). No Baby Unit detected.
- Page 5 Overview of Baby Unit Speaker Micro-SD Card Slot PAIR button Support micro-SD card up to Antenna 32MB memory. Power socket Microphone Light Sensor 10. Privacy Protection knob Camera Lens Slide to switch On/Off the privacy Power/Link LED indicator protection mode. Important guidelines for installing your Digital Video Baby Monitor •...
-
Page 6: Table Of Contents
Table of contents Safety Instructions ..................8 Getting Started .................... 10 Connecting the Power Supply for the Baby Unit ......10 Connecting the Power Supply of the Parent Unit ......11 Desktop Stand of the Parent Unit ............. 12 Registration (Pairing) ................12 Using the Baby Monitor ................ - Page 7 Wi-Fi Internet Viewing ................18 ® Minimum System Requirements ............18 Getting Started - Connecting Devices ..........18 Setup ....................19 User Account and Camera Setup on Android™ Devices or iPhone /iPad ..................19 ® ® 5.4.1 Power ON and Connect the Camera ....... 19 5.4.2 Download ChillaxCare App ..........
-
Page 8: Safety Instructions
1. Safety Instructions WARNING: S t r a n g u l a t i o n H a z a r d : C h i l d r e n h a v e STRANGLED in cords. Keep this cord out of the reach of children (more than 3ft (1m) away). - Page 9 ® Wi-Fi CAMERA UNIT SET UP & USE: • Choose a location for the Baby Unit that will provide the best view of your baby in his/her crib. • Place the Baby Unit on a flat surface, such as a dresser, bureau or shelf, or mount the Baby Unit on a wall securely using the keyhole slots in the underside of the stand.
-
Page 10: Getting Started
CAUTION There is a risk of explosion if the battery is replaced by an incorrect type. Dispose of used batteries according to their instructions. Use only the rechargeable battery pack with rating: 3.8V 2000mAh. 2. Getting Started Connecting the Power Supply for the Baby Unit •... -
Page 11: Connecting The Power Supply Of The Parent Unit
Connecting the Power Supply of the Parent Unit A rechargeable battery (Lithium-ion battery 2000mAh) inside the Parent Unit allows you to move it without losing the link and picture from the Baby Unit. The battery provides up to 8 hours operation of the Parent Unit. We recommend charging for at least 16 hours before first use, and when the Parent Unit indicates the battery is low. -
Page 12: Desktop Stand Of The Parent Unit
Desktop Stand of the Parent Unit • The parent unit comes with a desktop stand attached to the back of the parent unit. • To place the parent unit on a desk, simply pull out the stand, as shown. NOTE Place the parent unit on a flat, even surface. -
Page 13: Using The Baby Monitor
Press and hold the PAIR button on the underside of the Baby Unit until • the Parent Unit finds the camera, beeps and PAIR OK appears on the screen. The video from the camera will then appear. NOTE A camera can only be registered to one Parent Unit at any one time. 3. -
Page 14: 2-Way Talk Mode
2-Way Talk Mode Press and hold the 2-Way Talk button on the Parent Unit to talk to your baby through the Baby Unit’s loudspeaker. icon will be displayed at the top of the LCD screen. Release the button to stop the talk back. Video ON/OFF Press button once to turn the LCD screen on or off at standby mode,... -
Page 15: Parent Unit Menu Options
4. Parent Unit Menu Options Alarm • Press the button and the menu bar will pop up. • Press the < LEFT / > RIGHT buttons until is highlighted. • Press the < LEFT / > RIGHT buttons to select the alarm time (6h, 4h, 2h). (The default setting is Alarm OFF.) •... -
Page 16: View A Camera
4.2.2 View a camera • Press the button and the menu bar will pop up. • Press the < LEFT / > RIGHT buttons until is highlighted, and the scan , view , add , del menus will pop up. and press the OK •... -
Page 17: Temperature Unit
• Press the < LEFT / > RIGHT buttons until is highlighted, and the scan , view , add , del menus will pop up. and press the OK • Press the < LEFT / > RIGHT buttons to select button to confirm. -
Page 18: Wi-Fi ® Internet Viewing
® 5. Wi-Fi Internet Viewing Minimum System Requirements Web Portal Android™ System, Version 7.0 or above ® ® iPhone /iPad iOS, Version 10.0 or above High Speed (Wi-Fi ® ) Internet At least 0.6 Mbps upload bandwidth per camera (you can test your internet speed here: http://www.speedtest.net) Getting Started - Connecting Devices How does it work? -
Page 19: Setup
Setup ® Connect the Wi-Fi Camera to the Power Adapter, then plug into mains ® power. The Camera must be within range of the Wi-Fi router with which you want to connect. Make sure the password of the router is available for entering during the in-app setup process. -
Page 20: Sign Up With Chillaxcare On Your Smart Device
5.4.3 Sign up with ChillaxCare on your smart device ® • Ensure that your smart device is connected to your Wi-Fi router. • Run ChillaxCare App, tap Sign In (fig. 1) • Enter your account information to sign up with ChillaxCare. (fig. 2) fig. -
Page 21: Add The Camera To Your Account
5.4.4 Add the Camera to your account • Tap on the <Device> button. • Tap the + to add new device (fig 3). • Tap Daily Baby to add the new camera (fig. 4). fig. 3 fig. 4 • The following setup instructions will appear on the screen, select your Wi-Fi network and enter “Password”... - Page 22 • Locate the pair button on the camera, press and hold the Pair button until you hear “Ready for Pairing” (fig.7). • Follow the instruction and generate a QR code (fig.8). fig. 7 fig. 8 Hold in 20-30 cm in front of the camera to get it scanned (fig. 9). It will •...
-
Page 23: Disposal Of The Device (Environment)
6. Disposal of the Device (environment) At the end of the product life cycle, you should not dispose of this product with normal household waste. Take this product to a collection point for the recycling of electrical and electronic equipment. The symbol on the product, user’s guide and/or box indicates this. -
Page 24: Help
8. Help Display No display • Try recharging the battery pack. • Reset the Units. Unplug both the Units’ electrical power, then plug them back in. • Is the Unit switched on? • Press and hold the ON/OFF button on the Parent Unit for 3 seconds to switch it ON. - Page 25 Interference Noise interference on your Parent Unit • Your Baby and Parent Units may be too close. Move them further apart. • Make sure there is at least 1 to 2m between the 2 Units to avoid audio feedback. • lf the Baby Unit is too far away;...
-
Page 26: Troubleshooting For Wi-Fi ® Internet Viewing
® 9. Troubleshooting for Wi-Fi Internet Viewing Category Problem Solution Description / Error Account I am unable to Please check your user name login even after and password. registra-tion. Account I receive an error Please ensure that you have registered with us. Tap Sign Up message saying: “Email ID is not to create an account. - Page 27 Category Problem Solution Description / Error Setting Up While I am adding If you are trying to add a a new Camera to Camera which has previously my account, I am been added into your account not able to find any or another account, you will first Cameras to add.
- Page 28 Category Problem Solution Description / Error Connectivity I get a message: We This could be due to lack of issues are having problems internet connection. Please accessing your wait and try again later. camera. Please try again in a few minutes.
- Page 29 Category Problem Solution Description / Error General What is the The LED indicates the following significance of the status: camera LED? LED flashing Red: Your Camera is booting up. After a voice prompt the camera is booted up and ready for pairing. LED Cycling Blue/Red: Your camera is in pairing mode.
- Page 30 Category Problem Solution Description / Error General How do I download • Open the Google Play the App for Android™ Store on your Android™ and iOS devices? device or App Store™ on your iOS device. • Select Search • Type in “Chillax Care” •...
-
Page 31: Standard Warranty
What Does this Limited Warranty Cover? Subject to the items listed below in the section “What is not Covered” Chillax warrants that this ChillaxHome or ChillaxBaby (“Product”) will be free from defects in material and workmanship under normal use for a period of 1 year from the date of purchase and that any certified accessory (“Accessory”) sold for use with this product will be free from defects in... - Page 32 What Other Limitations Are There? THIS LIMITED WARRANTY SETS FORTH THE ENTIRE LIABILITY OF CHILLAX AND CONTAINS YOUR SOLE AND EXCLUSIVE REMEDY. OTHER THAN THIS LIMITED WARRANTY, CHILLAX MAKES NO ADDITIONAL REPRESENTATIONS OR WARRANTIES, EXPRESS OR IMPLIED, INCLUDING WARRANTIES OF MERCHANTABILITY OR FITNESS FOR A PARTICULAR PURPOSE.
- Page 33 How to Obtain Warranty Service or Other Information? To obtain service or information, please email us at hello@chillaxcare.com You will receive instructions on how to ship the Products or Accessories at your expense and risk, to a CHILLAX Authorized Repair Centre. You must include: (a) the Product or Accessory;...
- Page 34 To ensure safety of users, the FCC has established criteria for the amount of radio frequency energy that can be safely absorbed by a user or bystander according to the intended usage of the product. This product has been tested and found to comply with the FCC criteria. This Class B digital apparatus complies with Canadian ICES-003.
-
Page 35: Technical Specifications
11. Technical Specifications CAMERA UNIT Radio Frequency Proprietary 2400 MHz to 2483.5 MHz ® Wi-Fi 802.11 b/g/n, 2.4GHz Image sensor Color CMOS 1M Pixels IR LED 8 pcs Operating Temperature 41 °F- 104°F (5 °C ~ 40 °C) Power Adapter Input: 100-240V AC, 50/60Hz, 300mA;... - Page 36 Chillax, Chillaxcare, Chillaxbaby and the Logos, are trademarks of Chillax Care Limited. 5GenCare and the Logo are trademarks of 5GenCare Limited. Apple logo is trademarks of Apple Inc., registered in the U.S. and other countries. App Store is a service mark of Apple Inc.
Need help?
Do you have a question about the DM640 and is the answer not in the manual?
Questions and answers