Table of Contents
Advertisement
Quick Links
Insignia 10.2" Portable DVD Player, Model # I-PD1020, User's Guide
Player Placement
Player
Headphones
composite video
Connecting to a TV using
component/progressive scan
video
amplifier
Selecting with numbers buttons
Changing subtitle language
Using the repeat function
TABLE OF CONTENTS
- 1 -
3D processing
Search options
Program play
Shuffle or random play
Digest play
Advertisement
Table of Contents

Related Manuals for Insignia I-PD1020


Summary of Contents for Insignia I-PD1020
-
Page 1: Table Of Contents
Insignia 10.2” Portable DVD Player, Model # I-PD1020, User’s Guide TABLE OF CONTENTS SAFETY PRECAUTIONS Power Sources Player Placement For Safety Lens and pickup maintenance When using headphones IMPORTANT SAFETY INSTRUCTIONS INSIGNIA FEATURES WHAT’S WHAT Player Remote Control PLAYER CONNECTIONS... -
Page 2: Safety Precautions
WARNING: Any change or modification to the product, not expressly approved by INSIGNIA or its authorized parties, could void the user’s authority to operate the product. NOTE: If the product requires servicing, contact Best Buy or Insignia customer service. Visit our website at www.insignia-products.com for more information. -
Page 3: For Safety
If liquid or objects get inside the product, unplug the AC adapter immediately to cut the power and contact Insignia customer service. Do not drop or shake the product, or expose it to strong shocks. Strong vibrations will damage the product. -
Page 4: Important Safety Instructions
Unplug this product from the AC outlet before cleaning. Do not use liquid or aerosol cleaners. Use a damp cloth for cleaning. Do not use attachments that are not recommended by Insignia. They may cause hazards. Do not use this product near water, for example, near a swimming pool, bathtub, washbowl, kitchen sink, laundry tub, or in a wet basement. -
Page 5: Insignia Features
(21) During playback, a few bright or dark flecks may appear on the TFT LCD. This happens occasionally in active matrix displays, and does not indicate a malfunction. INSIGNIA FEATURES LARGE 10.2'' TFT 16 x 9 wide screen LCD display delivers an enhanced cinematic video experience. -
Page 6: What's What
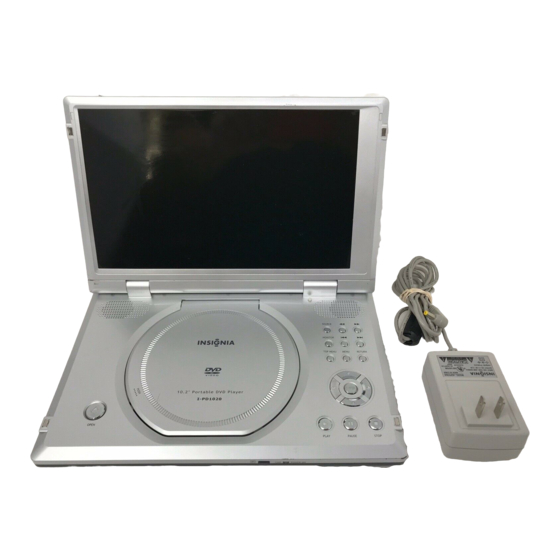
WHAT’S WHAT DVD Player (1) TFT LCD MONITOR (2) SPEAKERS (3) OPEN TRAY BUTTON (4) REMOTE CONTROL SENSOR (5) POWER ON/BATTERY CHARGING INDICATOR (6) PLAY (7) PAUSE (8) STOP (9) DIRECTION BUTTONS (10) ENTER (11) RETURN (12) FF SEARCH (13) MENU (14) TOP MENU *Press the SOURCE button to select DVD, YPBPR OUT, YCBCR OUT, CVBS &... -
Page 7: Remote Control
Remote control buttons and functions (1) OSD (ON SCREEN DISPLAY) BUTTON (2) SUBTITLE (3) PLAY MODE (4) AUDIO MODE (5) RESUME (6) DIGEST (7) TITLE (8) PLAY (9) DIRECTION BUTTONS (10) SETUP (11) SLOW PLAY (12) PAUSE (13) FF/FR SEARCH (14) PREV/NEXT SKIP (15) STOP (16) RETURN... -
Page 8: Player Connections
PLAYER CONNECTIONS AC adapter (A) The player can operate or charge batteries using the supplied AC adapter. 1. Insert the DC adapter cord into the player’s DC IN jack. 2. Insert the AC adapter into an AC wall outlet. The POWER ON/BATTERY CHARGING INDICATOR light will appear, and the product is ready for use. -
Page 9: Connecting To A Tv Using
Connecting to a TV using composite video (C) 1. Connect the mini plug to the VIDEO/AUDIO jacks on the product. 2. Connect the yellow RCA plug to the VIDEO IN jack on the TV. 3. Connect the red RCA plug to the AUDIO IN R jack on the TV. 4. -
Page 10: Before You Begin
BEFORE YOU BEGIN Using the remote control 1. Install batteries. Open the remote control battery compartment, insert batteries, and close the compartment, as in illustration. 2. When using the remote control, point it at the remote sensor on the front of the player. The remote’s range is 5 meters (16 feet), with a 60°... -
Page 11: Basic Operations
BASIC OPERATIONS 1. Press the lock switch to open the cabinet cover. 2. Turn the power on using POWER ON switch. 3. Adjust audio level (including headphones) using VOLUME control. 4. When connecting the player to a TV or an amplifier, adjust the volume according to the TV owner’s manual. -
Page 12: Adjusting The Picture
Adjusting the picture 1. Press MONITOR button to select brightness adjustment and press + or - buttons to select the preferred brightness level. 2. Press MONITOR button again to select the color adjustment and press + or - buttons until the preferred color is set. 3. -
Page 13: On Screen Display (Osd)
ON SCREEN DISPLAY (OSD) The On Screen Display (OSD) controls DVD playback features. To see the OSD, press the (OSD) button on the remote control while a DVD disc is playing. The OSD appears across the top of the screen. Each feature is illustrated with an icon. Use the (LEFT) or (RIGHT) buttons on the remote to select functions. -
Page 14: Selecting A Dvd Chapter
Selecting a DVD chapter Because DVD discs use digital technology, a title can be divided into individual chapters (similar to tracks on a CD). You can skip to any chapter by using the Chapter feature in the OSD. 1. While the disc is playing, press OSD on the remote to bring up the Display. 2. - Page 15 Selecting CD tracks using number buttons While a disc is playing, use the number buttons to select tracks. 1. If the track number is less than 10, simply press a 1-10 number button. For example: push 8 to select track 8. The screen shows: 2.
-
Page 16: Basic Settings
BASIC SETTINGS Changing the audio language If a DVD disc was created with additional audio language tracks (tracks recorded in different languages), you can use the OSD to temporarily change the player’s Audio Language setting. 1. While the disc is playing, press (OSD) on the remote to bring up the Display. 2. -
Page 17: Setting Title Time
Setting title time You can skip to a specific title time by using the Title Time feature in the OSD. 1. While the disc is playing, press OSD on the remote to bring up the Display. 2. Press the (UP) or (DOWN) buttons to highlight "TT (Title) Time". 3. -
Page 18: Playing A Cd
Playing a CD CD discs have the following playback features: Track, L/R, Audio (not available) and Repeat. Selecting a Specific Track 1. While the CD disc is playing, press (OSD) to bring up the Display. 2. Highlight the Track icon you’d like to play. 3. -
Page 19: Setup Functions
SETUP FUNCTIONS DVD & CD menus You might like to customize player functions to enjoy the best results for your equipment and discs. Here’s what to do: 1. Press SETUP to set the main menu. The main menu appears on the screen. Icons across the top of the screen indicate setup options: General Setup, Audio Setup, Preferences, Password Setup, and Exit. - Page 20 Press direction button (RIGHT) and then (DOWN) to select “Left Mono”. The screen will look like this: Press (PLAY) to confirm your selection. In “Dolby Digital Setup,” you have just set “Dual Mono” to “Left Mono”. The screen shows: 3. Exit the setup menu. Press the (LEFT) button to exit from “Dual Mono”.
- Page 21 Press the (DOWN) button 3 times to highlight “Exit Setup” and press (PLAY) to exit setup. Note: You can also keep pressing the direction button until the cursor is moved to the last icon illustrating Exit, then press the (PLAY) button to exit setup menu completely. - 21 -...
-
Page 22: General Setup
GENERAL SETUP The general setup page lets you setup and control the TV display, SPDIF output, captions, and screen saver. TV display 1. NORMAL/PS Select Normal/PS when the player is connected to a normal TV. Wide-screen images are shown on the screen, but with the left and right parts of the video frame deleted. 2. -
Page 23: Spdif Output
SPDIF output Sony/Philips Digital Interface (SPDIF) works with digital audio equipment that can playback linear PCM coded audio. Here are the options: 1. SPDIF OFF: No signal is output from the digital port. 2. SPDIF/RAW: Select this when the DVD player is connected to a digital amplifier through the digital port. -
Page 24: Dolby Digital Setup
Dolby digital setup Here are the options: DUAL MONO Select this option if you’d like the output mode of both L and R channels to output mono. MIXED MONO Select this function when playing 5.1-channel audio DVDs. Dynamic Range Control (DRC) This feature uses metadata to adjust the audio’s dynamic range so you can enjoy the best results for your listening environment. -
Page 25: Preferences
Preferences Use preferences to set up audio and subtitle language (explained in Basic Operations), disc menu language, and Parental lock-out. Parental lock-out Select a rating and the parental lock out will prevent the player from playing a movie with a higher rating. -
Page 26: Dvd Slow Play
DVD slow play You can enjoy slow motion with the following steps. 1. Press SLOW to play a DVD slowly. The screen displays the following options: Select the preferred slow forward or slow reverse speed icon, and press (PLAY) to confirm and play. Press (PLAY) again to exit slow play. DVD repeat playing To repeat a chapter, press REPEAT, the screen will verify your choice: To repeat a title, press REPEAT twice, and again the screen will verify your choice:... -
Page 27: Repeating One Section
To stop the REPEAT function, press REPEAT until ALL disappears. Repeating one selection Use the A-B function to repeat specific scenes or music on a CD or DVD disc. Search for and find the beginning of the scene or music you’d like to repeat and pause the disc. -
Page 28: Selecting Viewing Angles
Note: On some discs, subtitles cannot be removed. DVD discs can contain a variety of subtitle languages or none at all. If subtitles cannot be selected, press SUBTITLE again, and the screen will display Selecting viewing angles Some DVD discs include additional scenes taken from different viewing angles. For example, when you watch a NASCAR race, you might watch it from the front, the bleachers, or from the car behind you without stopping the DVD. -
Page 29: Dvd Time Search
Press button 6 to select title 6. The screen shows: Repeating these, select chapter 2 in title 6. The DVD will play from that point. DVD time search Press TIME SEARCH until the screen displays: Press the number buttons to enter the hour, minute and second of the scene you’d like to play. -
Page 30: Dvd Bookmarks
Note: CD discs have three time search options: 1. You can enter the elapsed time of a disc to play. 2. You can enter the elapsed time of a track to play. 3. You can go to a track you want to play by entering the track number. DVD bookmarks The bookmark feature lets you establish a point on the disc that the player can quickly go to. - Page 31 DVD & CD program play To use the program playback feature, enter the order in which you want DVD titles (and chapters) or CD tracks to play. Here’s how to do it: When playing a DVD Press (PLAY MODE) until the screen shows: Use the number buttons on the remote to enter the title and chapter you want to play first.
-
Page 32: Playing Dvds
Use the number buttons on the remote to enter the track number you’d like to hear. The numbers appear in the first box. The screen displays: The cursor jumps to the next spot in the program list section. Make sure the box is highlighted and enter your next track. -
Page 33: Playing Cds
Playing CDs Press DIGEST after the player stops. The screen shows “scan”: The player plays the first ten seconds of each track, one after another. To remove digest play, press (STOP), digest play is removed and the disc stops playing. Note: A CD disc only has the SCAN function. -
Page 34: Additional Topics
ADDITIONAL TOPICS Accessories The following accessories are included with your player. (1) Audio cable (1) Video cable (1) Remote control (1) Owner’s manual (1) AC power adapter (1) Rechargeable battery pack (1) Warranty card (1) Car cigarette adapter Handling discs To keep your discs clean, do not touch the play side of the disc. -
Page 35: Troubleshooting
Troubleshooting If you experience the following problems while using the product, this troubleshooting guide can help you. No Power If player is connected to AC adapter: Make sure the plug is inserted in the wall socket. Verify that the AC adapter is inserted to the correct plug on the DVD player. Check if the wall socket has power (Some wall sockets use an on/off switch). -
Page 36: Technical Specifications
Technical specifications Laser wavelength Video system Frequency response Signal/noise ratio Audio distortion + noise Channel separation Dynamic range Output Audio out (analog audio) Audio out (digital audio) Video out Video load impedance Power supply Allowable motion temperature Power Consumption Weight This manual is only for your reference. - Page 37 While the charge is in progress, do not disconnect the AC adapter and the power cord until the POWER/CHG indicator turns off. The charging time of a battery pack is approximately 4.5 hours, depending on environmental conditions. The attached battery pack may get warm when you are charging it or operating the player. This is normal.
Need help?
Do you have a question about the I-PD1020 and is the answer not in the manual?
Questions and answers