Table of Contents
Advertisement
Quick Links
Advertisement
Table of Contents

Related Manuals for CNBOU Helios III Series

Summary of Contents for CNBOU Helios III Series
- Page 1 H e l i o s I I I - 2 4 3 MC P 、H e l i o s I I I - 4 8 5 MC P...
-
Page 2: Table Of Contents
Table Of Contents 1. About This Manual ................1 1.1 Purpose ....................1 1.2 Scope ....................1 1.3 Safety Instructions ................1 2. Introduce ....................1 2.1 Features ....................2 2.2 Basic System Architecture ..............2 ... -
Page 3: About This Manual
1. About This Manual 1.1 Purpose This manual describes how to assemble, install and operate the units and how to troubleshoot of this unit. Please read this manual carefully before installation and operation. Keep this manual for future reference. 1.2 Scope This manual provides guidelines of safety installation as well as the information on tools and wiring. -
Page 4: Features
2.1 Features 1. Off grid inverter 2. Output power factor COSφ=1.0 3. Configurable AC/Solar Charger priority via LCD setting 4. Smart battery charger design for optimized battery performance 5. Compatible to mains voltage or generator power 6. Overload ,Over temperature ,Short circuit protection , battery low voltage 7. -
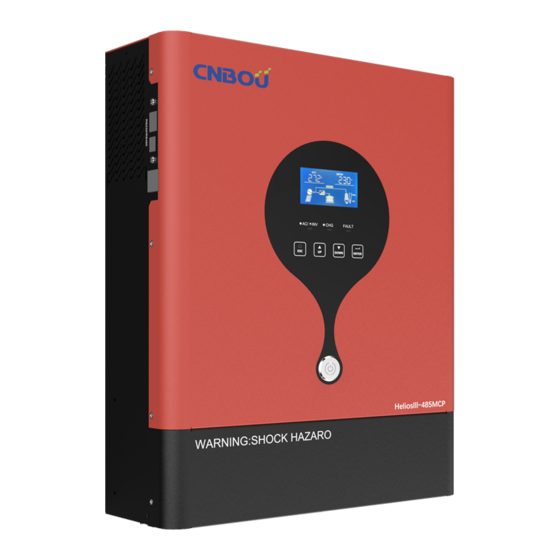
Page 5: Product Overview
2.3 Product Overview NOTE: The following picture is only a schematic diagram of the equipment .If the actual chassis does not conform to the schematic due to a structural upgrade, it is subject to prior notice. 1:RS232(RS485/CAN port is optional) 6:WIFI port 2:USB port(optional) 7: Battery input... -
Page 6: Installation
4. INSTALLATION 4.1 Unpacking and Inspection Before installation, please inspect the unit. Be sure that everything in the package is not damaged. The following items inside of package would be received. The inverter x1 User manual x 1 Communication cable x 1 4.2 Preparation Please remove the two screws on the bottom cover of the inverter as shown below before connecting all wirings. -
Page 7: Ac Input/Output Connection
CAUTION! Before connection the DC breaker, be sure positive (+) must be connected to positive (+) and negative (-) must be connected to negative (-). 4.5 AC Input/output Connection CAUTION! Before connecting to AC input power source, please install a separate AC breaker and lightning arrester between inverter and AC input power source. -
Page 8: Final Assembly
Application Example: SOLAR INPUT Q’ty of Total input panels power (Min. in serial: 5 pcs, max. in serial: 11 pcs) 5 pcs in serial 5 pcs 1250W Solar Panel Spec. 250Wp 8 pcs in serial 8 pcs 2000W Vmp: 30.1Vdc Imp: 8.3A Voc: 10 pcs in serial 10 pcs... -
Page 9: Dry Contact Signal(Optional)
4.9 Dry Contact Signal(Optional) There is one dry contact (3A250VAC) available on the rear panel. It could be used to deliver signal to external device when battery reaches warning level. Unit Status State NC & C C & NO Unit is off and no output is powered Power off Open Close... -
Page 10: Operation
5. OPERATION 5.1 Power ON/OFF Once the unit has been properly installed and the batteries are connected well, simply press On/Off switch(located on the button of the case) to turn on the unit. 5.2 Operation and Display Panel The operation and display panel, shown in below chart, is on the front panel of the inverter. It includes three indicators, four function keys and a LCD display, indicating the operating status and input/output power information. -
Page 11: Lcd Display Icons
5.3 LCD Display Icons Icon Function description Input Source Information Indicates the AC input. Indicates the PV input Indicate input voltage, input frequency, PV voltage, charger current, battery voltage. Configuration Program and Fault Information Indicates the setting programs. Indicates the warning and fault codes. Warning: flashing with warning code. - Page 12 In AC mode, it will present battery charging status. LCD Display Status Battery voltage <2V/cell 4 bars will flash in turns. Bottom bar will be on and the other three bars will flash in Constant 2 ~ 2.083V/cell turns. Current mode / Bottom two bars will be on and the other two bars will flash 2.083 ~ 2.167V/cell Constant...
-
Page 13: Lcd Setting
5.4 LCD Setting After pressing and holding ENTER button for 3 seconds, the unit will enter setting mode. Press “UP” or “DOWN” button to select setting programs. And then, press “ENTER” button to confirm the selection or ESC button to exit. Note:All settings must be modified in battery mode and must be rebooted to be valid. - Page 14 Appliances (default) If selected, acceptable AC input voltage range will be within 90-280VAC. AC input voltage range If selected, acceptable AC input voltage range will be within 170-280VAC. AGM (default) Flooded Battery type User-Defined If “User-Defined” is selected, battery charge voltage can be set up in program 26, 27.
- Page 15 Available options in 5.5KW model: (default) Setting voltage point back to 46.0V Setting voltage point back utility source when selecting 48V model:(default 46.0Vdc) “SBU priority” or “Solar first” setting range :44.0V to 51V in program 01. setting increase or decrease of 1.0V.
- Page 16 Charger source priority: If this inverter/charger is working in Battery mode, only solar To configure charger energy can charge battery. Solar energy will charge battery if it's source priority available and sufficient. Alarm on (default) Alarm off Alarm control Return to default display If selected, no matter how users screen (default) switch display screen, it will...
- Page 17 3.5K default setting: 27.0V 5.5K default setting: 54.0V Floating charging voltage If self-defined is selected in program 5, this program can be set up. Setting range is from 25.0V to 31.5V for 3.5KVA model and 48.0V to 61.0V for 5.5KVA model. Increment of each click is 0.1V.
- Page 18 30days (default) Setting range is from 0 to 90 days. Equalization interval Increment of each click is 1 day Enable Disable (default) Equalization activated If equalization function is enabled in program 30, this program can immediately be set up. If “Enable” is selected in this program, it’s to activate battery equalization immediately and LCD main page will shows “...
-
Page 19: Fault Reference Code
5.5 Fault Reference Code Fault Code Fault Event Fan is locked when inverter is off. Over temperature Battery voltage is too high Battery voltage is too low Output short circuited or over temperature is detected by internal converter components. Output voltage is too high. Overload time out Bus voltage is too high Bus soft start failed... -
Page 20: Warning Indicator
5.6 Warning Indicator Warning Code Warning Event Fan is locked when inverter is on. Over temperature Battery is over-charged Low battery Overload Output power derating PV energy is low High AC input (>280VAC) during BUS soft start Battery equalization Battery is not connected... -
Page 21: Trouble Shooting
6.TROUBLE SHOOTING Problem LCD/LED/Buzzer Explanation / Possible cause What to do Unit shuts down LCD/LEDs and automatically buzzer will be active The battery voltage is too low 1. Re-charge battery. for 3 seconds and during startup (<1.91V/Cell) 2. Replace battery. then complete off. - Page 22 Battery is over-charged. Return to repair center. Check if spec and quantity Fault code 03 The battery voltage is too high. of batteries are meet requirements. Fault code 01 Fan fault Replace the fan. Output abnormal (Inverter 1. Reduce the connected Buzzer beeps Fault code 06/58 voltage below than 190Vac or...
-
Page 23: Specifications
7. SPECIFICATIONS Table 1 Solar Mode Specifications 3.5KW24Vdc 5.5KW48Vdc MODEL Rated output power 3500W 5500W Normal output voltage 230VAC 230 ± 5%VAC Output voltage range Normal output current 15.2A 24.0A Efficiency(DC/AC) ≥92% PV Input Max. Power 4500W 5500W PV Array MPPT 120-450VDC Voltage Range 150Vdc +/- 10Vdc... - Page 24 Table 2 Line Mode Specifications Input Voltage Waveform Pure sine wave (utility or generator) Normal Input Voltage 230VAC Low Loss Voltage 90VAC±7V(wide range)170VAC±7V(narrow range) Low Loss Return Voltage 100VAC±7V(wide range)180VAC±7V(narrow range) High Loss Voltage 280VAC±7V High Loss Return Voltage 270VAC±7V Max AC Input Voltage 300VAC Normal Input Frequency...
- Page 25 Table 3 Charge Mode Specifications INVERTER MODEL 3.5KW 5.5KW Charging Algorithm 3-Step Utility Charging Mode 10/20/30/40/50/60/70A/80Amp AC Charging Current =230Vac) Flooded Battery 29.2VDC 58.4VDC Bulk Charging Voltage AGM / Gel Battery 28.2VDC 56.4VDC Floating Charging Voltage 27.0VDC 54.0VDC Charging Curve Max.
- Page 26 Table 4 Inverter Mode Specifications Normal DC voltage Waveform Pure sine wave Output voltage range 230VAC±5% Output frequency 50/60Hz±1Hz Peak Efficiency ≥93% Power factor 10s@110%~130% load , 5s@130%~200% load, Overload protection 200ms@≥200% load 10ms typical (narrow range) Transfer time 20ms typical (wide range) Low voltage protection;...
-
Page 27: Installation Dimension Drawing
8.Installation Dimension Drawing Unit:mm NOTE: The following picture is only a schematic diagram of the equipment .If the actual chassis does not conform to the schematic due to a structural upgrade, it is subject to prior notice.
Need help?
Do you have a question about the Helios III Series and is the answer not in the manual?
Questions and answers