Table of Contents
Advertisement
Available languages
Available languages
EN
Kits – FS34H90 & FS34H
Leak Detection & Automatic Water Shut-off System
Installation and Operating Manual
Congratulations on your purchase of a Floodstop electronic water leak detection and automatic water shut-off kit
for washing machines. This product has been designed to give you years of reliable service and minimize home
water damage by detecting water leaks and automatically shutting off the water supply.
To ensure proper installation and to maximize the performance of your Floodstop water leak detection system,
please read this manual thoroughly.
PLEASE READ CAREFULLY BEFORE PROCEEDING: If a leak is detected, the Floodstop Valves will shut off the water
going to the washing machine. This will stop the continuous flow of water from the water supply valve to the
washing machine. However, all or some of the water that is already in the washing machine and hoses may still
leak out onto the floor.
NOTE: This unit was shipped with an installation and operating manual that contains important information about
its operation. If you are installing this unit for use by others, we recommend you leave this manual – or a copy of
it – with the user.
Washing Machine Kit
FEATURES:
• Control Panel has easy to read, lighted function buttons
• AC Power with battery backup – For continued operation in the event of power outages
• Solid brass, full port motorized ball valves for dependable, long lasting performance
• Valves automatically shut-off the water supply when a leak is detected
• Automatic monthly maintenance cycling of the valves to ensure reliable operation
• Valves can be opened and closed with the touch of a button
• Activates an audible alarm when a leak is detected
• Mute button to silence the audible alarm
• Can be reset and reused continuously with the touch of a button
• Can be tested at any time with the touch of a button
• Can accommodate additional water leak sensors
• 1 Year Limited Warranty
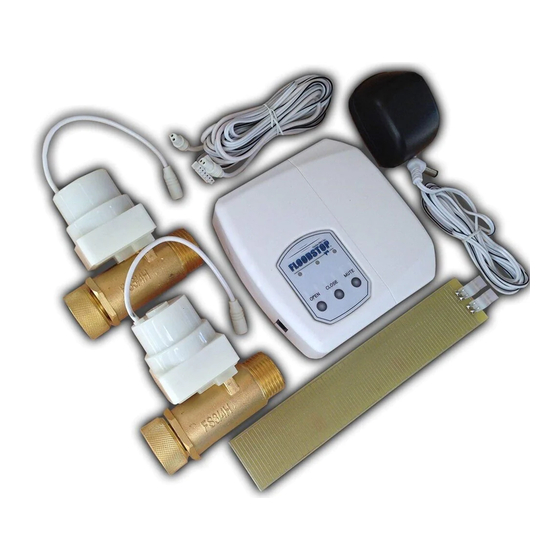
This Package Contains:
A (2) Floodstop Motorized Brass
Valves (3/4" FHT x 3/4" MHT)
B (1) Control Panel
C (1) Leak Sensor with Paper Sleeve
D (1) AC Adaptor
E (1) Wire Harness
F
(1) Hook & Loop Mounting Pad
G (2) Mounting Screws with Anchors
H (1) Pigtail
Check to make sure everything in the package
D
matches the Contents Listing above. Read the
instructions thoroughly before installing or
operating the Floodstop system.
Warning: Do not put finger(s) inside Floodstop
F
Valves. Risk of serious injury may occur. Caution:
Do not grip plastic motor drive for leverage when
tightening Floodstop Valves.
STOP: Read the instructions thoroughly before installing or operating the Floodstop System. The Floodstop
Valves get installed directly to your existing valves. If you are not sure how to install the Floodstop Valves to
your existing water lines, we recommend that you contact a licensed Plumber.
WARNING:
• For use with water only.
• Do not install on gas line.
Installation
1. Shut off the hot and cold valves that supply water to your
washing machine.
2. Remove the hot and cold washing machine hoses from
both valves. Mark the hoses so you know which hose goes
to which valve. NOTE: Do not remove hoses from washing
machine.
3. Your existing hot and cold manual shut-off valves will have
outlets that either face you, or face downward.
A. If the outlets face you: Hand tighten the Floodstop
Valves to the manual shut-off valves so their outlets point
downward as shown in the diagram. Note that a washer
A
has been pre-assembled in each coupling nut.
B. If the outlets face downward: Hand tighten the Floodstop
Valves to the manual shut-off valves so their outlets point
B
sideways as shown in the diagram. Note that a washer
has been pre-assembled in each coupling nut.
4. Hand tighten the hot and cold washing machine hoses to the
correct Floodstop Valve.
E
G
C
H
5. Lightly wrench tighten all connections 1/4 turn, or until snug.
Do not over tighten.
1
6. Turn on the hot and cold manual shut-off valves and check
for leaks.
7. Mount the Floodstop Control Panel in an easily accessible
location within 30 inches of the Floodstop Valves. You may
mount the panel using the screws and anchors, or Hook & Loop
Mounting Pad provided. When using the Hook & Loop Mounting
2
Pad, make sure the adhesive is put on a clean, dry surface.
NOTE: Depending on the location you pick, and the distance
between the hot and cold shut-off valves, you may need to
purchase two (2) Floodstop Control Panel to Valve Extension
Wires, Model #FSACEXT9 (available where you purchased your
Floodstop System).
8. With the contacts of the wire harness connector facing you, plug
the 6-pin connector end of the Wire Harness into the bottom of
the Control Panel.
3A
3B
valve
valve
4
5
6
7
8
6 pin connector
(NO) Output &
Sensitivity Adj
Advertisement
Table of Contents

Related Manuals for Floodstop FS34H90


Summary of Contents for Floodstop FS34H90
- Page 1 STOP: Read the instructions thoroughly before installing or operating the Floodstop System. The Floodstop 5. Lightly wrench tighten all connections 1/4 turn, or until snug. Valves get installed directly to your existing valves. If you are not sure how to install the Floodstop Valves to Do not over tighten.
- Page 2 Paper Sleeve. 2. Pull the plastic motor cover off the Floodstop Valve and slide it down the wire until it stops at the plug. Note • If the Leak Sensor Paper Sleeve is misplaced or becomes unusable, a paper towel can be used in its place.
- Page 3 Floodstop, lea detenidamente este manual. LEA ATENTAMENTE ANTES DE CONTINUAR: Si se detecta una fuga, las válvulas Floodstop cortarán el agua que va a la lavadora. Esto detendrá la corriente continua de agua desde la válvula de suministro de agua hasta la lavadora.
- Page 4 • Una vez al mes, las válvulas Floodstop se cerrarán y abrirán automáticamente por sí solas. El panel de 2. Tire de la cubierta de plástico del motor de la válvula Floodstop y deslícela por el cable hasta que se detenga control está...
- Page 5 Félicitations pour l’achat de votre ensemble de détection électronique des fuites et d’arrêt automatique de l’eau 6. Ouvrez les robinets d’arrêt d’eau chaude et d’eau froide et Floodstop pour les machines à laver. Ce produit a été conçu pour vous donner des années de service fiable vérifiez s’il y a des fuites.
- Page 6 • Débranchez le long câble plat du capteur de fuite et rebranchez-le. pouvez connecter n’importe quel câble à n’importe quelle un petit seau d’eau. Lorsque le capteur de fuite est mouillé, il envoie un signal à la soupape Floodstop pour mais les soupapes Floodstop ne se •...
Need help?
Do you have a question about the FS34H90 and is the answer not in the manual?
Questions and answers
My Floodstop FS3/4H-90 didn't go off when washing machine flooded. Does the thin, cut off white wire go into the tray the washing machine sits in? Is that the sensor? I just put that wire into the tray. It wasn't in there before. Is this the proper set up? Instructions online are very hard to read and deal with, as language switches to default French each time page is turned. Thank you
Yes, the thin white wire is connected to the leak sensor, which should be placed in the tray where the washing machine sits to detect water and trigger shutoff.
This answer is automatically generated