Table of Contents
Advertisement
Quick Links
Contact us:
support@oneuppower.com
ONEUP 360 | User Manual
1. Never disassemble, puncture, shock, damage, or incinerate
the product.
2.Recycle and dispose of ONEUP 360 in accordance with local
laws and regulations.
3. Pay attention to safety when handling the ONEUP 360.
WARNING
4. Children or people with disabilities should use the product
under adult supervision.
Advertisement
Table of Contents

Related Manuals for oneup 360


Summary of Contents for oneup 360
- Page 1 ONEUP 360 | User Manual 1. Never disassemble, puncture, shock, damage, or incinerate the product. 2.Recycle and dispose of ONEUP 360 in accordance with local laws and regulations. 3. Pay attention to safety when handling the ONEUP 360. WARNING Contact us: 4.
- Page 2 2. Never use non-ONEUP parts. ONEUP takes no responsibiliies for any damage caused by the use of non-ONEUP parts. 3. Never install or remove other modules from the ONEUP 360 when it is turned on. DO NOT plug or unplug other modules when the power of the product is turned on, otherwise the power interface may be damaged.
- Page 3 9. DO NOT put the product in a microwave oven or in a pressurized container. 10. DO NOT allow pins, wires, or other metal pieces to enter the ONEUP 360 case, outlets, or controls. Metal pieces may short circuit the product.
- Page 4 ONEUP 360 Usage and Safety Guide Congratulations! You are now an ONEUP 360 user. This brief pamphlet is meant to help you. Please take some time to read it carefully before using the product. NOTICE To turn ONEUP 360 on or off, you need to PRESS and HOLD the ON/OFF System Power Button. To turn on the AC power outlet, you need to PRESS and HOLD the AC Button after turning on ONEUP 360.
-
Page 5: Table Of Contents
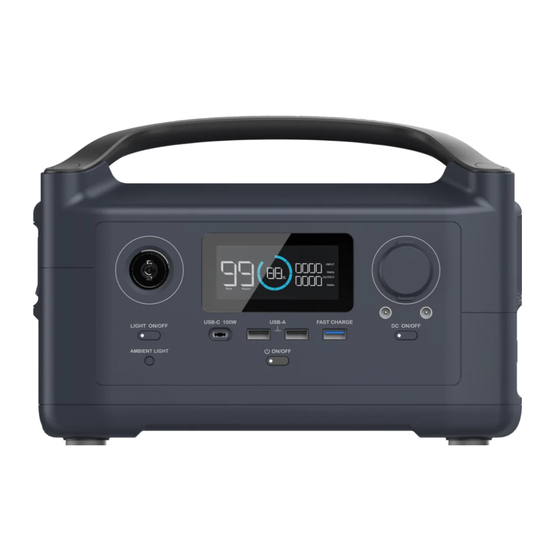
CONTENTS Features of the ONEUP 360 LCD Display Introduction Protection and Error Information Connecting the Solar Panels Entry-Level UPS AC Smart Inverter Mode Technical Specifications How to Recharge ONEUP 360 ONEUP 360 FAQ What’s in the Box... - Page 6 Features of the ONEUP 360 1. LCD Display 2. USB-A Output Ports 3. ON/OFF Button of LED Light 4.Ambient Light Button 5. USB-C 100W Output Port 6. Power Button & LCD Display Screen ON/OFF & Power Indicator 7. DC Output ON/OFF Button (Car Outlet, 2 DC 5521 Output Ports) &...
- Page 7 AC power button. When AC power is not in use to charge a device, press the AC power button to turn off the AC power. Make sure to unplug the power cord from the AC port. When the AC power of the ONEUP 360 is enabled, the AC indicator will light up.
-
Page 8: Lcd Display Introduction
Connect at most two 110W solar panels in parallel to recharge ONEUP 360. ONEUP 360 supports a solar input of 10-25Vdc, 200W, 12A Max. ONEUP 360 supports 12V car charge up to 8A. (Remember to start the engine when you charge via car charge, otherwise, the car battery may be drained.) Do not use the same cigaratte lighter port to charge other devices when... -
Page 9: Protection And Error Information
Shows the current output power of ONEUP 360 in watts. i. Overload Warning The overload icon appears along with a second icon indicating what part of the ONEUP 360 is in an overload condition. Battery Indicator Refers to the Protection and Error Information Section. - Page 10 Protection and Error Information The ONEUP 360 display screen showcases different icons to indicate errors or prompts. Read the infor- mation below to understand the icons and what to do when they appear. Icon(s): USB-A and OVERLOAD icons flash together. What to...
- Page 11 P12.) Icon(s): AC and High-Temperature icons flash together. Inverter High-Temperature What to do: Turn off ONEUP 360 and let it cool down. Then Protection turn System Power On and AC Power On. Icon(s): The AC and Low-Temperature icons flash together.
-
Page 12: Connecting The Solar Panels
1. Connect the solar panel to the MC4 to XT60 Solar Charging Cable. Connect the XT60 connector to the ONEUP 360 XT60 input port to charge the ONEUP 360. Users can connect up to 2 sets of solar panels in parallel to the MC4 port as shown in Example 2. -
Page 13: Entry-Level Ups
ONEUP 360 AC system supports an entry-level UPS function. You can use the ONEUP 360 AC socket while the ONEUP 360 is con- nected to an AC power source (your devices or appliances connected the ONEUP 360 AC sock et will get power from the AC power source, not the ONEUP 360 battery). -
Page 14: Ac Smart Inverter Mode
Entry-Level UPS User Guide Users can connect the AC charging cable of ONEUP 360 to an AC power source, connect a device to ONEUP 360, and turn on the AC switch to automatically enter the entry-level UPS mode. When the AC power source is cut off, power will be supplied from the battery of ONEUP 360 to power your device (as shown below). -
Page 15: Technical Specifications
Technical Specifications General Specs Net Weight 11.9 lbs (5.4kg) Dimensions 11.3 x 7.3 x 7.7 in (28.8 x 18.5 x 19.4 cm) Pack Capacity 360Wh (28.8V, 12.5Ah) Single Cell Equivalent Capacity 100,000mAh @ 3.6V Testing and certification UL, FCC, RoHS, UN38.3 Outputs 600W (Surge 1200W) total, 120Vac, 60Hz AC Output (x3) -
Page 16: How To Recharge Oneup 360
How to Recharge ONEUP 360 ONEUP 360 has an AC charging port and an XT60 charging port located on the side. ONEUP 360 can be charged with a 12V car charger, solar panels, or with AC power. Example 1: AC Charging (330W Max) <2 hrs... -
Page 17: What's In The Box
Please turn off the ONEUP 360 and store it within its recommended use and storage temperature range. If you need to store the ONEUP 360 for a long time, please discharge the ONEUP 360 to 30%, then charge it to 85% every 3 months.
Need help?
Do you have a question about the 360 and is the answer not in the manual?
Questions and answers
Misplaced manuel for 360 need a copy