Advertisement
Quick Links
Advertisement

Related Manuals for Monoprinter Mono2

Summary of Contents for Monoprinter Mono2
- Page 1 Mono2 - Build Platform Calibration (Leveling) Ver. 1.1 Dec. 26, 2017...
- Page 2 MonoWare connection - Launch MonoWare - Go to ‘Printer Setting’ and refresh COM ports - Select a COM port that shows USB-SERIAL CH340. - Baud rate is usually 115200. Don’t need to change. - Press OK button to save and finish the printer setting. - Press Connect button.
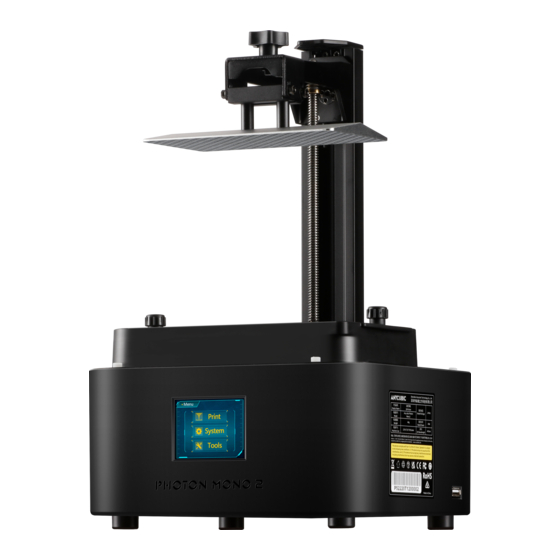
- Page 3 Build platform calibration 1 - Build platform calibration will use above MonoWare buttons - After Mono2 is connected to PC, move the platform upward by 50 mm or higher.
- Page 4 Build platform calibration 2 - There are 3 different kinds of screws on the build platform; 4 x m4 thumb screws (yellow circles above), 2 x m4 hex screws (blue circles), and m5 hand screw at the center (red). - You need to operate these screws one by one : thumb screws(yellow) hex screws (blue) ...
- Page 5 Build platform calibration 3 - Loosen thumb screws. - Loosen hex screws. - Slightly engage the hand screw. - Caution: If you fully unscrew hex screws, the platform may fall down to the vat. Check if the platform is still engaged while loosening the hex screws...
- Page 6 Build platform calibration 4 - Gently tighten the thumb screws (x4). - Press ‘Homing’ button and wait for it is completed - Check if the hex screws are still loose during - Check if the platform is touching down the FEP film tightening the thumb screws.
- Page 7 Build platform calibration 5 - Once the thumb screws are gently locked, the build - Finally tighten the central hand screw platform is not freely movable. Do not force it to - After all screws are tighten, the build platform is move, which makes scratches on the film firmly fixed.
- Page 8 - Now Homing and Build platform calibration is completed. - Move the build platform upward by 70 mm. - Pour resin with 2-3 mm deep for Mono2 resin tank or 5-7 mm deep for Mono1 tank. - With a well calibrated build platform, you can see the aluminum build plate through the bottom glass.
-
Page 9: Troubleshooting
Troubleshooting Q: Why do I need the build platform calibration? A: This is to ensure the platform surface is as parallel as possible with respect to the vat bottom, which is important to the first layer formation. If performed improperly, the first layer might not adhere to the platform, leading to failed prints. - Page 10 Thank you! Send an email at info@monoprinter.com for any questions.
Need help?
Do you have a question about the Mono2 and is the answer not in the manual?
Questions and answers