
Related Manuals for NETASQ U Series


Summary of Contents for NETASQ U Series
- Page 1 TECHNICAL NOTE TECHNICAL NOTE Connectors and cards: U Series Copyright NETASQ 2009 Page 1 of 31 ENTN0901_CONNECTORS-CARDS-U-SERIES...
-
Page 2: Table Of Contents
CENARIO IN WHICH A PORT CARD IS ADDED AFTER A CARD 3 APPENDIX A: UPDATING THE LICENSE ................28 ........................... 28 ETRIEVING THE LICENSE ........................... 30 NSTALLING THE LICENSE GLOSSARY ............................ 31 Copyright NETASQ 2009 Page 2 of 31 ENTN0901_CONNECTORS-CARDS-U-SERIES... -
Page 3: Introduction
TECHNICAL NOTE : INTRODUCTION The majority of U Series appliances have multi-gigabit intrusion prevention and filtering performance abilities. Each of these appliances has been designed to adapt to all types of infrastructures. There are 8 appliance models: U30, U70, U120, U250, U450, U1100, U1500 and U6000. -
Page 4: 1 Presentation Of The Appliances
1. PRESENTATION OF THE APPLIANCES In this chapter, we will be describing the front and rear panels of the U Series appliances. On certain models, the 3 LEDs (from bottom to top) described below will appear on the front panel: 3. -
Page 5: The U30 Appliance
The Status LED will blink (quick blinking every 250 milliseconds) in the event of a major failure of the product (hardware modification, faulty network interface, etc). In this case, do contact your distributor. Copyright NETASQ 2009 Page 5 of 31... -
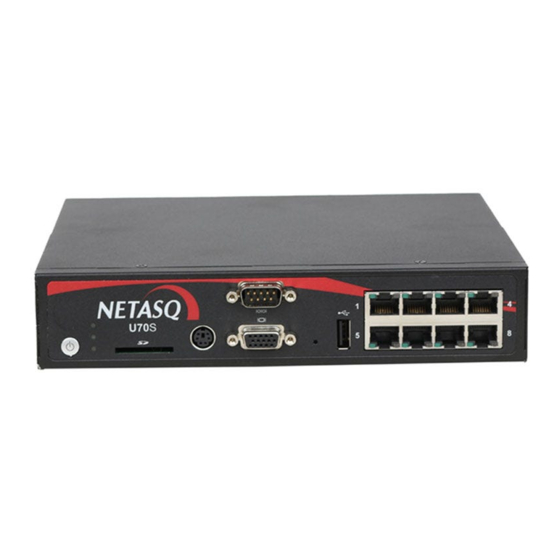
Page 6: The U70 Appliance
Point 2: the Power LED (yellow) indicates that the product has been plugged in but has been shut down. If this is the only LED that lights up, this means that the appliance is off. Copyright NETASQ 2009 Page 6 of 31... -
Page 7: The U120 Appliance
2. LEDs from bottom to top: Power/Status/Online. 3. Serial port: for connecting the firewall directly to a PC or modem. 4. PS2 mini-din port: for connecting a keyboard. 5. VGA port: for connecting a monitor. Copyright NETASQ 2009 Page 7 of 31 ENTN0901_CONNECTORS-CARDS-U-SERIES... -
Page 8: The U250 Appliance
NOTE: power is supplied to this appliance from inside the rear panel. An upgrade to version 8.0 is recommended. The U250 appliance has the following characteristics: Throughput of 850 Mbits/s. 400,000 concurrent connections. 6 Gigabit interfaces. 8,500 new sessions per second. Copyright NETASQ 2009 Page 8 of 31 ENTN0901_CONNECTORS-CARDS-U-SERIES... - Page 9 One or two blinking LEDs on an IN interface indicate the presence of network activity. NOTE: power is supplied to this appliance from inside the rear panel. An upgrade to version 8.0 is recommended. Copyright NETASQ 2009 Page 9 of 31 ENTN0901_CONNECTORS-CARDS-U-SERIES...
-
Page 10: The U450 Appliance
2 seconds). This means that the appliance is in passive mode. Points 3, 4 and 5: these different ports enable access to the appliance in console mode. Copyright NETASQ 2009 Page 10 of 31... -
Page 11: The U1100 Appliance
The product is running when the Power LED and the Status and Online LEDs (green) are visible. Point 2: When the appliance is restarting, shutting down or being updated, the Status LED will light up. Copyright NETASQ 2009 Page 11 of 31... -
Page 12: Rear Panel
(when the orange indicator is on) until the On line indicator goes off. To turn on the firewall, simply press lightly on this button. The U1500 appliance has the following characteristics: Throughput of 3,800 Mbits/s. 1,200,000 concurrent connections. 10 Gigabit interfaces. Copyright NETASQ 2009 Page 12 of 31 ENTN0901_CONNECTORS-CARDS-U-SERIES... -
Page 13: Front Panel
For an appliance configured in high availability, the Online LED will light up intermittently (for every second it lights up, it will go off for 2 seconds). This means that the appliance is in passive mode. Copyright NETASQ 2009 Page 13 of 31... -
Page 14: Rear Panel
To turn on the firewall, simply press lightly on this button. The U6000 appliance has the following characteristics: Throughput of 5,000 Mbits/s. 2,500,000 concurrent connections. 6 to 24 Gigabit interfaces. 40,000 new sessions per second. Copyright NETASQ 2009 Page 14 of 31 ENTN0901_CONNECTORS-CARDS-U-SERIES... -
Page 15: Front Panel
The U6000 firewall has 2 additional indicators – a temperature indicator and a power supply indicator. If a unit is not receiving any power supply, the power supply indicator will light up. If a fan is faulty, the temperature indicator will light up. Copyright NETASQ 2009 Page 15 of 31 ENTN0901_CONNECTORS-CARDS-U-SERIES... -
Page 16: Rear Panel
13. Slot for one 0-channel RAID card. WARNING When one of the power supply units is no longer working, an alarm will go off. Likewise, the alarm will go off if only one power cable is plugged in. Copyright NETASQ 2009 Page 16 of 31 ENTN0901_CONNECTORS-CARDS-U-SERIES... -
Page 17: Dismantling The Appliance
The warranty will be deemed null and void in the event you dismantle the appliance on your own. A warranty band protects all NETASQ products from being tampered with. If this band is found to have been removed, the warranty will be null and void. -
Page 18: 2 Adding An Additional U6000 Network Card
Rebooting the firewall in console mode. 2.1.1. Authorization Only persons who have attended NETASQ’s Expert training and have obtained such certification issued by the NETASQ Institute are authorized to perform this operation. They must also have the seals. 2.1.2. Warning After the appliance has been dismantled, the warranty remains valid if and only if the person who has performed this operation is NETASQ Expert-certified and has abided by the procedure. -
Page 19: Description Of The Cards
The U6000 appliance has 6 gigabit network ports by default and 3 slots that allow for the insertion of additional network cards. The initial order of the ports is as follows: PCI-E PCI-E PCI-E PCI-X PCI-X QUAD (dmz-1) (dmz-2) (dmz-3) (out) (in) (dmz-4) Copyright NETASQ 2009 Page 19 of 31 ENTN0901_CONNECTORS-CARDS-U-SERIES... -
Page 20: Procedure For Adding A Card
2.2.2 Procedure for adding a card The license has to be updated before an additional network card can be installed on a NETASQ firewall. For further information, please refer to Appendix A at the end of this document. - Page 21 The terms PCI-E and PCI-X refer to the bus technology on the slot. It therefore has to be conformed with in order to add adapted cards to the right slots. (PCI-E PCI express). Copyright NETASQ 2009 Page 21 of 31 ENTN0901_CONNECTORS-CARDS-U-SERIES...
-
Page 22: Adding Apci-Enetwork Card
The diagram below illustrates how a 6-port network card should be inserted. PCI-E PCI-E PCI-E PCI-X PCI-X QUAD (dmz-5) (dmz-6) (dmz-1) (dmz-7) (dmz-2) (dmz-8) em10 (dmz-3) (dmz-9) em11 (out) (in) (dmz-4) (dmz-10) Copyright NETASQ 2009 Page 22 of 31 ENTN0901_CONNECTORS-CARDS-U-SERIES... -
Page 23: Adding Apci-Xnetwork Card
PCI-E card installed on the product (PCI-X slot). The interfaces for this card will be added after those that are already present, giving each PCI-X card 6 additional ports as a result. WARNING Copyright NETASQ 2009 Page 23 of 31 ENTN0901_CONNECTORS-CARDS-U-SERIES... -
Page 24: Scenarios For Adding Pci-Xcards
6 default ports + 18 extension ports. WARNING The interfaces on the firewall will be renumbered when a PCI-X card is added. As such, the cables connected to these interfaces have to be rearranged accordingly. Copyright NETASQ 2009 Page 24 of 31 ENTN0901_CONNECTORS-CARDS-U-SERIES... -
Page 25: Scenario In Which A 6- Port Pci-Xcard Is Added To A Default Configuration
Initial configuration (dmz-1) (dmz-2) (dmz-3) (dmz-4) (out) (in) PCI-E PCI-E PCI-E PCI-X PCI-X QUAD Final configuration (dmz-1) (dmz-2) (dmz-7) (dmz-3) (dmz-8) (dmz-4) em10 (dmz-9) (dmz-5) em11 (dmz-10) (out) (in) (dmz-6) New Interfaces Copyright NETASQ 2009 Page 25 of 31 ENTN0901_CONNECTORS-CARDS-U-SERIES... -
Page 26: Scenario In Which A 2- Port Pci-Xcard Is Added To A Default Configuration
PCI-E PCI-E PCI-E PCI-X PCI-X QUAD Initial configuration (dmz-1) (dmz-2) (dmz-3) (dmz-4) (out) (in) PCI-E PCI-E PCI-E PCI-X PCI-X QUAD Final configuration (dmz-1) (dmz-3) (dmz-4) (dmz-6) (dmz-2) (dmz-7) (out) (in) New Interfaces Copyright NETASQ 2009 Page 26 of 31 ENTN0901_CONNECTORS-CARDS-U-SERIES... -
Page 27: Scenario In Which A 6- Port Pci-Xcard Is Added After Apci-Ecard
(dmz-12) (dmz-18) (dmz-2) em14 em20 (dmz-7) (dmz-13) (dmz-19) (dmz-3) em15 em21 (dmz-14) (dmz-20) (dmz-8) (dmz-4) em16 em22 em10 (dmz-15) (dmz-21) (dmz-9) (dmz-5) em17 em23 em11 (dmz-16) (dmz-22) (out) (in) (dmz-10) (dmz-6) Copyright NETASQ 2009 Page 27 of 31 ENTN0901_CONNECTORS-CARDS-U-SERIES... -
Page 28: 3 Appendix A: Updating The License
Once you have acquired a network card, you will need to update your product with the license that will allow you to use this card. Please refer to the procedure below to find out how to update your product license: Step 1 : Go to NETASQ’s website at www.netasq.com Step 2 : Go to the menu CLIENTS-PARTNERS\Secure-Access Areas. - Page 29 Step 3 : Click on “License mangement”. You will then see a list of all the NETASQ UTM products registered in this area. Select the product for which you wish to retrieve the license, by clicking on the product’s serial number.
- Page 30 Click on the License… button in order to insert the license that you have downloaded from the NETASQ website. Select the downloaded license in order to insert it into the NETASQ UTM product.
-
Page 31: Glossary
It operates on a serial interface, thus enabling a much higher bandwidth than on a bus that operates on a parallel interface. PCI-X (Peripheral Component Interconnect eXtended). This is an add-on interconnection bus that is secondary to a PCI-E. Copyright NETASQ 2009 Page 31 of 31 ENTN0901_CONNECTORS-CARDS-U-SERIES...
Need help?
Do you have a question about the U Series and is the answer not in the manual?
Questions and answers