Table of Contents
Advertisement
Quick Links
installation ManUal
ZX60 & ZX100 commercial solar lighting system
IMPORTANT: Always install the system assembly on the pole before inserting the batteries.
The assembly system should never be manipulated when the batteries are installed inside.
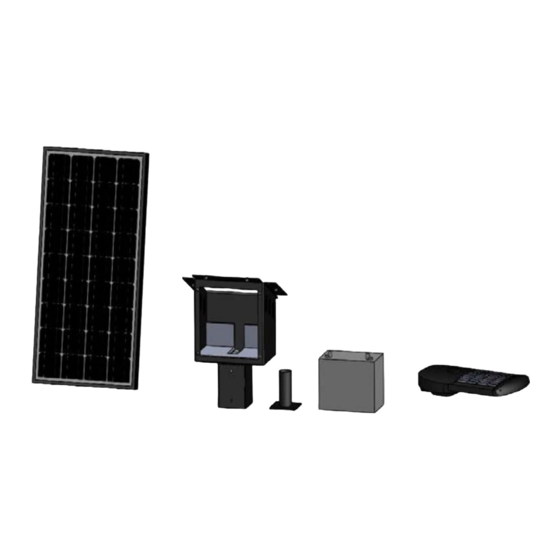
A) Solar module with integrated control system and wiring. (1 per system)
B) Battery main enclosure (1 per system)
C) Battery, 12V (1 per system)
D) Stainless Steel Hardware, 1/4"-20 (ZX60) or 5/16"-18 (ZX100) for system assembly
E) LED Luminaire (12Vdc compatible only)
F) Luminaire mounting tenon (hardware 5/16-18x1" included)
Note : The ZX system operates at 12Vdc. Other voltage will damage system.
ZX SYSTEM COMPONENTS
Solar Vision inc.
Revision 3.0
LIST OF MATERIAL
www.solar-vision.com
ZX FINAL ASSEMBLY
info@solar-vision.com
T. 1-819-729-0450
P.1/10
Advertisement
Table of Contents

Related Manuals for SOLAR VISION ZX60

Summary of Contents for SOLAR VISION ZX60
- Page 1 A) Solar module with integrated control system and wiring. (1 per system) B) Battery main enclosure (1 per system) C) Battery, 12V (1 per system) D) Stainless Steel Hardware, 1/4”-20 (ZX60) or 5/16”-18 (ZX100) for system assembly E) LED Luminaire (12Vdc compatible only) F) Luminaire mounting tenon (hardware 5/16-18x1” included) Note : The ZX system operates at 12Vdc.
- Page 2 ZX60 & ZX100 commercial solar lighting system STEP 1: Using the supplied 1/4”-20 (ZX60) bolts or the 5/16”-18 (ZX100) bolts and hardware (hex bolt, lock washer, flat washer), fasten the battery compartment to the solar module as indicated on the image.
- Page 3 ManUal ZX60 & ZX100 commercial solar lighting system STEP 3: Insert the luminaire power cable located in the battery main enclosure through the 90 deg connector located at the bottom to make it available for the luminaire con- nection. Supplied cable: #16 AWG, 6ft cable length, pre-installed on the control side.
-
Page 4: Storage And Handling
ManUal ZX60 & ZX100 commercial solar lighting system STEP 6: Install the tenon and light at the desired location. Refer to the tenon drawing and luminaire installation guide herein for more details. Avoid having the luminaire illuminate the solar module surface. This would cause synchronization errors as the artificial lighting coming from the luminaire would simulate daylight causing the luminaire to turn ON and OFF every 5 minutes. - Page 5 P.5/10...
- Page 6 P.6/10...
- Page 7 Hardware 1/4-20x1” (4x) included for installing the tenon. Please coordinate drilling holes with your pole manufacturer. P.7/10...
- Page 8 Hardware 5/16-18x1” (2x) included for installing the tenon. Please coordinate drilling holes with your pole manufacturer. P.8/10...
-
Page 9: Installation Instructions
SERIES-H LED STREET LIGHTS INSTALLATION INSTRUCTIONS IMPORTANT SAFEGUARDS When using electrical equipment, basic safety precau�ons should always be followed including the following: READ AND FOLLOW ALL SAFETY INSTRUCTIONS To avoid the possibility of electrical shock, turn off power supply before installa�on or servicing. - Page 10 IMPORTANT DC(Direct Current) based system. STEP 1: DC BASED Make the following Electrical Connec ons: Connect INPUT POSITIVE(+) conductor to RED WIRE posi on FIXTURE WIRING of the terminal block or POSITIVE(+) conductor of LED driver. Connect INPUT NEGATIVE(-) conductor to BLACK WIRE TERMINAL BLOCK posi on of the terminal block or Vin NEGATIVE(-)/DIM (-) POSITIVE(+)
Need help?
Do you have a question about the ZX60 and is the answer not in the manual?
Questions and answers