Table of Contents
Advertisement
Quick Links
Supported Models:
Supported Models:
Supported Models:
ICC Networking Enterprise Gigabit Power-over-Ethernet Switch
ICC Networking Enterprise Gigabit Power-over-Ethernet Switch
ICC Networking Enterprise Gigabit Power-over-Ethernet Switch
Product Model: WX7020-1210G
Product Model: WX7020-1210G
Product Model: WX7020-1210G
WX7020-1210G
WX7020-1210G
WX7020-1210G
Web User Guide
Web User Guide
Web User Guide
Advertisement
Table of Contents

Related Manuals for ICCN WX7020-1210G

Summary of Contents for ICCN WX7020-1210G
- Page 1 Web User Guide Web User Guide Web User Guide Supported Models: Supported Models: Supported Models: ICC Networking Enterprise Gigabit Power-over-Ethernet Switch ICC Networking Enterprise Gigabit Power-over-Ethernet Switch ICC Networking Enterprise Gigabit Power-over-Ethernet Switch Product Model: WX7020-1210G Product Model: WX7020-1210G Product Model: WX7020-1210G...
-
Page 2: Intended Audience
Intended audience This guide is designed to be used by network managers, IT administrators, and technicians who are responsible for installing, networking equipment in enterprise and service provider environments. Knowledge of telecommunication and internet protocol (IP) technologies is assumed. Documentation ®... - Page 3 Table of Content...
-
Page 4: Chapter 1: Product Introduction
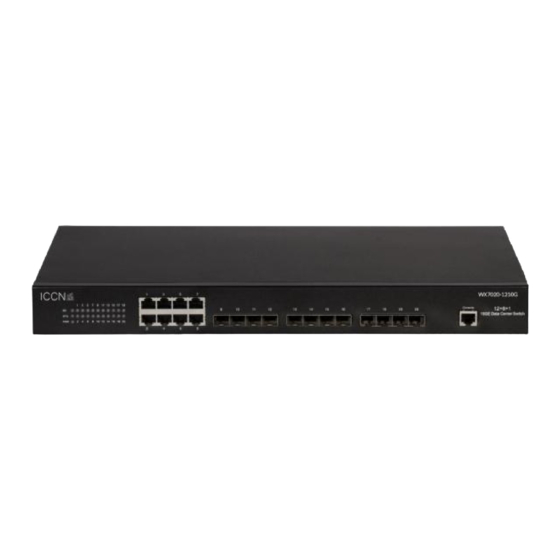
1.1 Product Brief 1.1 Product Brief The ICCN WX7020-1210G features 12 Ports of 10G SFP+ with 8 10/100/1000 Ports for The ICCN WX7020-1210G features 12 Ports of 10G SFP+ with 8 10/100/1000 Ports for The ICCN WX7020-1210G features 12 Ports of 10G SFP+ with 8 10/100/1000 Ports for aggregation and enterprise management. -
Page 5: Chapter 2: Hardware Installation
Chapter 2: Hardware Installation Installation Notice Please follow all safety instructions to ensure proper operation of the Link5010AS-POE, your physical security as well as the on-going warranty of the unit. Environmental Requirements The switch must be installed in a clean area with ample ventilation and free of dust, otherwise, the switch may be damaged by electrostatic adherence. -
Page 6: Temperature And Humidity
Temperature and Humidity The switch installation site should maintain a desirable temperature and humidity. High- humidity conditions can cause electrical resistance degradation or even electric leakage, degradation of mechanical properties and corrosion of internal components. Extreme low relative humidity may cause the insulation spacer to contract, making the fastening screw unsecure. Furthermore, in dry environments, static electricity is liable to be produced and cause harm to internal circuits. -
Page 7: Rack Configuration
frequency strong circuit devices. Provide electromagnetic shielding if necessary. Rack Configuration The dimension of the switch is designed to be mounted on a standard 19’’ rack. Please ensure good ventilation for the rack. Every device in the rack will generate heat during operation, therefore vent and fans must be provided for an enclosed rack, and devices should not be stacked close together. - Page 8 WX7020-1210G Installation Installing the switch into a rack is very simple. The generic switch images demonstrates that you add the switch mount ears to the switch first using the included screws. Once attached, place your switch in the rack and mount with your rack screws (not included).
-
Page 9: Chapter 3: Web User Management
Chapter 3: Web User Management Network administrators can use a simple-to-configure web Graphical User Interface (GUI) to manage and maintain the switch on their network. Login web network management The default Web login process and details are identified below. The default Web login information includes: Username: admin Password: 'there is no password'... - Page 10 Successful Login: Once you've logged in successfully, you'll be greeted by the initial overview page. This page provides a short description of each section of the switch. The overview page is devided into three sections: Navigation Tree - Salmon box Main Data Section - Red box Tab - Green box The Navigation sections are defined for you in the Main Data Section so you can quickly find the...
-
Page 11: Chapter 4: Introduction To The Navigation Menu
Chapter 4: Introduction to the Navigation Menu System: Consider the System selection as the central starting point of your new 10G switch. You can always start your navigation at the System page and select any number of features from the Navigation on the left or the Tab at the top of the page. --- General Use the General screen to display descriptive information about the switch, or for quick system identification. - Page 12 --- Default Priority --- Time UsetheTimemenutomanuallysetthesystemclock,ortoautomaticallyconfigure the clock through SNTP servers. --- Console Using the console page to setup parameters of the console terminal.
-
Page 13: Default Priority
--- Default Priority --- Web Manager The Web Manager navigation gives you the ability to set your web session time out and refresh rates. You might consider changing these parameters if you tend to be logged into the switch for long periods of time while doing other tasks. -
Page 14: Cpu Utilization
--- Default Priority --- User Manager User management provides the ability to add different users by type of access method such as Console, Telnet, Web GUI, and Privileged Password. To edit a user's access to a specific type of method you need to follow the below instructions for each method. - Page 15 --- Default Priority --- Memory Status Use the Memory Status page to display memory utilization parameters --- File Use the File menu to transfer runtime code or configuration settings, or to configure the automatic upgrade function.
- Page 16 --- Default Priority --- Reset Use the Reset page to restarts the switch immediately, at a specified time, after a specified delay, or at a periodic interval. Reset will power cycle the switch while keeping current settings Save will save all current settings Factory Default Settings, Reboot will reset the switch to it's original factory default setting.
-
Page 17: Chapter 5: Introduction To The Tab Menu
--- Default Priority Chapter 5: Introduction to the Tab Menu The menu table across the top of the web user interface is a very useful tool intended for use by novice as well as experienced network engineers. The Tab Menu starts with the System interface which provides a detailed navigation and definition of each feature and its location. -
Page 18: Green Ethernet
--- Default Priority Interface The first tab on the menu is Interface. Interface provides configuration access for ports, power, features, and a host of other statistics. For example, Port Configuration is simple of clicking General in the left Navigation menu while on the Interface Tab. - Page 19 --- Default Priority --- Statistics Use the Statistics page to show Interface, Etherlike, and RMON port statistics. --- Chart Use the Chart page to show Interface, Etherlike, and RMON port statistics in graphic form.
- Page 20 --- Default Priority -- Trunk Use the Trunk menu to configure static or dynamic trunks, or to display statistics on network traffic. --- Static Use the Static page to create a trunk, add port members, and configure connection parameters. First you must decide on the Trunk ID by selecting 1 - 32 and click the 'ADD' button/ Once selected you can then decide on what type of Hash you'd like to use per trunk.
- Page 21 --- Default Priority As you select the Hash type you can continue to add more Trunks and the ports that belong to them. --- Mirror Use the Mirror screen to set the source and destination ports for mirroring. Note: the Mirror feature supports one-to-one and one-to-many mirroring.
- Page 22 --- Default Priority Traffic Segmentation The Traffic Segmentation feature enables traffic segmentation globally in the unit. The feature can also be used to configure the Uplink/Downlink ports for a segmented group of ports...
- Page 23 --- Default Priority VLAN Use the VLAN menu items to configure VLAN-related functions. You can Configure, Modify, or Edit VLAN by selecting the drop down box next to 'Action.' --- Static Use the Static screen to create VLAN groups, and to specify VLAN attributes per VLAN, interface, or interface range.
- Page 24 --- Default Priority Once you've selected the various VLAN features including ports, frame types, filtering, tagged or untagged, etc. you then select 'Apply' at the bottom to save your VLAN configurations for that VLAN ID. Once all your VLAN details are entered you can edit each one by selecting the Edit function in the Action dropdown menu.
- Page 25 --- Default Priority --- Protocol Use the Protocol page to create a protocol group, and map a group to a VLAN. --- IP Subnet Use the IP Subnet page to map IP subnet traffic to a VLAN.
- Page 26 --- Default Priority --- MAC-Based Use the MAC-Based page to map traffic with a specified source MAC address to a VLAN.
- Page 27 --- Default Priority MAC Address Use the MAC Address menu to enable MAC address learning, configure static entries in the address table, and set the timeout for dynamically learned entries. --- Static Use the Static page to configure static entries in the address table. --- Dynamic UsetheDynamicpagetosetsthetimeoutfordynamicallylearnedentries,and display dynamic entries in the address table.
- Page 28 --- Default Priority Spanning Tree Use the Spanning Tree menu to configure the Spanning Tree Algorithm. --- STA Use theSTA pagetoconfigureglobalandinterfacesettingsforSTP,RSTPand MSTP. ---MSTP Use the MSTP page to configurethe VLAN and priorityfor an MST instance,add VLAN members for an MST instance, and to configure interface settingsfor an MST instance.
-
Page 29: Loopback Detection
--- Default Priority --- Loopback Detection Use the Loopback Detection page to configure Loopback Detection parameters. -
Page 30: Rate Limit
--- Default Priority Traffic Use the Traffic menu to configure various traffic content control and data handling functions. --- Rate Limit Use the Rate Limit page to sets the input and output rate limits on a per port basis. --- Storm Control Use the Storm Control page to set the broadcast storm threshold for each interface. - Page 31 --- Default Priority --- Priority Use the Priority menu to configure parameters for handling priority tags. Use the Default Prioritypage to set the default priorityfor each port or trunk. --- Queue UsetheQueuepagetoSetthequeuemodefortheswitch;ortosettheservice weight for each queue that will use weighted or hybrid mode.
- Page 32 ---PHB Queue Use the PHB to Queue page to map internal per-hop behavior values to hardware queues. --- VoIP The VoIP page allows you to: 1. Configure auto-detection of VoIP traffic, set the Voice VLAN, and VLAN aging time. 2. Map the OUI in the source MAC address of ingress packets to the VoIP device manufacturer.
-
Page 33: Access Control List (Acl)
Security Use the Security menu to control management access to the switch, access to connected users, or to restrict access to specific packet types of traffic flows. --- Access Control List (ACL) Use the ACL page to configure the time to apply an ACL, add an ACL based on IP or MAC address filtering, and bind a port to the specified ACL. -
Page 34: Arp Inspection
--- ARP Inspection Use the ARP Inspection page to enable inspection globally, configure validation of additional address components, and set the log rate for packet inspection; to enable ARP inspection on specified VLANs; to set the trust mode for ports, and set the rate limit for packet inspection. --- Port Security Use the Port Security page to configure per port security, includingstatus, response for a security breach, and the maximum allowed MAC addresses. -
Page 36: Ip Source Guard
---IP Source Guard Use the IP Source Guard menu to filter IP traffic based on static entries in the IP Source Guard table, or dynamic entries in the DHCP Snooping table. --- Port Configuration Use the Port Configuration page to enable IP source guard and select filter type per port. --- Static Binding Use the Static Binding page to add a static addresses to the source-guard binding table. -
Page 37: Dynamic Binding
--- Port ARP Cache Set the per port ARP cache based on your policy requirements. --- Dynamic Binding Dynamic bind connections. - Page 38 Administration The Administration tab allow you to perform administration tasks including: Configure logging of error messages LLDP SNMP Configuring device management clusters The Log Configurations on the Navigation tree allows control of the logging of error messages, including the type of events that are recorded in the switch memory, logging to a remote System Log (syslog) server, and displays a list of recent event messages.
- Page 39 ---LLDP Use the LLDP page to configure: Global LLDP timing parameters Set the message transmission mode Enable SNMP notification, set the LLDP attributes to advertise Display general information about the local device or display information about a remote device connected to a port on this switch.
- Page 40 --- Cluster Use the Cluster page to group switches together to enable centralized management through a single unit. ICC Networking WP6000 Series Web User Guide...
- Page 41 Use the IP tab menu to ping another network device, or to configure an IPv6 management address. Use the General menu to access general IP functions. --- Ping Use the Ping page to ping another network device. --- IP Use the IP page to set the IPv4 address management access. ICC Networking WP6000 Series Web User Guide...
- Page 42 Service Use the IP Service menu to configure DNS and DHCP snooping. ---DHCP detection The use of Snooping enabled DHCP snooping in the global scope, MAC address validation information option setting information policy; enable DHCP snooping a VLAN; set the trust model for an interface.
-
Page 43: Igmp Snooping
Multicast Use the Multicast menu to configure IGMP snooping and Multicast VLAN Registration. --- IGMP Snooping Use the IGMP Snooping menu to configure IGMP snooping and query parameters. --- General Use the General page to enable multicast filtering, and configure parameters for multicast snooping. --- Multicast Router Use the Multicast Router page to assign ports that are attached to a neighboring multicast router. -
Page 44: Igmp Member
--- IGMP Member Use the IGMP Member page to statically assign multicast addresses to the selected VLAN. --- Interface Use the Interface page to configure IGMP snooping per VLAN interface. ICC Networking WP6000 Series Web User Guide... -
Page 45: Forwarding Entry
--- Forwarding Entry UsetheForwardingEntrypagetodisplaythecurrentmulticastgroupslearned through IGMP snooping. ICC Networking WP6000 Series Web User Guide... - Page 46 WARRANTY STATEMENT ® All IcXchange hardware, excluding fans and internal power supplies, is under warranty for the life of the product and 2 years after the product is End-of-Life. Fans and internal power supplies are not included in the lifetime warranty and are covered by a warranty period of five (5) years. ®...
- Page 47 FINANCIAL LOSS ARISING OUT OF OR IN CONNECTION WITH THE SALE, INSTALLATION, MAINTENANCE, USE, PERFORMANCE, FAILURE, OR INTERRUPTION OF ITS PRODUCTS, EVEN IF ICC OR ITS AUTHORIZED DISTRIBUTOR OR RESELLER HAS BEEN ADVISED OF THE POSSIBILITY OF SUCH DAMAGES. THE MAXIMUM LIABILITY OF ICC UNDER THIS WARRANTY IS LIMITED TO THE PURCHASE PRICE OF THE PRODUCT COVERED BY THIS WARRANTY.
- Page 48 ICC Networking ICC Networking ICC Networking 11801 Pierce St., 2nd FL 11801 Pierce St., 2nd FL 11801 Pierce St., 2nd FL Riverside, CA 92505 Riverside, CA 92505 Riverside, CA 92505 www.iccnetworking.com www.iccnetworking.com www.iccnetworking.com ® ® ® © 2019 International Communications Corporation, Inc. (DBA: ICC Networking). All Rights Reserved. Printed in U.S.A. activeARC ©...
Need help?
Do you have a question about the WX7020-1210G and is the answer not in the manual?
Questions and answers