Table of Contents
Advertisement
Quick Links
Advertisement
Table of Contents

Related Manuals for J.Sikora REFERENCE


Summary of Contents for J.Sikora REFERENCE
- Page 1 Uncompromising and Extreme Audio Solutions REFERENCE Turntable Manual...
- Page 2 J.Sikora – REFERENCE Turntable Manual Dear Customer Thank you very much for your trust and for your purchase of a J.Sikora turntable. Please read this manual carefully before assembly and first use of your table. Please do not disassemble any of the electronic parts of the product;...
-
Page 3: Table Of Contents
J.Sikora – REFERENCE Turntable Manual Contents General Information – REFERENCE Turntable ..................4 Weight and Dimensions ........................4 REFERENCE Box contents: ....................... 5 Unpacking ............................6 Turntable Setup ............................7 Set the Isolation Base .......................... 7 2.1.1 Place the Isolation Base ....................... 7 2.1.2... -
Page 4: General Information - Reference Turntable
J.Sikora – REFERENCE Turntable Manual 1 General Information – REFERENCE Turntable 1.1 Weight and Dimensions Total weight: 115 kg (253 lbs) Platter weight: 18 kg (40 lbs) Motor [pcs.]: 4 DC Speeds available: 331/3, 45 rpm Dimensions [WxDxH]: 560 x 560 x 380 mm (22 x 22 x 15inches) -
Page 5: Reference Box Contents
1 x set of silver-colored hex wrenches 1 x black hex wrench for adjusting fee 1 x set of J.Sikora Monogramed Coasters (3) (North American models only) 1 x precision bubble level (North American models only) 1 x pair of white gloves (North American models only) -
Page 6: Unpacking
J.Sikora – REFERENCE Turntable Manual 1.3 Unpacking Your REFERENCE turntable ships in three boxes. Be careful, all of the boxes are very heavy! Motors, Arm Tower(s), & Accessories Platter, Main Bearing, & Power Supply Isolation Base Any additional Arm Towers, accessories, tonearms, and cartridges will be packaged separately. All elements of the turntable are packed safely to protect them against damage in transport. -
Page 7: Turntable Setup
The Isolation Base is heavy, so if you place the Legs directly on your shelf, it may well scratch the shelf. So, a set of leather J.Sikora Coasters are included for you to set under the Legs of the Chassis during the setup process to avoid damaging the shelf. -
Page 8: Add Isolation Feet
J.Sikora – REFERENCE Turntable Manual Adjustable Legs Place the coasters in the approximate position where you would like to Legs to sit. Ideally with the help of another person, slowly lower the Isolation Base onto the Coasters. Once on the Coasters, gently slide the Isolation Base to its desired location. -
Page 9: Level The Isolation Base
J.Sikora – REFERENCE Turntable Manual Bearing Feet Now, place one of the Bearings into the indent on the top of each Disc to create the assembled Feet. You will now place one of each of the Feet under each Leg of the Isolation Base. - Page 10 J.Sikora – REFERENCE Turntable Manual Even if you leveled your shelf, sometimes the weight of the Isolation Base can impact the leveling of your furniture. Center the included Bubble Level on the plinth to determine if your table is level in all directions (front to back and side to side).
-
Page 11: Place Templates
J.Sikora – REFERENCE Turntable Manual 2.2 Place Templates To achieve the exceptional performance of your REFERENCE turntable is capable of, the table’s four Motors and Spindle Assembly must be precisely placed on the Isolation Platform. The included plastic Templates provide a guide for placing these elements. - Page 12 J.Sikora – REFERENCE Turntable Manual Align Here Align Here Align Here Next, place the other Template felt-side-down onto the left-hand side of the Isolation Base. Link the two Templates so that same numbers facing one another (e.g., “1” faces “1”).
-
Page 13: Place The Spindle Assembly
Assembly, realign the Template with the edges of the Isolation Base. 2.4 Place the Motors Your REFERENCE turntable uses four high-torque Motors to rotate the Platter. All four of the Motors are the same. You will now place each of the motors into the Template cut-outs as shown below. In this example, we arbitrarily started with the left side and added the motors in a clockwise manner. -
Page 14: Remove The Templates
J.Sikora – REFERENCE Turntable Manual Route the each Motor’s Umbilical cables from the rear of the Motor to the rear of the Isolation Base. Do NOT plug the Motors into jacks on the back of the Base now. You will do that later. - Page 15 J.Sikora – REFERENCE Turntable Manual Next, place the small ceramic ball in the indentation. Note from image below that no gloves were worn in this step. It is too difficult to place the Bearing while wearing gloves. Also the Bearing Oil will permanently stain the gloves.
- Page 16 J.Sikora – REFERENCE Turntable Manual Now coat the Ball Bearing and the entire Bearing with a thin layer of oil. You do not need a lot of oil, but you do want to cover the whole Bearing. Should you get grease on anything other than the bearing, use the provided Cleaning Cloth to remove any excess grease.
-
Page 17: Placing The Platter
J.Sikora – REFERENCE Turntable Manual Placing the Platter Once again, we encourage you to enlist a friend to place the platter. It is very heavy. Carefully align the opening in the middle of the Platter with the Bearing. Gently place your platter over the Bearing. - Page 18 J.Sikora – REFERENCE Turntable Manual Check to see that the platter spins without any resistance by rotating the platter by hand. The Platter should spin freely. If there is any resistance, repeat this step. © 2021 Notable Audio Products | www.notableaudio.com...
-
Page 19: Place The Glass Mat
J.Sikora – REFERENCE Turntable Manual 2.8 Place the Glass Mat Warning! Be careful with the mat—the glass section can break if it is dropped, struck, or overly-stressed. Damage caused by any of these conditions is not covered under warranty. The Mat is supplied in two parts: the aluminum Center Disc and the outer Glass Disc. -
Page 20: Mount The Drive Belts
Belt. J.Sikora uses square belts for improved strength and stability. Because the Belts are square, they can become twisted when they are but in place. Be sure to remove all twists for the table to work optimally. - Page 21 J.Sikora – REFERENCE Turntable Manual Keep rotating the platter and removing any twists until you see that the belt is flat against the platter. Repeat this procedure for the other three Motors. You will know when all of the belts are flat when the belts are fairly evenly spaced on the platter.
-
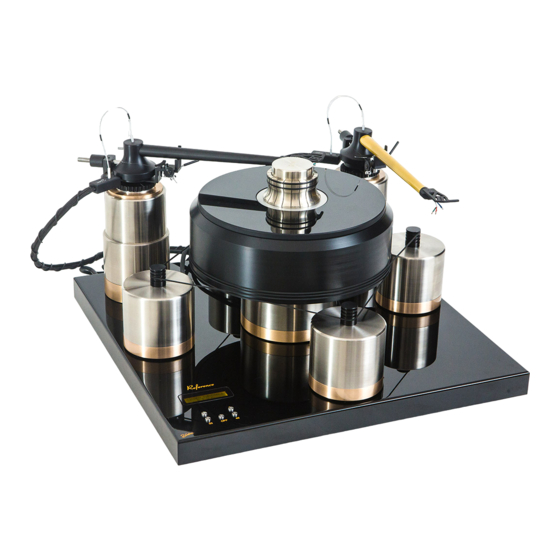
Page 22: Place Arm Tower
J.Sikora – REFERENCE Turntable Manual 2.10 Place Arm Tower The REFERENCE turntable comes with one Arm Tower to support one tonearm. You may order up to two more Arm Towers, for a total of three tonearms. Tonearm Insert Insert Set Screw... - Page 23 If you are not an expert in the precess on aligned a tonearm and cartridge, we suggest you seek the professional services of your J.Sikora dealer. Below is a image of a completed Reference turntable with two J.Sikora KV12 tonearms. © 2021 Notable Audio Products | www.notableaudio.com...
-
Page 24: Re-Level Your Turntable
J.Sikora – REFERENCE Turntable Manual 2.12 Re-Level Your Turntable It is possible that the additional weight of the turntable may have caused your shelf to shift. Now is a good time to re-level your turntable using the included bubble level. This manual may seem like a stuck record, but we cannot emphasize enough the importance of proper leveling. -
Page 25: Connect The Motors
J.Sikora – REFERENCE Turntable Manual 2.13 Connect the Motors It is now time to the plug in the Motors into the bank of power jacks on the back left corner of the Isolation Base. Motor Power Jacks The connector at the DIN plug of the Motor’s Umbilical Cable can only fit one way. Be careful to properly orient the pins of the DIN connector and do not force the cable. -
Page 26: Connect Power Supply
J.Sikora – REFERENCE Turntable Manual 2.14 Connect Power Supply The North American version of the REFERENCE turntable comes standard with the Reference Power Supply. This power supply both cleans the incoming power and outputs a precise 24 VDC to the table’s Motor Controller. -
Page 27: Using Your Turntable
Congratulations on a fine job of setting-up your table. Now it is time to enjoy it! 3.1 Powering On / Off The toggle power button for your turntable is located on the front of the Reference Power Supply. Input Voltage... - Page 28 Some records with warps may not lie flat against the Mat. In most cases, a good tonearm and cartridge will still track the record properly. To help flatten the record and improving tracking, J.Sikora has included a small Clamp O-Ring that you can place at the bottom of the spindle.
-
Page 29: Starting / Stopping The Turntable
J.Sikora – REFERENCE Turntable Manual Placing Clamp Ring over Mat Some people prefer the sound of using the O-Ring for all their records, even if the records are flat. This a matter of personal taste, but worth trying for yourself. -
Page 30: Getting Your Turntable Settled
J.Sikora – REFERENCE Turntable Manual Decrease Speed Increase Speed Button Button 3.5 Getting Your Turntable Settled After being set-up, your Turntable needs a few days to fully settle in. Once the grease spreads evenly inside the bearing, it will stay this way for several years. The drive belts also need time to stretch to the optimum length and tension. -
Page 31: Properly Maintaining Your Table
4 Properly Maintaining Your Table 4.1 Bearing Replace the J.Sikora bearing grease every 2 years. Remember to be very careful when handling the grease, as it can stain the turntable’s finish. Wipe the old grease off the bearing with a disposable, soft, lint-free cloth. -
Page 32: Limited Warranty Conditions
• Shipping damage • Electrical surges or acts of nature 1. If any defects are found in the materials or workmanship of this J.Sikora product within the warranty period, the unit will be repaired or replaced by J.Sikora or its authorized agent.
Need help?
Do you have a question about the REFERENCE and is the answer not in the manual?
Questions and answers