Advertisement
Available languages
Available languages
Owners Manual
Assembly Instructions
CRAWFISH BOILER
Models: LCBR90 • LCBR150
WARNING
READ INSTRUCTION MANUAL BEFORE ATTEMPTING TO ASSEMBLE
OR OPERATE THIS PRODUCT.
Adult assembly required. Keep screws and parts out of reach of children.
KEEP THIS MANUAL FOR FUTURE REFERENCE.
LCBR90-LCBR150 • Cart Boiler • IM • 061521
Advertisement

Related Manuals for LOCO COOKERS LCBR90


Summary of Contents for LOCO COOKERS LCBR90
- Page 1 Models: LCBR90 • LCBR150 WARNING READ INSTRUCTION MANUAL BEFORE ATTEMPTING TO ASSEMBLE OR OPERATE THIS PRODUCT. Adult assembly required. Keep screws and parts out of reach of children. KEEP THIS MANUAL FOR FUTURE REFERENCE. LCBR90-LCBR150 • Cart Boiler • IM • 061521...
- Page 2 Equipped for use on: Propane • Extinguish any open flame. Main Max. Input Rating: • If odor continues, keep away from the MODEL LCBR90 = 73,000 BTU/H appliance and immediately call your fire department. MODEL LCBR150 = 146,000 BTU/H Failure to follow these instructions could Certified under ANSI Z21.89 - CSA 1.18-2017...
-
Page 3: Table Of Contents
TABLE OF CONTENTS Warnings 1, 3-6 Parts Diagram Parts and Hardware List Assembly Instructions/Features 9-11 Operating Instructions 12-14 Care and Maintenance Troubleshooting Warranty Information lococookers.com... -
Page 4: Warnings
WARNINGS SAVE THESE INSTRUCTIONS • THIS APPLIANCE IS NOT FOR FRYING the appliance. Do not operate when under the TURKEYS. THIS APPLIANCE IS ONLY influence. INTENDED FOR HEATING WATER . . . NOT • When cooking, always have a Type BC or ABC OIL OR GREASE. - Page 5 When removing food from the appliance, care shall be taken LCBR90 to avoid burns from hot cooking liquids. Once food is removed from cooking vessel, do not Burner allow vessel to boil dry.
- Page 6 WARNINGS: LP TANK 5. When the appliance is not in use, the gas DANGER must be turned off at the supply cylinder. 1. Do not store a spare LP gas cylinder 6. Storage of an appliance indoors is permissible only if the cylinder is under or near this appliance.
- Page 7 WARNINGS: LP TANK LP TANK FILLING: LP Tank Leak Test Procedure: • Use only licensed and experienced dealers. • Use a clean paint brush and a 50/50 soap and water solution. • LP dealer must purge tanks before filling. • Use mild soap and water. Do not use •...
-
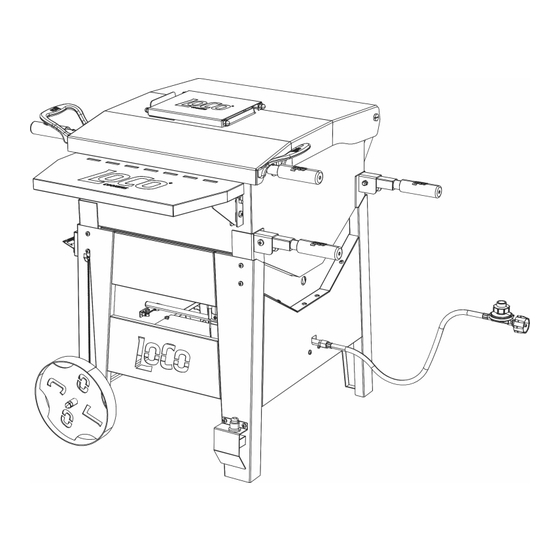
Page 8: Parts Diagram
PARTS DIAGRAM NOTE: Wash all parts that will come into contact with food with warm soapy water. Rinse and towel dry. LCBR90 LCBR150 Contact customer service if any parts are missing, damaged or if replacement parts are needed. customerservice@lococookers.com • lococookers.com... -
Page 9: Parts And Hardware List
PARTS LIST Part # Description Qty Part # Description Wheel Axle Lid Hatch Match Holder Lid Handle Cart Handle Basket Regulator/Hose Assembly Basket Handle AA Battery Lid Support SureSpark Ignitor Folding Front Shelf Ignitor Cover Cart Base with Legs Jet Burner Assembly Wheel Electrode Bottle Opener... -
Page 10: Assembly Instructions/Features
ASSEMBLY INSTRUCTIONS Open lid to rest on lid support. - Page 11 ASSEMBLY INSTRUCTIONS Slide Press lococookers.com...
- Page 12 ASSEMBLY INSTRUCTIONS Positive (+) end of battery faces upward. Boiler Features Folding Front Shelf Bottle Opener Large 1.5” Drain Valve Slots for LoCo’s Crazy Spoon Storage Brackets (sold separately) Supports basket for hands-free draining and clean-out. Ideal for LoCo’s Crazy Spoon or Crazy Spoon wooden stirring paddles.
-
Page 13: Operating Instructions
OPERATING INSTRUCTIONS CONNECTING REGULATOR TO LP TANK: 2. Completely open LP tank valve by turning hand wheel counterclockwise. If you hear 1. Place LP tank on a secure, level and stable a rushing sound turn gas off immediately. surface. This means there is a major leak at the 2. - Page 14 OPERATING INSTRUCTIONS 3. Ensure a CAUTION minimum of If ignition does not occur in 5 seconds, 24 inches turn the regulator control knob OFF, wait 5 (61 cm) minutes, then repeat the lighting procedure. separate If the burner does not light with the regulator the LP tank control knob on, or if the flame goes out after and the...
- Page 15 OPERATING INSTRUCTIONS DISCONNECTING REGULATOR FROM LP BOILING YOUR FOOD: TANK: Once the water comes to a rolling boil, wear 1. Turn regulator control knob protective gloves to prevent burns or scalding counterclockwise to the OFF position. while adding food to the basket. After food has been added, the approximate time for the water 2.
-
Page 16: Care And Maintenance
CARE AND MAINTENANCE PROPER CARE AND MAINTENANCE WILL 6. Confirm that all components are completely KEEP YOUR APPLIANCE OPERATING dry before using or placing in storage. SMOOTHLY. CLEAN THOROUGHLY AFTER 7. It is recommended to thoroughly clean the EVERY USE. appliance prior to every use. -
Page 17: Troubleshooting
TROUBLESHOOTING PROBLEM POSSIBLE CAUSE SOLUTION Burner will not light. Bad connection between the Make sure the regulator regulator and LP tank. coupling nut is fully tightened on the LP tank valve. The LP tank is empty. Refill LP tank at an authorized dealer or purchase new filled LP tank. -
Page 18: Warranty Information
WARRANTY INFORMATION The appliance has been manufactured under the highest standards of quality and workmanship. We warrant to the original consumer/purchaser that all aspects of this product will be free of defects in material and workmanship for one (1) year from the date of purchase. A replacement for any defective part will be supplied free of charge for installation by the consumer. - Page 19 LEA EL MANUAL DE INSTRUCCIONES ANTES DE INTENTAR MONTAR U OPERAR ESTE PRODUCTO. Requiere montaje de adultos. Mantenga los tornillos y las piezas fuera del alcance de los niños. GUARDE ESTE MANUAL PARA REFERENCIA FUTURA. LCBR90-LCBR150 • Carro hervidor • IM • 061521...
- Page 20 Principal máx. Valor nominal de entrada: El incumplimiento de estas instrucciones MODELO LCBR90 = 73 000 BTU/H podría provocar un incendio o una explosión MODELO LCBR150 = 146 000 BTU/H que podría causar daños a la propiedad, Certificado bajo ANSI Z21.89 - CSA 1.18-2017...
- Page 21 ÍNDICE Advertencias 1, 3-6 Diagrama de las piezas Lista de piezas y tornillería Instrucciones/características de montaje 9-11 Instrucciones de funcionamiento 12-14 Cuidado y mantenimiento Resolución de problemas Información de garantía lococookers.com...
- Page 22 ADVERTENCIAS GUARDE ESTAS INSTRUCCIONES • ESTE APARATO NO ES PARA FREÍR PAVOS. • Cuando cocine, siempre tenga a mano un extintor de ESTE APARATO SOLO ESTÁ DISEÑADO PARA incendios tipo BC o ABC. CALENTAR EL AGUA. . . NO USAR ACEITE NI •...
- Page 23 Una vez que la comida se retira del LCBR90 recipiente de cocción, no permita que el recipiente hierva hasta que se seque. Quemador •...
- Page 24 ADVERTENCIAS: TANQUE LP 6. El almacenamiento de un aparato en interiores PELIGRO solo está permitido si el cilindro se desconecta y se retira del mismo. 1. No almacene un cilindro de gas LP de repuesto debajo o cerca de este aparato. 7.
- Page 25 ADVERTENCIAS: TANQUE LP LLENADO DE TANQUES LP: Procedimiento a prueba de fugas del tanque • Use solo distribuidores autorizados y con experiencia. • Use un pincel limpio y una solución de agua y jabón 50/50. • El distribuidor de LP debe purgar los tanques antes de llenarlos.
- Page 26 DIAGRAMA DE LAS PIEZAS NOTA: Lave todas las piezas que entrarán en contacto con los alimentos con agua jabonosa tibia. Enjuague y seque con una toalla. LCBR90 LCBR150 Póngase en contacto con el servicio al cliente si faltase alguna pieza, si estuviese dañada o si necesita piezas de repuesto.
- Page 27 LISTA DE PIEZAS Pieza Descripción Cant. Pieza Descripción Cant. n°. n°. Tapa Eje de la rueda Trampilla de la tapa Portafósforos Asa de la tapa Asa del carro Canasta Conjunto de regulador/manguera Manija de la canasta Batería AA Soporte de la tapa Encendedor SureSpark Estante frontal plegable Cubierta del encendedor...
- Page 28 INSTRUCCIONES DE MONTAJE Abra la tapa para que descanse encima del soporte de la tapa.
- Page 29 INSTRUCCIONES DE MONTAJE Deslizar Presionar lococookers.com...
- Page 30 INSTRUCCIONES DE MONTAJE El extremo positivo (+) de la batería mira hacia arriba Características del hervidor Estante frontal plegable Abridor de botellas Válvulas de drenaje grande de 1,5” Ranura para la cuchara crazy de Soportes de LoCo almacenamiento (se vende por separado) Soporta la canasta para el escurrido y la limpieza manos...
- Page 31 INSTRUCCIONES DE FUNCIONAMIENTO CONEXIÓN DEL REGULADOR AL TANQUE LP: 2. Abra completamente la válvula del tanque LP girando la manivela en sentido antihorario. Si oye 1. Coloque el tanque LP en una superficie segura, un sonido de ráfaga, cierre el gas inmediatamente. nivelada y estable.
- Page 32 INSTRUCCIONES DE FUNCIONAMIENTO 3. Asegúrese PRECAUCIÓN de que un Si no se produce el encendido en 5 segundos, mínimo de apague la perilla de control del regulador, espere 24 pulgadas 5 minutos y luego repita el procedimiento de (61 cm) encendido.
- Page 33 INSTRUCCIONES DE FUNCIONAMIENTO REGULADOR DE DESCONEXIÓN DEL TANQUE LP: CÓMO HERVIR SU COMIDA: 1. Gire la perilla de control del regulador en sentido Una vez que el agua hierva, use guantes protectores antihorario a la posición OFF (apagado). para evitar quemaduras o escaldaduras mientras agrega alimentos a la canasta.
- Page 34 CUIDADO Y MANTENIMIENTO UN CUIDADO Y MANTENIMIENTO ADECUADOS obstrucciones están despejadas, la manguera MANTENDRÁN SU APARATO FUNCIONANDO del regulador se puede conectar al tubo del SIN PROBLEMAS LIMPIE A FONDO DESPUÉS DE quemador. CADA USO 6. Confirme que todos los componentes estén NOTA: Limpie todo el aparato cada año y apriete completamente secos antes de usarlos o todos los accesorios 1-2 veces al año o más,...
- Page 35 RESOLUCIÓN DE PROBLEMAS PROBLEMA CAUSA POSIBLE SOLUCIÓN El quemador no se enciende. Mala conexión entre el regulador y Asegúrese de que la tuerca de el tanque LP. acoplamiento del regulador esté completamente apretada en la válvula del tanque LP. El tanque LP está vacío. Vuelva a llenar el tanque LP en un distribuidor autorizado o compre un tanque LP nuevo lleno.
- Page 36 INFORMACIÓN DE GARANTÍA El aparato ha sido fabricado bajo los más altos estándares de calidad y mano de obra. Garantizamos al consumidor/comprador original que todos los aspectos de este producto estarán libres de defectos materiales y de mano de obra por un (1) año a partir de la fecha de compra. Se proporcionará un reemplazo para cualquier pieza defectuosa sin cargo para la instalación por parte del consumidor.
Need help?
Do you have a question about the LCBR90 and is the answer not in the manual?
Questions and answers