Advertisement
Quick Links
Advertisement

Related Manuals for RavensBlight THE GHOST HOUSE

Summary of Contents for RavensBlight THE GHOST HOUSE
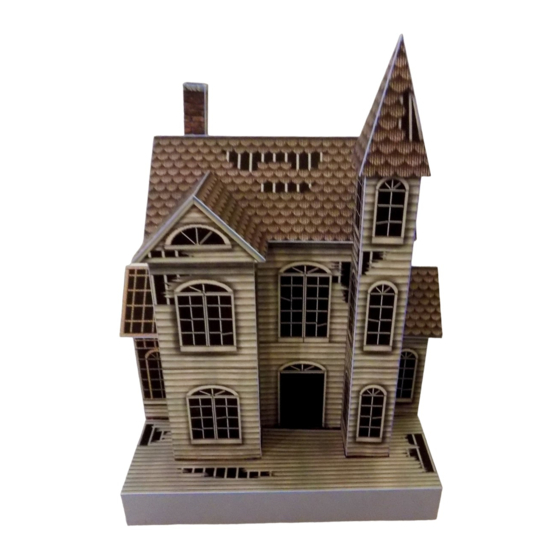
- Page 1 THE GHOST HOUSE – ASSEMBLY INSTRUCTIONS page1. (CONTINUED ON NEXT PAGE)
- Page 2 THE GHOST HOUSE – ASSEMBLY INSTRUCTIONS page2. WHAT YOU'LL NEED: Scissors, Elmer's glue (or a glue stick), and a ruler or other straightedge. An X-acto knife is helpful but not required. Also, a black marker is handy to darken any unwanted white edges on the various parts.
- Page 3 THE GHOST HOUSE – ASSEMBLY INSTRUCTIONS page3. HOUSE ASSEMBLY: Begin by cutting out the HOUSE FRONT on Page 1. Cut between the two tabs with yellow dots to separate them. Fold all four triangular tabs DOWNWARD. Fold the wall panels DOWNWARD along the blue line and UPWARD along the green line.
- Page 4 THE GHOST HOUSE – ASSEMBLY INSTRUCTIONS page 4. Place the roof in position (with the arrow on the bottom pointing towards the front of the house) and glue in place. This can be a little tricky, but it helps to use a large drop of glue on each corner, let it dry till it’s tacky, place the roof in position and...
- Page 5 THE GHOST HOUSE – ASSEMBLY INSTRUCTIONS page 5. The Ghost House has a solarium on the left side and a library on the right. They will both be constructed in the same way. We’ll start with the Solarium. Cut out the SOLARIUM on Page 7.
- Page 6 THE GHOST HOUSE – ASSEMBLY INSTRUCTIONS page 6. Now’s a good time to add the front doors. Cut out the DOOR LEFT and DOOR RIGHT on Page 3. For each door, fold the wall panel UPWARD along the green line and then fold the outer door panel DOWNWARD along the blue line. Glue the outer door panel to the back of the inner door panel to make a two sided door.
- Page 7 THE GHOST HOUSE – ASSEMBLY INSTRUCTIONS page 7. Next cut out the LEFT PORCH RAILS on Page 11. Remove the two white areas (you may want to use an X-acto knife for this). At the top of the white areas are two ledge panels.
- Page 8 THE GHOST HOUSE – ASSEMBLY INSTRUCTIONS page 8. Now cut out the AWNING on page 11. Fold the two rail panels UPWARD along the green lines. Fold DOWNWARD along the blue line between the two shingle panels. Fold DOWNWARD between the shingle panel and the triangular wall panel (along the blue line).
- Page 9 THE GHOST HOUSE – ASSEMBLY INSTRUCTIONS page 9. Next we’ll add the fence. Cut out the LEFT FENCE on Page 17. Fold the two end tabs DOWNWARD and then fold DOWNWARD along the blue line between the two fence panels. Glue the two fence panels together. The outside panel is the one with brick along the bottom and the inside panel is the one without brick along the bottom.
- Page 10 THE GHOST HOUSE – ASSEMBLY INSTRUCTIONS page 10. Remove the LAMP POST from Page 15 by cutting around the outside black lines. Fold DOWNWARD along the blue center line and then fold UPWARD along both green lines. Glue the two lamp panels together, but don’t glue the bottom panels (with the dark rectangles) together.
Need help?
Do you have a question about the THE GHOST HOUSE and is the answer not in the manual?
Questions and answers