Advertisement
Quick Links
Advertisement

Related Manuals for Nexar HaloCam


Summary of Contents for Nexar HaloCam
- Page 1 WELCOME TO The Complete Package for Safety & Video Evidence START HERE!
- Page 2 In this manual, we’ll show you how to install the HaloCam in your vehicle and connect it to the Nexar app for the safest driving experience possible. Let’s go! support@getnexar.com...
- Page 3 App Store (iPhone) or Google Play (Android) Open the app, register, and enable all necessary settings when prompted. Be sure to enable Location Services so Nexar can automatically start and stop when you start and stop driving Do you share your car? If so, make sure each driver downloads Nexar and connects to the camera.
-
Page 4: Package Contains
PACKAGE CONTAINS HaloCam Holder USB charger USB power cable Installation tool Micro SD card Cable clips support@getnexar.com... -
Page 5: Assembling The Camera
ASSEMBLING THE CAMERA Insert micro SD card into the micro SD slot on the camera until you hear a click Insert the holder into the holder slot on the camera and slide to lock in place (The SD card may be pre-slotted for you) Remove sticker from camera lens Hold camera with lens facing downwards... - Page 6 ACTIVATING THE CAMERA IN YOUR VEHICLE Connect the charging cable to the camera’s POWER port support@getnexar.com...
- Page 7 Plug the USB charger into your vehicle’s power socket Plug the other end of the charging cable into the USB charger Start your vehicle. You should see a green light indicating that the camera is powered on, and a blue blinking light indicating that the camera is waiting to be paired...
- Page 8 Open your iPhone’s settings Wi-Fi Tap on WiFi Connect to the WiFi network DIRECT-Nexar (5G) that begins with ‘DIRECT-Nexar (5G)’ Enter password: 12345678 Don't worry, your cellular data is still available The blue indicator light on the camera should now be steady...
- Page 9 DO YOU HAVE AN ANDROID? Open the Nexar app Tap the menu button in the top left corner Tap Settings Tap External camera After a few seconds, the camera and your phone will connect automatically The blue indicator light on the camera should...
- Page 10 INSTALLING THE CAMERA IN YOUR VEHICLE sticker lens towards the road windshield Open Nexar and tap the car icon (for Android) or the Drive button (for iPhone) Wait a few moments for your camera’s feed to show up in the Nexar app Before sticking your camera to the windshield, make sure it has a clear view of the road.
- Page 11 Location to ‘Always’. Then go to the settings screen inside the app and turn on ‘Auto start drive’. On Android - Go to Nexar’s settings menu in the app, and make sure ‘Auto start rides’ is on. Also, make sure your phone’s GPS is on.
- Page 12 HOW TO HIDE THE CAMERA’S CABLE Watch the video: nxr.cm/hidecables Sit in the passenger seat With one hand, gently pull downthe edge of the fabric at the top of the windshield With your other hand, use two fingers or the installation tool to insert the cable behind the ceiling fabric You can use the cable clips provided if you prefer 12 |...
- Page 13 Open the passenger-side door Insert the cable into the door’s seal from top to bottom Bring the cable behind the glove compartment Insert the remaining cable under the passenger-side floor mat Bring the cable as close to the power socket as possible, and connect the cable to the USB charger | 13...
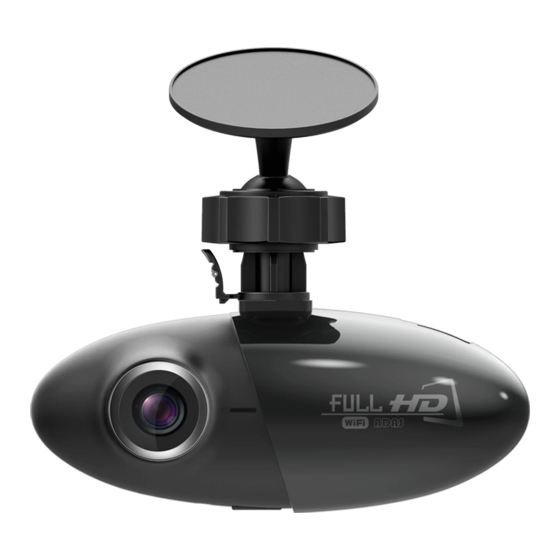
- Page 14 STRUCTURE & BUTTONS Rear camera port Heat dissipation holes Holder slot Reset button POWER port Camera lens Speaker Power indicator light WiFi indicator light Microphone Power button Micro SD card slot Heat dissipation holes 14 | support@getnexar.com...
- Page 15 Additional Info: Note: The camera will turn on and off automatically when you start and stop your vehicle. Indicator Lights: 1. Green light on: camera powered on and active 2. Red light blinking: firmware upgrading 3. Blue light blinking: camera waiting for a connection 4.
-
Page 16: Drive Safely
When you use our free app and a Nexar-ready dash cam, you join a safe driving network of vehicles. As more drivers in your area join this network, Nexar will start warning you of dangers on the road ahead.
Need help?
Do you have a question about the HaloCam and is the answer not in the manual?
Questions and answers