
Related Manuals for genourob ROTAM

Summary of Contents for genourob ROTAM
- Page 1 Instruction for use of the ROTAM DIAGNOSTIC INSTRUMENT FOR PERIPHERALS LIGAMENTS AND ANTERIOR LIGAMENTS INJURIES...
-
Page 2: Table Of Contents
4.2. Connections ..............................6 4.3. Installation of protect connections ........................6 5. ROTAM SOFTWARE..............................7 5.1. ROTAM software installation on a PC ......................7 5.2. First used of the software ..........................8 5.3. Tab patient record ............................8 5.4. Tab preparation test ROTAM ........................... 9 5.4.1 Automatic mode ............................ -
Page 3: Introduction
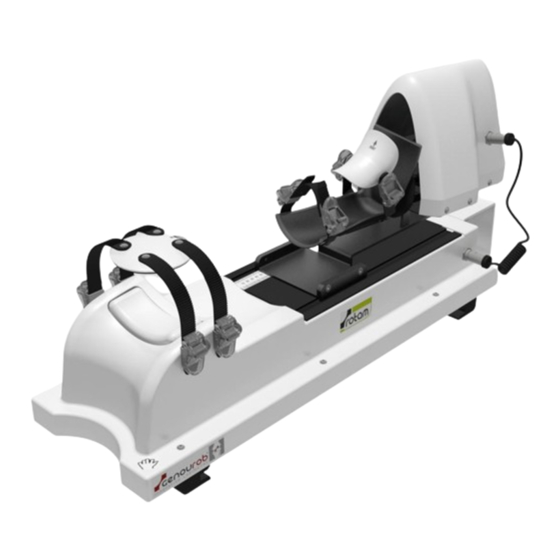
LNE G'MED 1. INTRODUCTION The ROTAM is a device which allows diagnosis of complete or partial failures of the anterior crossed ligament of the knee and associated ligaments. The principle of the device is to lead a rotation effort of the tibia relative to the femur and to measure the resistance of knee ligaments at this opposite rotation. -
Page 4: Description Of The Device
A motor and rotation sensors rotation module A protect Patella attachment with connections straps Force sensor A 2m cable to connect the ROTAM to the electric An USB-A/USB-B cable An emergency power supply (1,80m) stop button Electrodes cable A 1.7m mains power cable... -
Page 5: Installation Guide
4.1.2 Installation of the ROTAM The ROTAM must be on an examination table in order to place easily the legs on this device. The patient must be lie down on the table and put his head on the headrest (optimal relaxation). -
Page 6: Connections
LNE G'MED 4.2. Connections Connect the power supply cable to the ROTAM then connect the PC to the device using the USB cable. Connect the power supply bloc to the sector (tension 100- 240 V ~ 2 A 50/60 Hz). -
Page 7: Rotam Software
You have the possibility, if you wish, to install ROTAM software on a PC. The computer and the USB cable associated to the ROTAM and on which will be installing the ROTAM software, must be accord to the norm EN 60950-1. -
Page 8: First Used Of The Software
Entreprise certifiée ISO 13485 : 2016, NF EN ISO 13485 : 2016 par le LNE G'MED F/ Wait for the software installation G/ The window « Installation complete » opens, click on Close 5.2. First used of the software At the launch of the software the following window shows up : By default, the «... -
Page 9: Tab Preparation Test Rotam
5.4. Tab preparation test ROTAM This tab will allows you to set and to start a test. -
Page 10: Automatic Mode
5.4.2 Information This display allows you to follow in real time the saved sets by the ROTAM during the test: - Left torque: left ligament resistance - Right torque: right ligament resistance - Rotation: leg rotation angle - Tighten: tightening force of the knee 05ROTAM FT02.008 C EN... -
Page 11: Controls
Entreprise certifiée ISO 13485 : 2016, NF EN ISO 13485 : 2016 par le LNE G'MED 5.4.3 Controls This module allows you to launch the ROTAM test and doing a reset of the programme after a loss of connection software. 5.4.4 Connections This module allows you to connect the software to the ROTAM. -
Page 12: The Graph
The button « Delete » allows you to delete definitively all the marked test data. The deletion is irreversible. The button « PDF Report » allows you to generate a PDF file with the marked tests and the correspondent graph. Reports can be found in “My Documents\PDF Genourob” ... -
Page 13: Configuration Tab
Default practitioner name: e n t e r here the name of the practitioner who primarily use the ROTAM. It’s this name which is found in the tab « Patient record » when a new patient is saved in the data. -
Page 14: Information
Entreprise certifiée ISO 13485 : 2016, NF EN ISO 13485 : 2016 par le LNE G'MED 5.5.2 Information All the information indicated here will appear on the impression. Picture Path: Enter in the "image path" field: the image to print. The image must have a size of 795 x 80 pixels in the case of portrait or 1135 x 80 pixels in the case of the landscape. -
Page 15: Utilisation Guide
It removed the patient’s clothes legs. Explain to the patient the operation of the ROTAM to avoid the patient surprise during the test, during the forced rotation of the tibia relative to the femur. This is so the test is done under the best relaxation conditions. - Page 16 Entreprise certifiée ISO 13485 : 2016, NF EN ISO 13485 : 2016 par le LNE G'MED The foot rests on the adjustable boot 1.2 Fasten the knee-cup on the patella Locating the positions of the patella and the TTA and fix the patient’s leg.
- Page 17 Entreprise certifiée ISO 13485 : 2016, NF EN ISO 13485 : 2016 par le LNE G'MED 1.3 Fasten the foot in the support and take the measurement Adjust the position of the support (boot) until the heel fits snugly ...
- Page 18 Launch the tests, at least twice, at 3, 5 and 8 Nm (if possible) Note: the tightness is shown in real time under 'ROTAM status' and must be identical for a particular patient for each test 05ROTAM FT02.008 C EN...
- Page 19 Entreprise certifiée ISO 13485 : 2016, NF EN ISO 13485 : 2016 par le LNE G'MED To validate the ROTAM test we apply the following principles: - The initial tightening should be the same (to +/- 10%) of the healthy side / pathological side (or on...
- Page 20 Release the patient In case of malfunction, notify GENOUROB ® at once so they can carry out the necessary maintenance. Do not forget to unbolt the emergency stop button to make the other tests Then, unplug the power supply from the power box of the ASTEC DPS 55M.
-
Page 21: Safety Instructions And Precautions For Use
BE CAREFUL, do not place your fingers around the boot to avoid pinching. - The ROTAM has been created for a functional time of 5 minutes maximum, follow by a rest time of 15 minutes minimum. -
Page 22: Transporting The Rotam
Entreprise certifiée ISO 13485 : 2016, NF EN ISO 13485 : 2016 par le LNE G'MED - Le ROTAM ne doit pas être utilisé adjacent ou empilé à d’autres équipements. Si cet usage est nécessaire, une vérification de bon fonctionnement du ROTAM dans cette configuration est à réaliser. -
Page 23: Maintenance And Recycling
Any damage to the device should trigger maintenance such as a broken pad, a damaged cable… In such events, phone GENOUROB ® on + 3 3 243 904 301 f r o m 9am to 18p m , Monday to Friday or send an email to the following address: contact@genourob.com... -
Page 24: Appendix I : Manufacturer's Declarations
Entreprise certifiée ISO 13485 : 2016, NF EN ISO 13485 : 2016 par le LNE G'MED 11. APPENDIX I : MANUFACTURER’S DECLARATIONS Electromagnetic emissions The ROTAM is intended for use in the electromagnetic environment specified below. Users should ensure that it is used in such an environment Emissions test Compliance... - Page 25 Entreprise certifiée ISO 13485 : 2016, NF EN ISO 13485 : 2016 par le LNE G'MED Electromagnetic immunity The ROTAM is intended for use in the electromagnetic environment specified below. Users should ensure that it is used in such an environment Compliance level...
- Page 26 WARNING: RF portable communication devices (including peripherals such as antenna cables and external antennas) should not be used closer than 30 cm (12 inches) to any part of the ROTAM device, including cables specified by the manufacturer. Otherwise, the performance of these devices may be impaired.
- Page 27 Entreprise certifiée ISO 9001 : 2008, ISO 13485 : 2003, NF EN ISO 13485 : 2004 par le LNE G'MED 05ROTAM FT02.008 B...
Need help?
Do you have a question about the ROTAM and is the answer not in the manual?
Questions and answers