
Related Manuals for genourob GNRB

Summary of Contents for genourob GNRB
- Page 1 ® GNRB NSTRUCTIONS FOR USE OF THE DIAGNOSIS INSTRUMENT FOR ANTERIOR LIGAMENT KNEE INJURIES...
- Page 2 Please feel free to send us the results of your tests, along with any comments and suggestion you ® may have concerning the use of the GNRB . This is all part of an ongoing progression to ensure that our device meets as closely as possible the requirements of those who use it.
-
Page 3: Table Of Contents
2. LIST OF MARKING SYMBOLS _________________________________________________________ 6 3. DESCRIPTION _____________________________________________________________________ 7 4. GENERAL SAFETY INSTRUCTIONS _____________________________________________________ 8 5. INSTALLATION GUIDE _______________________________________________________________ 9 5.1. Installation of the GNRB® device __________________________________________________________ 9 5.1.1. Unpacking ________________________________________________________________________________ 9 ® 5.1.2. Installation of the GNRB __________________________________________________________________ 9 5.2. - Page 4 Certified Company ISO 13485 : 2016, NF EN ISO 13485 : 2016 by LNE GMED ® 8. INSTALLATION OF THE GNRB SOFTWARE ONTO A PC ____________________________________ 26 9. INSTRUCTIONS FOR USE ___________________________________________________________ 28 10. Calibration of the device __________________________________________________________ 33 11.
-
Page 5: Introduction
Some arthrometers had begun the analysis of the displacement curves but these devices had the problem of a very bad consistency (manual traction, no parameter setting of the tightening…). The GNRB® is a device which allows the diagnosis of total or partial ruptures of the anterior cruciate ligament of the knee. -
Page 6: List Of Marking Symbols
Admissible air pressure range Keep dry Indicates the direction of the position of the knee and foot cups Type B electromagnetic device Direct current Read instructions for use Alternating current Show where put hands for the transport GNRB FT.02.008 O EN... -
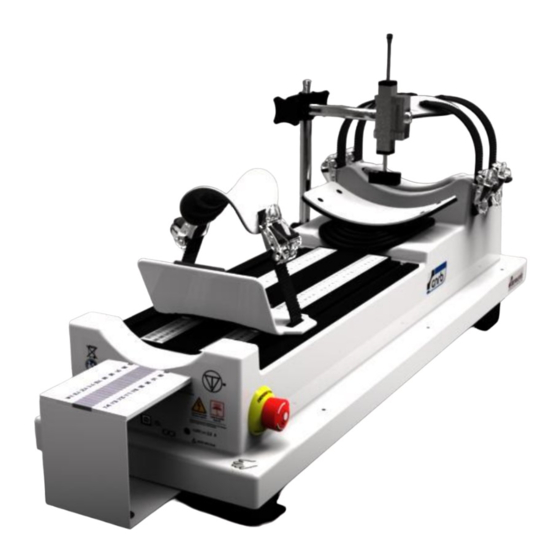
Page 7: Description
It is also composed by : -An USB key for the GNRB software Cable to connect the GNRB to the electric -This instruction manual -A PC together with its power supply cables and user manual power supply (2m) + mains power (1.70m) -
Page 8: General Safety Instructions
GNRB The level of protection against electric shocks of the parts applied to the patient (displacement ® sensor, the curved support under the calf, the leg support and stops) classifies the GNRB as a type B device. -
Page 9: Installation Guide
Certified Company ISO 13485 : 2016, NF EN ISO 13485 : 2016 by LNE GMED 5. INSTALLATION GUIDE 5.1. Installation of the GNRB® device 5.1.1. Unpacking Blocking foam (See first instructions for use) ® 5.1.2. Installation of the GNRB ®... -
Page 10: Connections
Connect the power supply unit to the mains Hz). ® When the GNRB is powered a green light shows. ® When the connections are all made and the GNRB is switched on, switch on the PC. GNRB FT.02.008 O EN... -
Page 11: Using The Gnrb ® For The First Time
6.1. Login GNRB application When the application is launched, the following window appears: “Start GNRB” is activated and allows to login the application. Only the button When you click on this button, the following window appears: The default “Login” and “Password” are admin and admin. You may then create or remove accounts via the configuration page of the application (see «... -
Page 12: First Time Use
LNE GMED 6.2. First time use When you switch on the GNRB for the first time, we recommend that you change the administrator login and password. To do so, go into the “Account management” tab, create a new user by entering their name and password, tick the administrator box and then confirm by clicking on the “Add”... -
Page 13: Description Of The Gnrb ® Software
Certified Company ISO 13485 : 2016, NF EN ISO 13485 : 2016 by LNE GMED ® 7. DESCRIPTION OF THE GNRB SOFTWARE 7.1. Toolbar Located at the top of the screen, the toolbar is used to launch the various commands listed below. -
Page 14: Medical Information
The "Medical Practitioner" box is used for displaying the name of the practitioner ® who is to use the GNRB . This box is automatically filled by the name supplied in “Default Specialist name” located in the configuration tab the box ... -
Page 15: Additional Examinations
click on the following boxes to give the activity level declared by the patient. After having made changes to the “Additional examinations” chart of a patient, you must remember to save the information by clicking on GNRB FT.02.008 O EN... -
Page 16: Gnrb Test Preparation Tab
To connect the computer to the GNRB button. Once the ® connection is established, the name of the port or the USB convertor to which the GNRB is connected appears on the right-hand side. The button is then grey and inoperative. ... -
Page 17: Gnrb Status
Certified Company ISO 13485 : 2016, NF EN ISO 13485 : 2016 by LNE GMED 7.3.3. GNRB status Once connected to the GNRB, this window provides information about the status of the sensors, as well as the previous and current patella pressure readings. ... -
Page 18: Number Of Test Measurements
2 cycles. 7.3.6 Radiology Option When this option is enabled, the GNRB launch one push and the tibia is blocked in high position during 5 s (time needed to take a radio). -
Page 19: The Results Tab
P D F b o t t o m , i f y o u c l i c k ‘ O K ’ . Click on the button 'result / calibration' and then you can see the results of the tests or the calibrations of GNRB tests. “Export All.” : all results are exported in an Excel file GNRB FT.02.008 O EN... -
Page 20: Graphs
LNE GMED 7.4.2. Graphs ® The graphs enable you to view the results of the test selected in the GNRB table. By default, the x axis shows the force exerted under the calf, whilst the y axis shows the corresponding displacement. -
Page 21: Differential Results
(at 100 N, 134 N, 150N and 200N) and the side to side difference of the slopes of the curves (S1 and S2). The application estimates the displacement at 1000N and displays it bellow the results. GNRB FT.02.008 O EN... -
Page 22: Configuration Tab
The default location of the database is C:\LDAcontrol\BDD\LDA.mdb. By entering a different path here, however, you can work with another database. Default GNRB test: allows you to specify the default test used in the “GNRB ® test preparation” tab: 134 N, 250 N. - Page 23 This text will be included at the bottom PDF Report, if you click ‘OK’ -The document is opened, and the file will be recorded in the “My documents” Directory and the sub Directory “PDF Genourob”. “GNRB_[last - The name written in this model Name]_[First Name]_[ID]_[Test Date].pdf...
-
Page 24: Information
PDF file created Header : information printed at the top of the document. Footer : information printed at the bottom of the document. All the information entered here will appear on the printout 7.5.4. Change User GNRB FT.02.008 O EN... - Page 25 The user name and password must be lowercase. Only administrators may access this part. An administrator may delete all the users, in “Administrators”, but cannot delete the last administrator. GNRB FT.02.008 O EN...
-
Page 26: Installation Of The Gnrb Software Onto A Pc
If the installation does not start automatically, please follow the instructions B/ and C/ below. If it does, go on to step D/. B/ Click on setup C/ The “Welcome to GNRB Wizard” window opens automatically. Click on Next. D/ The “Select Installation Folder” window opens. Select “Everyone” and Click on Next. GNRB FT.02.008 O EN... - Page 27 Certified Company ISO 13485 : 2016, NF EN ISO 13485 : 2016 by LNE GMED ® If you do not wish to install the GNRB software in the default location, change the access path in the “Folder” field (click on “Browse”).
-
Page 28: Instructions For Use
LNE GMED 9. INSTRUCTIONS FOR USE There are three distinct stages to using the GNRB (test each leg - healthy and injured) : 1. Securing the leg to the GNRB 2. Recording patient info and starting the tests (two steps 3. - Page 29 Fix the foot in position by tightening both buckles Take the ‘support-foot’ measurement as it appears in the aperture Note: each time a particular patient is tested this value must be the same GNRB FT.02.008 O EN...
- Page 30 134, one at 150 and three at 200N. Note: the tightness is shown in real time under 'GNRB status' and must be identical for a particular patient for each test GNRB FT.02.008 O EN...
- Page 31 Certified Company ISO 13485 : 2016, NF EN ISO 13485 : 2016 by LNE GMED To validate the GNRB test we apply the following principles: - The initial tightening should be the same (to +/- 10%) of the healthy side / pathological side (or...
- Page 32 As the dish is rising, press on the emergency stop button The dish should come back at once to its low position. ® In case of malfunction, notify GENOUROB at once so they can carry out the necessary maintenance.
-
Page 33: Calibration Of The Device
The value of the variance must be between 0 and 0.5 to validate the calibration test. If the calibration results are good, this kind of window should pop up with the following message “Calibration OK” written in green : GNRB FT.02.008 O EN... - Page 34 Certified Company ISO 13485 : 2016, NF EN ISO 13485 : 2016 by LNE GMED If the calibration results are not good, contact GeNouRoB Maintenance: Click on the results you want select: The calibration results in PDF format: GNRB FT.02.008 O EN...
-
Page 35: Safety Instructions And Precautions For Use
This device is only to be used for measuring the laxity of lower limbs. ® The data is only to be interpreted by medical staff trained by an instructor from GENOUROB Do not use this device on patients having undergone an anterior cruciate ligament operation on the knee less than 3 months previously. - Page 36 The GNRB® should not be used adjacent to or stacked with other equipment. If this use is required, a check of proper operation of the device in this configuration is to be performed.
-
Page 37: Transporting The Gnrb
- must be stored in a room where the humidity is between 30% and 70 % 1060 HPa - must be stored under atmospheric pressure between 860 and 1060 HPa 860 Hpa to transport GNRB®, please put your hands where indicated by the labels. GNRB FT.02.008 O EN... -
Page 38: Maintenance And Recycling
: contact@genourob.com ® Then, a maintenance contract will be put in place between GENOUROB and the client. There is a telephone helpline to assist you with any inquiries regarding the use of the software:... -
Page 39: Certifications- Manufacturing And Marketing Dates
The device has been CE certified by LNE-GMED (1, rue Gaston Boissier, 75724 Paris Cedex 15) : 0459 The GNRB® device complies with the EMC and safety standard IEC 60601-1-2 and IEC 60601-1 : certification awarded by the LCIE (33 avenue du Général Leclerc, 92260 Fontenay aux Roses). -
Page 40: Appendix I : Manufacturer's Declarations
Certified Company ISO 13485 : 2016, NF EN ISO 13485 : 2016 by LNE GMED 15. APPENDIX I : MANUFACTURER'S DECLARATIONS Electromagnetic emissions The GNRB is intended for use in the electromagnetic environment specified below. Users should ensure that it is used in such an environment Emissions test Compliance... - Page 41 Certified Company ISO 13485 : 2016, NF EN ISO 13485 : 2016 by LNE GMED Electromagnetic immunity The GNRB is intended for use in the electromagnetic environment specified below. Users should ensure that it is used in such an environment Compliance level...
- Page 42 WARNING: RF portable communication devices (including peripherals such as antenna cables and external antennas) should not be used closer than 30 cm (12 inches) to any part of the GNRB device, including cables specified by the manufacturer. Otherwise, the performance of these devices may be impaired.
Need help?
Do you have a question about the GNRB and is the answer not in the manual?
Questions and answers