
Related Manuals for Duosida SES Series

Summary of Contents for Duosida SES Series
- Page 1 Zhangj agang Uchen New Energy Technology Co.Ltd Att:Jesscia@uchen.com.cn Add : No.999 yongjin road,miaoqiao,tangqiao town, zhangjiagang city,jiangsu province.china 2020-7-22 The Second Edition...
- Page 2 User Manual User Manual SES Series Charager Zhangjiagang Uchen New Energy Technology Co.,Ltd...
- Page 3 User Manual Dear users: Thank you for using our Company’ products. Please read this guide seriously and storage carefully. In order for you to better use and maintain this product, (here in after referred as EV charging station). The EV charger includes the high voltage circuit, low voltage circuit.
-
Page 4: Table Of Contents
User Manual CATALOGUE CATALOGUE Introduction 1 Product appearance and type --------------------------------page 7, 8 2 Product description of appearance 2.1 SES Charger -----------------------------------------page 9 2.2 E-stop and incoming line ------------------------------page 9 4.LED screen & Protect function -------------------------------page10 5.Technical parameters --------------------------------------Page11-17 6.How to charge --------------------------------------------page18 7. - Page 5 Supporting smart charging. Supporting APP smart control (remote start charge, reserving charging, set charging current, display and view charging status, etc. APP’s name is DUOSIDA Charge, you can find it in Google play or apple store.) Remark: smart charging require EV charger containing WiFi modules. WiFi modules are...
- Page 6 User Manual WARNING It's may cause danger and harm, or damage the device if you don't in accordance with safety guide. Electrical and fire risk: Don't use damaged and smudgy charge connector. The electrical system for the connection of the EV charger must be inspected by professional, meet the current requirements of the station, also installed a residual current short circuit (RCB) Don't follow the safety instructions can result in danger and injury, as well as...
-
Page 7: Product Appearance And Type
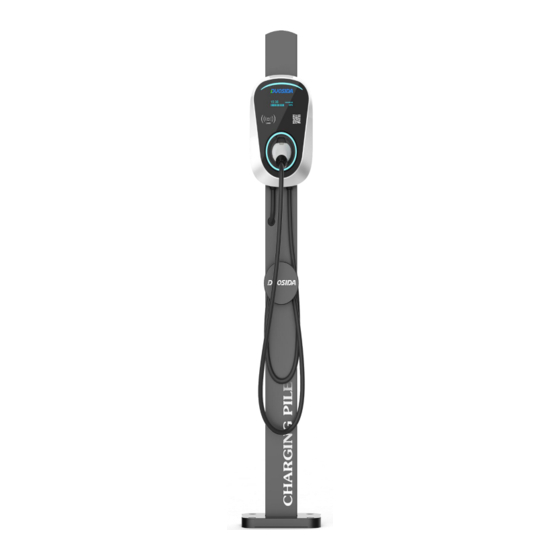
User Manual Brief instruction Product appearance and type SES Charger with cable SES Charger with socket... - Page 8 User Manual IEC Charging Mode: Mode3 Case C IEC Charging Mode: Mode3 Case B Remark: 1 For case B, You need to buy a charging cable separately. 2 (a) Socket-outlet, (b) Plug, (c) Cable, (d) Vehicle connector, (e) Vehicle coupler, (f) Vehicle inlet, (g) Charging station, (h) EV socket-outlet, (i) EV plug.
- Page 9 User Manual Description of appearance Arc status light LED screen Annular status light Socket (2030) Outlet wire (2080) Inlet wire...
- Page 10 User Manual Description of LED screen Voltage Current KW/h Duration Temperature Protection Function Over temperature protect Over current protect Low voltage protect Over voltage protect E-stop switch Leakage current protect Lightning protection E-stop switch Protection Class of Case Indoor and outdoor use...
-
Page 11: Technical Parameters
User Manual Technical parameters The dimensions... - Page 12 User Manual 1.Style - wall mounted Technical specifications: Installation method: wall mounted Maximum power: 22kW Communication interface: (optional) GPRS ■ WIFI ■ RFID Outdoor protection: Without power supply - the waterproof protection grade can reach up to IP55 With power supply-The waterproof protection grade state can reach up to IP54,under coupling state Safety regulation: Meet IEC 61851 and IEC 62196 Operating temperature:...
- Page 13 User Manual 2.Style - Stake Technical specifications: Installation method: stake-type mounted Maximum power: 22kW Communication interface: (optional) GPRS ■ WIFI ■ RFID Outdoor protection: Without power supply - the waterproof protection grade can reach up to IP55 With power supply-The waterproof protection grade state can reach up to IP54,under coupling state Safety regulation: Meet IEC 61851 and IEC 62196 Operating temperature:...
- Page 14 User Manual Charging plug V4-DSIEC2b-EV32P V4-DSIEC2e-EV32P Charging gun : Provide 16A / 32A for choosing Superior protection performance, the protection level reaches IP54 (working state) Certification: CE & TUV...
- Page 15 User Manual Technical parameters (32A) Product type SES-32 Charger with cable SES-32 Charger with socket Rate voltage 400VAC 400VAC The max output current 32A/Phase 32A/Phase Operating frequency 50Hz/60Hz 50Hz/60Hz The max output power 7-22KW 7-22KW Human-computer LED screen LED screen interaction Charging control mode Charge when insert...
- Page 16 User Manual Technical parameters (16A) Product type SES-16 Charger with cable SES-16 Charger with socket Rate voltage 400VAC 400VAC The max output current 16A/Phase 16A/Phase Operating frequency 50Hz/60Hz 50Hz/60Hz The max output power 11KW 11KW Human-computer LED screen LED screen interaction Charging control mode Charge when insert...
- Page 17 User Manual Naming Technical specifications Regulations IEC 61851-1 Charging power mode 3 3KW to 22 kW Nominal voltage 230 V / 400 V / 1/3 AC Rated current to 16 A adjustable from 6 to 32 A in 1 A steps Nominal frequency 50 Hz connection technology...
-
Page 18: How To Charge
User Manual How to charge SES Charger with SES Charger with cable Module Function socket plug and charge ● ● IC card charging RFID module ● ● Smart APP Charging WiFi module ● ● LED screen display LED module ● ●... -
Page 19: How To Use Wifi
User Manual How to use wifi 1 Power on after the EV charger is installed *1:After the charger is turned on, the circular indicator light and the arc indicator light turn red. At this time, the charger needs to be unlocked with the mobile phone APP. 2 Connect to the charger 2.1 In to the WiFi configuration mode 2.1.1 Use IC card to enter WiFi configuration mode... - Page 20 2.2 Use your smart phone to connect the charger's WiFi Find the network of DUOSIDA_XXXX, enter the password: duosida@cp Note: after being connected to the WiFi network of the charger, the mobile phone may prompt that it cannot connect to the Internet and keep the current connection.
- Page 21 User Manual 3 Open the APP Click the screen to scroll down and refresh until the list of charge points appears. After successful activation, the circular and arc indicators of the charge point will turn blue *2:If red appears here, please scroll down again to refresh Click on and into the charge point details page...
- Page 22 User Manual 4 charger details Charge point Status management Current Voltage CP Status*3 Working time Internal temperature*4 Charged KW/h Device Setting Start/Stop Schedule IC card charging management *3:Idle is for standby status, 9V is for prepare charging, and 6V PWM is for charging status. *4 :...
- Page 23 User Manual 5 Charging procedure 5.1 Plug the charging plug into the electric vehicle charging socket. 5.2 Use the APP to enter the charging details page, and click the start charging button or use IC card to start charging. 5.3 Click the stop charge button in the APP or use IC to stop charging. Note: if you use the APP to start charging, then you need to click the stop button in APP when you want to stop charging(the EV will automatically stop when it is fully charged), and you must use the IC card to stop charging when you start charging by IC.
- Page 24 User Manual 6 Schedule setting Scheduling tasks are three types: 1Absolute: The charge performs charging according to the set time During the time period of the task, point. Example 1: 4.Send schedule charge point 1.Set the task start time 2.Set the task end time 3.
- Page 25 User Manual 5.Click the Start to enable task. Clicking on the start time will affect the actual charging chart. Click the Start from 6:00am to 18:00pm...
- Page 26 User Manual The task activated between start time and end time only. If you click the Start at 4:00AM, charger will work at default 32A. Time period for task control 2Relative: The charging chart is based from start time of charging session. Example 2: This part setting same to example1 “12Hour Later”...
- Page 27 User Manual Click Start before 6:00AM A:click Start before 6:00AM B:click Start at 8:00AM 3Recurring: Loop execution can be set to cycle by day or cycle by week. Example3:You want to charge from 8pm to next day 6pm on Mondays to Fridays, and all day on Saturdays and Sundays.
- Page 28 User Manual The first task ↑ The second task ↑...
- Page 29 User Manual 7 IC card management system For mobile phones that support NFC, special IC CARDS can be added to the IC card management system of APP. IC card’s ID, effective time, maximum power. Among them, the maximum available power information is stored on IC card, and other information is stored in the cache of charger.
- Page 30 User Manual IC card ID IC card effectivetime Input IC card KW/h Place the IC card that needs to be added near the NFC module of the phone. After reading the information of IC card, the setting window will pop up. Set the KWh and click ok to add. If there is no response, please change a few more areas to stick, or ask the mobile phone manufacturer to confirm the location of the NFC module.
- Page 31 User Manual If you don't want to charge, you can cancel the current charge by simply swiping the card. 4、 When charging is completed, the user needs to swipe the card to end charging, and the charge KWh on the card will be deducted from the charging process; 5、...
-
Page 32: How To Install
User Manual 1、 Charger enters protection conditions, such as over voltage, over current, over temperature, leakage, emergency stop, etc.; 2、 In the charging process, the scheduling condition is not satisfied, resulting in the active suspension of SuspendedEVSE. SuspendedEV mainly occurs when the S2 switch of the EV SuspendedEV is not closed. - Page 33 User Manual Indicates:important information and particularities 1. Suitable for garages, carports or outdoor as well as for underground parking garages, apartment blocks, hotel parking lots etc.. 2. for wall mounting or freestanding with matching Duostar stainless column, 3. IP class: IP 55(Splash-proof) Charging station should not be directly exposed to sunlight The installation site must offer protection against...
- Page 34 User Manual We recommend that this product be installed in a place that is rainproof and sun proof, or it can be equipped with protective function. This can reduce the possibility of failure and extend the life of the product. If you need support, please contact your supplier.
- Page 35 User Manual 1. Ideally, the installation site should 1.Ideally, cable entry is from already provide for connection the underside of the to the electricity grid. housing base 2. Otherwise, a power supply cable 2.Above or below surface must be installed especially power supply possible 3.
- Page 36 User Manual 1.3 Installation requirements The installation surface The mounting substrate Minimum distances measures at least must be level and firm to other technical 262 x 222 mm installations must be (height x width) observed The installation height is The installation site must be freely be-tween 140 and 160 cm accessible (floor to bottom edge of housing)
- Page 37 User Manual 1.4 Dos and don'ts The charging cable must not be The charging cable and the charging Under strain during the connector must not be driven over charging process The charging cable must not The charging cable must be coiled be kinked or twisted tightly and stored.
- Page 38 User Manual 1.5 Installation notes (De-)installation and repairs must only be carried out by a specialist electrical contractor No modifications must be made to the charging station None of the components need to be maintained by the user Different model has bit difference in size , appearance and function , The charging station can be installed by yourself according to the following installation procedure...
- Page 39 User Manual 1.6Cleaning and maintenance Charging station must only Maintenance must be checked be cleaned using a dry cloth regularly Cable must be checked regularly if there is any damage or aging phenomenon...
- Page 40 User Manual 1.7 The installation procedure 1.71 Installation tools Electric drill Wrench adhesive tape bolt driver Pliers The knife scissors pencil screw hammer...
- Page 41 User Manual 1.72 Installation process 1.First, stick the drawing on the 2.Drill holes in the four corners wall with tape to decide the with an electric drill drilling hole position 3. Knock the expansion screws in 4.Hang the mounting plate on fixed holes with hammer he screw...
- Page 42 User Manual 5.Tighten the screw with a wrench 6.Tighten the screw with a wrench 7.Hang the main body of the 8.Tighten the anti-theft screw to charging station on the mounting ensure outdoor safety plate...
- Page 43 User Manual 1. Use a pencil to draw location 10.Use an electric drill to make where the hook needs to be punched holes in the drawing position 11. Drive the expansion screw in 12.Tighten the screw with a with a hammer wrench...
- Page 44 User Manual 1.7.3 Electrical connection Requirements Connect the wires to the RCD in sequence Pay attention to the correct order when connecting. Reversing the polarity of the cables will destroy the electronics of the wallbox. Setting the charging current. The charging current must never be set higher than the line fuse itself. !!! ATTENTION !!! If the wallbox is to be operated with an output of 11 kW, it must be protected with a 20 A fuse (over current protection).
- Page 45 User Manual First commissioning Pay attention to release the emergency stop switch Arc-LED and cyclo-LED is blue The nameplate is located to the left of the charger You can start charge with plug in charging gun or use APP the power supply has been established when arc-LED blink and cyclo-LED often on Before the first commissioning the According to “Ordinance on general conditions for grid connection and its use for electricity supply in Low voltage (Low Voltage Connection Ordinance - NAV)“...
- Page 46 User Manual - before the first commissioning with an electric car the following tests must be carried out with an adapter for vehicle simulation (CP) according to VDE 0122-1: - For planning, installation, operation and use, please follow the “Der Technische Leitfaden –...
- Page 47 User Manual Environment o This device is used to charge electrically operated Vehicles and is subject to the EU directive 2012/19 / EU on waste electrical and electronic equipment(WEEE). o Disposal must be according to national and regional Regulations for electrical and electronic equipment respectively.
-
Page 48: Faq
User Manual Display information Status indicator light meaning Condition Arc power indicator light Circular status indicator light Remarks E-stop Red often on Red often on Standby Blue breathing lamp Blue breathing lamp Prepare for Simple one has no this Green often on Green often on charging state... - Page 49 User Manual Breakdown and maintenance The meaning of the error code Display code Meaning of code Solution Please ensure safety before releasing 0x00010001 The emergency stop switch is triggered emergency stop switch Reserved, without this function, temperature control 0x00010002 Over Temperature sensor must be connected 0x00010003 Over current protection...
- Page 50 User Manual Safety tip The people who assemble and use the EV charger must response the follow principle and rule, to confirm the relevant people and device operation normally: Before device power on, please confirm the device is good earth, to avoid the unnecessary accident.
-
Page 51: Contact
User Manual protector. The EV charger must keep away from firework, dusty and corrosive environment. The EV charger input high voltage current, please keep personal safety. If the EV charger break down, it would happen electric shock even death. The E-stop switch can be pressed to cut power. Don’t cut the breaker or press the E-stop switch when the EV charger running normally.
Need help?
Do you have a question about the SES Series and is the answer not in the manual?
Questions and answers
Как снят ерор 16