Table of Contents
Advertisement
Quick Links
Electronic Deer Control
PRIOR TO INSTALLATION
®
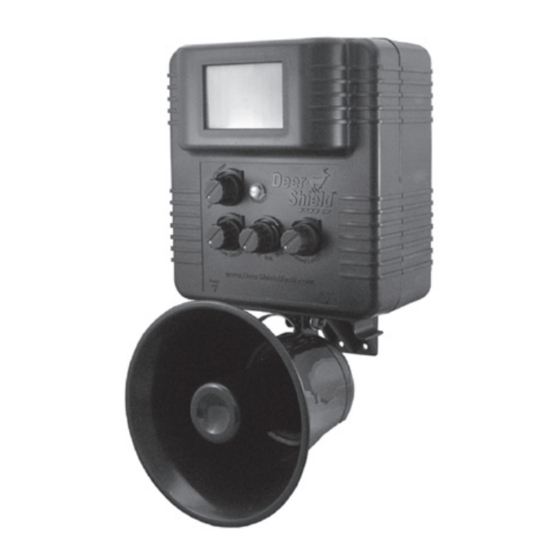
Your complete Deer Shield
Pro kit (Fig. 1) includes a con-
trol unit with built-in motion sen-
sor, adjustable ratchet mount-
ing bracket, PA horn speaker
and an AC power adapter. An
optional battery clip assembly is
also available.
IMPORTANT: Be certain that the OFF-
ON-VOLUME rotary knob is rotated
fully to the left (counterclockwise) to
the OFF position (Fig. 2) before the
AC power adapter is connected to the
Deer Shield Pro.
SETUP AND INSTALLATION
1) The Deer Shield Pro should be mounted on a
post or vertical surface with the motion sensor
aimed at the area to be protected or at the point
where deer are accessing your property. The
unit should be mounted at the same height as the
deer, approximately 3-4 feet above level ground.
A ratchet mounting bracket is included for easy
mounting.
2) Attach the ratchet mounting bracket (Fig. 3) to
a post, fence, wall or other vertical
surface. The ratchet mounting bracket
has four (4) screw holes for easy
mounting. There is a mounting hole
on the bottom of the Deer Shield Pro.
Slide the unit onto the mounting brack-
et and adjust it horizontally in order to
properly aim the motion sensor.
3) If desired, the PA horn speaker can be detached
from the unit and mounted remotely using the
included metal mounting bracket. The attached
PA horn speaker has 10 feet (3 meters) of cable
wrapped around posts just above the speaker.
4) Be sure the volume level is set to the OFF position,
by rotating the volume rotary knob completely to
the left (counterclockwise) before proceeding with
the set-up of your Deer Shield Pro.
5) Plug the AC power adapter into any
protected standard electrical outlet. Or
you may attach an optional battery clip
assembly to a 12V battery. Plug the
other end of the cable into the power jack
(Fig. 4) located on the bottom of the unit (left side)
below the arrow on the front of the unit.
OPERATING YOUR DEER SHIELD
To operate your Deer Shield Pro unit you will find
Fig. 1
a series of rotary control knobs, a photocell, and a
motion sensor lens, all located on the front of the
unit. A complete explanation of the function of each
aspect of your Deer Shield Pro is outlined in the
following sections. All of the rotary control knobs
on your Deer Shield Pro come preset to the recom-
mended starting configuration.
Fig. 2
OFF - ON - VOLUME CONTROL ROTARY KNOB
The OFF-ON-VOLUME control rotary
knob (Fig. 2) will turn your Deer Shield
Pro unit OFF, or ON, and will control
the volume of the sounds that are
being broadcast.
volume level depending on the overall
area that is to be protected. Louder sounds will be
more effective and cause the deer to move further
away thereby covering a larger area.
ABOUT THE MOTION SENSOR LENS
The Motion Sensor is located
on the front of the Deer Shield
Pro unit, behind the large white
plastic lens (Fig. 5) above the
various rotary control knobs.
Fig. 3
This motion sensor lens is
Fig. 4
PRO
®
Set the desired
Fig. 2
Fig. 5
sealed to protect against moisture entering the unit.
Care must be taken to avoid pressing on the front
surface of this lens, as damage may occur. Proper
function of your Deer Shield Pro is dependent on
the integrity and condition of this lens. The motion
sensor lens will enable the Deer Shield Pro unit to
detect motion (heat sensing) directly in front of the
unit, and laterally in an area approximately 50 feet
wide by up to 75 feet directly in front of the lens (see
diagram below). The size and orientation of the
moving object that is detected, as well as tempera-
ture or other weather conditions may limit the overall
area of detection.
TOP VIEW:
24ft
(7.5m)
13ft
(4m)
0
13ft
(4m)
24ft
(7.5m)
SIDE VIEW:
3.3ft
(1.0m)
MOTION SENSITIVITY CONTROL ROTARY KNOB
The Motion Sensitivity control rotary
knob is located just below the OFF-
ON-VOLUME knob (Fig. 6).
The
Motion Sensitivity may be adjusted to
determine the sensitivity of the Motion
Sensor for more defined operation of
your Deer Shield Pro product.
Rotating the knob
clockwise (to the right) will adjust the sensitivity to
the most sensitivity, maximizing the range of the
motion sensor. It is recommended to use the maxi-
mum sensitivity in order to get the greatest area of
coverage. However, if you experience false alarms
where the motion sensor is triggered by smaller
animals or trees blowing in the wind, then you can
adjust the motion sensitivity to a lower level. When
75ft
(23m)
Fig. 6
Advertisement
Table of Contents

Related Manuals for Deer Shield PRO

Summary of Contents for Deer Shield PRO
- Page 1 The motion sensor lens will enable the Deer Shield Pro unit to 4) Be sure the volume level is set to the OFF position, detect motion (heat sensing) directly in front of the...
- Page 2 New ©2011 Deer Shield from the makers of Bird Gard, Bird Gard, LLC. All Rights Reserved. Deer Shield ® is a trademark of Bird Gard, Deer Shield Pro Instructions P/N 655-0068-00 LLC.
Need help?
Do you have a question about the PRO and is the answer not in the manual?
Questions and answers