Table of Contents
Advertisement
Quick Links
Advertisement
Table of Contents

Related Manuals for Myr MYREVA SS-30

Summary of Contents for Myr MYREVA SS-30
- Page 1 Slide Stainer MYREVA SS-30 and SS-30H User manual Version 07/17...
- Page 2 Especialidades Medicas Myr, S.L. would like to thank you for the purchase of this equipment and for your confidence in choosing our company. We are committed to offer you the best and most reliable service. Don’t hesitate to contact your local dealer for any question related to this Slide Stainer.
-
Page 3: Table Of Contents
Slide Stainer Contents Introduction ........................4 Intended use ......................4 Warranty ........................ 4 Certification ......................5 Safety ..........................5 Safety Precautions ....................6 Hazards ......................... 6 Documentation ...................... 8 Conditions for the transportation of the instrument ..........8 Technical data ....................... 9 Reception and installation of the unit ............... -
Page 4: Introduction
Slide Stainer Introduction The Slide Stainer MYREVA SS-30 is an automatic programmable device for Cytology and Histology processes. It is composed of a metallic chassis holding reagents troughs, washing troughs, robotic arm X/Y and electric fun with active charcoal filter. The instrument also features a transparent cover with three hinged doors. -
Page 5: Certification
Slide Stainer Certification Especialidades Médicas Myr, S.L. certifies that this instrument has been tested and checked carefully. All technical data were checked before delivering to guarrantee that fulfill published specifications. The instrument complies with applicable international safety regulations. Safety The installation and normal use of the Slide Stainer is simple and safe if you observe the instructions given in this manual. -
Page 6: Safety Precautions
Please observe the following general precautions during operation of this instrument. Failure to comply with these precautions violates safety standards and the intended use of the instrument. Especialidades Médicas Myr, S.L. is not liable for misuse of the instruments and failure to comply with basic safety requirements. Hazards... - Page 7 Slide Stainer When the instrument is not in operation, the reagent troughs should be covered with the plastic lids supplied to minimise reagent evaporation. Fume accumulation Remember that, when working with the device, reagent fumes that are harmful to health always form. The Slide Stainer should always operate with the active carbon filter fitted or the discharge duct connected to a fume extraction system.
-
Page 8: Documentation
Repair or maintenance work are normally carried out at the site of installation. If this is not possible for some special reasons, the instrument can be returned to Myr. The contact address can be found at the end of this instruction manual. -
Page 9: Technical Data
Slide Stainer Technical data General information Through a transformer: Power Requirements Input: 100 – 240V , 1.5A, 50 - 60Hz Outpu: 12V , SS-30: 5.5A — SS-30H: 12.5A Supply: Running water Maximum pressure: 4 bar Water temperature: Less than 30°C (86°F) without freezing Water supply Fitting: Standard ¾”... -
Page 10: Reception And Installation Of The Unit
Slide Stainer Reception and installation of the unit Before removing the Slide Stainer from their shipping package, carefully inspect the wooden case for any damage which may have occurred during transport. Should you detect any sign of damage, do not open the case and immediately report the situation to the transport agency. -
Page 11: Connection
Slide Stainer The fume extractor outlet is located at the back of the instrument. For correct ventilation of the instrument a minimum space of 100 mm from wall should be kept free. Connection Connecting to the mains CAUTION Electronics of the Slide Stainer are protected and screened. However, the instrument should not be sited near to heavy electrical machinery generating heat, vibrations or strong electrical noises. -
Page 12: Water Inlet And Outlet
¾” threaded fitting supplied with the device. The water supply must be equipped with a stopcock (not supplied) to enable it to be turned off. Myr accepts no responsibility for the connection between the water supply and the equipment. -
Page 13: Commisioning
Slide Stainer Length L in mm is calculated with the formula: (Nt - Nc) * 55 - 16 Nt is the number of the station in which the water inlet is located. Nc is the number of the station containing the trough to be connected. 55 is the distance in mm between the troughs and water inlets. - Page 14 Slide Stainer Check that the 20 troughs are positioned correctly and not inverted. If they are not positioned correctly, significant mechanical problems can occur. To prevent the reagents from overflowing, the troughs should only be filled up to the level indicated on the inner recess. Note that the reagent that each trough should contain is determined by the previously-established Reagent map.
- Page 15 Slide Stainer Only SS-30H Pay special attention to the programmes that use the drying station. In these cases, make sure that the previous programmed step cannot originate from a trough containing a flammable reagent (e.g. xylol). This is to prevent a possible fire.
-
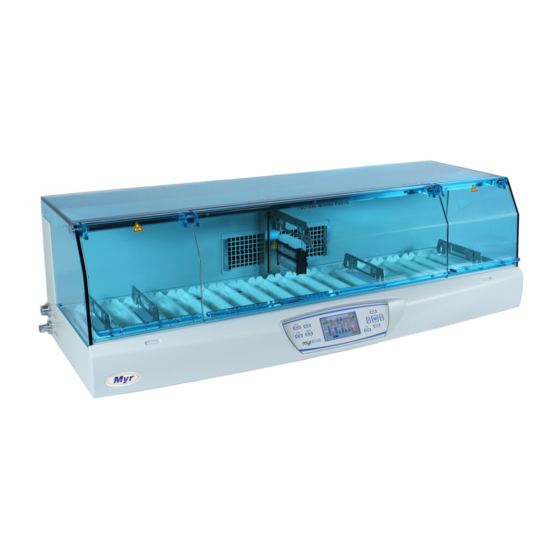
Page 16: Slide Stainer Components
Slide Stainer Slide stainer components The figure below shows the Slide Stainer’s different components. 1. Loading door 2. Central door 3. Unloading door 4. Robotic arm 5. Slide rack (maximum 5) 6. Troughs (20) 7. Display screen and keypad Display screen and keypad The DRAIN key is used to enable or disable the draining of the racks as they leave each trough. -
Page 17: Menus And Options
Slide Stainer The arrow keys are used for navigation (option selection) within the different menus, and the middle key is used to confirm or validate the selected option. It is equivalent to the ENTER key. The ESC key is used to exit the various menus in which values and operation options are entered. -
Page 18: Configurations And Settings
Slide Stainer Configurations and settings Before starting the first staining process, some parameters have to be configured in the EDIT and SETUP menus. Once the settings have been adjusted and the reagents and programmes STAIN edited, the STAIN process can be started. See the details of how to run a staining process on page 27. - Page 19 Slide Stainer Clock edit menu Edit date: DD/MM/YY Edit hour: HH:MM:SS Type: 12/24H Dip of the rack within the trough. The dip height, dips number and dip speed of the rack in the reagent and washing troughs can be adjusted. This affects the reagent stations.
- Page 20 Slide Stainer This affects the washing stations. CLEANING With the arrows, select the Dip Mode to be defined (01... 04). Press ENTER to access each of the parameters and select the value using the arrows. The example shows the editing of Mode 01 parameters for the washing stations.
-
Page 21: Advanced Configurations
Slide Stainer Attention: Burn hazard If you activate the drying station, be aware that high temperatures are generated in its immediate vicinity. Fan edit menu This option defines filter usage time and useful life, as well as fan usage time. FILTER Filter Use Time (h) 0...150 This time depends on how long the fan has been operating. -
Page 22: Programming
Slide Stainer Programming The two most outstanding features of the MYREVA SS-30 Slide Stainer are: Its ability to operate in multi-load mode. Its great versatility in determining operating parameters: almost all process parameters are freely configurable. This feature enables the Slide Stainer to perform up to 5 processes Multi-load mode simultaneously. -
Page 23: Preparation Of Programmes
Slide Stainer ATTENTION! The MYREVA SS-30 is unable to detect the type of reagent used in each station. Make sure that the programmed reagent corresponds to the ACTUAL content of the station. Preparation of programmes Optimising the functioning of programmes in the Slide Stainer in multi-load... - Page 24 Slide Stainer PROGRAMME NO.:20 NAME: TS2 EXACT STEP STATION REAGENT TIME TIME DIP MODE Load 00:00 Alcohol 96 05:00 Water 00:10 Haematoxylin-Harris 05:00 Water 01:00 Hydrochloric acid 00:01 Water 01:00 Ammoniacal 00:01 Water 01:00 Alcohol 96 02:00 Orange 03:00 Alcohol 96 02:00 EA-50 03:00...
- Page 25 Slide Stainer EXACT TIME This indicates whether the assigned immersion time is critical or not, that (YES - NO - 50%) is, whether it should be accurate (accuracy +/- 1 second). YES means that the sample may be damaged if it remains for a longer time than that indicated.
-
Page 26: Reagent Map
Slide Stainer Reagent map REAGENT MAP (Example) Programme REAGENT STATION REAGENT Load (Xylene) Load (Xylene) Alcohol 100º Alcohol 96º Alcohol 70º Water Haematoxylin-Harris Water Hydrochloric acid Water Ammoniacal Alcohol 96º Eosin Orange Alcohol 96º EA-50 Alcohol 96º Alcohol 100º Unload (Xylene) Unload (Xylene) This Reagent map example shows the reagent that each trough should contain to perform programmes TS1 and TS2, the reagent number (to... -
Page 27: Reagent And Programme Editing
Slide Stainer Reagent and programme editing The reagent and programme edit menu enables you to enter the information required for the operation of the stainer. From the main menu, using the arrow keys, select EDIT and press ENTER to confirm. EDIT MENU REAGENTS PROGRAMS... - Page 28 Slide Stainer Once the reagent name has been edited, select “Ent” and then press ENTER to finish editing. A confirmation message will appear. Press ENTER again to confirm the changes. Save changes? Press ESC to leave the edit menu without saving changes.
- Page 29 Slide Stainer After replacing the reagent, navigate to Reset in the top row of options using the vertical and horizontal arrows. Press ENTER to select this option, go to the Changed column of the corresponding station and press ENTER to update the change date. Press ENTER again to confirm the Update change date? changes.
-
Page 30: Entering Programmes
Slide Stainer Entering programmes The programmes that were previously determined on the programming form can be entered into the Stainer by means of the display screen and keypad, or a PC connected via a USB (page 31) To enter them with the keypad, perform the following steps. Using the arrow keys, select PROGRAMMES and press ENTER to confirm. -
Page 31: Programming With Pc
Slide Stainer Remember that all programmes must always have a first step 1 (LOAD) and a last step (UNLOAD). Programming with PC Stainer Software is a programme designed to facilitate the programming of the SS-30 slide stainer and collect data on staining processes that have been performed. -
Page 32: Configuration
Slide Stainer Configuration Firstly, select the COM port to which the equipment is connected. To do so, use the “Connect > Via USB” menu: In the dialogue box that appears, select the appropriate port. After selecting the port, determine the working directory with the “Edit > Working Directory”... -
Page 33: File Menu
New This initialises all programmes and tables, and shows the settings with the default values Open This opens a file with the extension .myr containing programmes, reagents and settings. Save This saves programmes, reagents and settings in a file with the extension .myr... -
Page 34: Creating A Programme
Slide Stainer Print This prints programmes, settings, info and logs Quit This closes the programme. Creating a programme From the Programs tab, it is possible to create or modify programmes. The fields need to be filled in by selecting the options in the dropdown menus (Station, Reagent, Time, Exact Time and Dip Mode), as specified for each process. -
Page 35: Reading And Writing Programmes
By clicking OK, all data received from the slide stainer appears on screen. At this point, it is possible to generate a backup file with the extension “.myr” and save it in the “File > Save...” menu so that it can be recovered at a later date if necessary. - Page 36 Slide Stainer Once writing is complete, everything transmitted will appear in the slide stainer. This first writing is temporarily stored in the volatile memory of the equipment to enable the user to check that it is correct. This means that if the slide stainer is turned off and then on, the stored information will be lost.
- Page 37 Slide Stainer Once confirmed, it remains stored even if the slide stainer is turned off. Reading and writing reagents 32 default reagents appear in the programme, and these are the same as those that appear in the machine. All reagents can be edited, except number 15, which, as previously mentioned, is reserved to indicate the washing stations.
-
Page 38: Tabs "Info, Settings And Logs
Slide Stainer Tabs “Info, Settings and Logs” Info This tab enables the user to view processes running in real time Each rack is shown in a column, indicating: Programme no. Programme name Loading time Programme start time ... -
Page 39: History" Tab (Only Ss-30H)
Slide Stainer Settings This tab lists all of the machine’s programmable settings From here, it is possible to modify/read/save all of these settings. The date and time are synchronised with the PC when it is connected to the slide stainer. Logs In this tab, all alarms that have appeared in the equipment are logged. - Page 40 Slide Stainer When you click the “History” tab, the following screen will appear: The first column, “Id”, shows a consecutive numbering of the events produced. The following columns provide more information about each event. Filter by: This option allows you to filter data by User, Programme, Rack, etc. Export Enables you to export the data shown on screen in “.csv”...
- Page 41 Slide Stainer Export Enables you to export the data shown on screen in “.csv” format for subsequent processing. Print Prints the data displayed on the screen to a local or remote printer connected to the computer. Deleting the “History” (Only SS-30H) Important Historical data is stored in the slide stainer’s memory Make sure you read the history and save the data to your computer before...
-
Page 42: Running A Process
Slide Stainer Running a process On page 13, it is recommended that you perform some assays without samples or reagents to familiarise yourself with the device. Perform the checks that are shown, carry out some test processes to verify the programmes before filling the troughs with reagents and run processes with real specimens. - Page 43 Slide Stainer These instructions must be followed carefully since the processor can only obtain its information if the key presses confirming the loading and unloading operations performed are made in the correct order. For your safety, do not lift the loading or unloading doors when the indicator light is RED.
- Page 44 Slide Stainer Make sure that the rack fits perfectly into the notches of the trough, otherwise the robotic arm will not collect it properly and a collision will occur. Once the rack has been placed into the corresponding trough, close the loading door and press LOAD again to confirm that the loading operation has been completed.
-
Page 45: Monitoring The Process
Slide Stainer Monitoring the process The screen shows an example of how monitoring of the processes is displayed in the Slide Stainer. This example shows 3 staining processes in multi-load mode. 10:23:14 23/05/14 R2 R1 9 10 11 12 13 14 15 16 17 18 19 20 00:11:58 00:20:04 00:23:15... -
Page 46: Unloading Procedure
Slide Stainer SS-30H 10:23:14 43 C F C 23/05/14 R2 R1 9 10 11 12 13 14 15 16 17 18 19 20 Display differences compared to the SS-30 slide stainer: The first box of the group in the middle indicates the actual temperature of the drying station (43 in the example). -
Page 47: Alarm And Attention Messages
Slide Stainer The GREEN indicator light goes out and the UNLOAD message disappears. Alarm and attention messages Here is a list of the alarm and attention messages that can appear during the staining process. Time exceeded in This indicates that the immersion time (programmed + extra) of the rack (1 ... Rack XX St. -
Page 48: Battery Operation
In the event of a power failure, the illumination of the window located on the lower left-hand side with the Myr logo will go out. The device will continue to operate for a period of about two hours. SS-30H... -
Page 49: Maintenance
Slide Stainer Maintenance Routine maintenance To secure optimum performance of the instrument, it is recommended that a routine maintenance be performed by a trained service technician once a year. It is highly recommended to replace the troughs every 2 years of standard use. -
Page 50: Replacing The Filter
Slide Stainer Wash the reagent troughs and water trough in the dishwashing machine at max. +65 ºC. Standard washing agents can be used. The stations should never be washed at higher temperatures (i.e., using industrial dishwashing machines that work at +85 ºC) to avoid deformations. -
Page 51: Disposal Of The Instrument After Final Shutdown
Slide Stainer Disposal of the instrument after final shutdown Separate taking back of electrical and electronic instruments in the European Union countries: This is to be applied in the countries of the European Union and other European countries with a separate collecting system within the waste management. -
Page 52: Programming Form
Slide Stainer Programming form PROGRAMME NO.: NAME: EXACT STEP STATION REAGENT TIME DIP MODE TIME... -
Page 53: Reagent Map
Slide Stainer Reagent map Programme REAGENT STATION REAGENT... - Page 54 Especialidades Médicas Myr, S.L. Vidriers 19 - 21 Polígono Industrial La Cometa 43700 El Vendrell - Tarragona www.myr.com.es...
Need help?
Do you have a question about the MYREVA SS-30 and is the answer not in the manual?
Questions and answers
hi how to solve dry **** error ?