Table of Contents
Advertisement
Quick Links
Advertisement
Table of Contents

Related Manuals for RWD R419

Summary of Contents for RWD R419
- Page 1 R419 Intelligent Animal Ventilator User Manual...
- Page 2 RWD’s registered trademark or mark, these trademarks and the related security mark belong to RWD’s intangible property. The use of non RWD’s trademark or mark in this instruction manual are only for editing purposes, without other purposes, the rights belong to their respective rights owners.
-
Page 3: Table Of Contents
Contents 1-INTRODUCTION ......................1 1.1 O ........................... 1 VERVIEW 1.2 S ..........................1 AFETY 1.3 P ......................1 RODUCT EATURES 1.4 I ’ ..............2 NTRODUCTION OF DEVICE S MAIN COMPONENTS 1.5 S ........................3 PECIFICATION 2-SYSTEM SAFETY ......................4 2.1 S ...................... - Page 4 5.2 B ....................22 ATTERY AINTENANCE 5.2.1 Battery Performance Maintenance ................22 5.2.2. Check battery performance ..................22 5.3 R ..................... 22 ECYCLING ATTERIES 6-TROUBLESHOOTING ....................24 7-RETURN TO FACTORY FOR REPAIR ............... 25 8-AFTER-SALE SERVICE ....................26 9-TECHNICAL PARAMETERS ..................27...
-
Page 5: 1-Introduction
RWD Life Science Co., Ltd. is endeavored to improve the product function and service quality. RWD reserves the right to change or alter the contents of user manual without prior notice. If you would like the latest product information, you are welcome to call us or visit our website (http://www.rwdstco.com/). -
Page 6: Introduction Of Device's Main Components
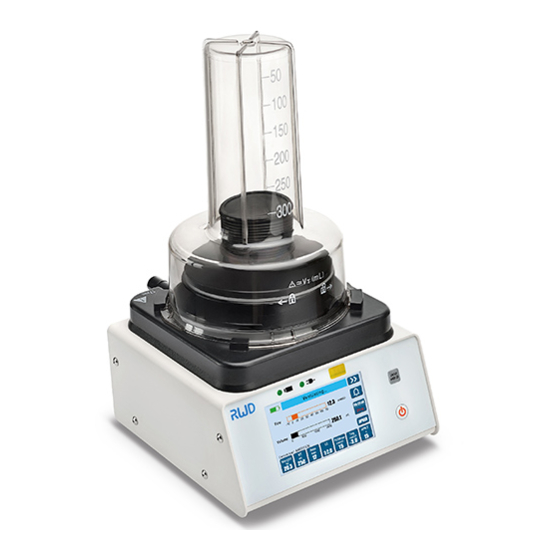
visual; Auditory alarm, with text message prompts, improving human-machine interaction, and reducing human error; It is powered by an internal rechargeable battery and will run for more than 4 hours while unplugged. 1.4 Introduction of device’s main components Fig 1 Parts Description... -
Page 7: Specification
Fig 2 Components Description Fresh gas port To anaesthesia machine anaesthetic wastes exhaust To gas filtration tank port 17mm port To the port of the driving gas Port of gas source Oxygen source (or air) Port of pressure sensor To 22mm port Air outlet Discharge waste gas of the driving gas Port of the driving gas... -
Page 8: 2-System Safety
2.1 Safety Instructions For safety, please pay attention to the following items: Please read the user’s manual carefully. Operating conditions of R419 Smart Veterinary Ventilator: Temperature: 0℃~ +40℃, humidity:15%~95% (non- condensing),atmospheric pressure: 70kPa ~ 110kPa Storage conditions of R419 Smart Veterinary Ventilator: ... -
Page 9: Safety Instructions
providing any quality assurance or technical maintenance service to this equipment. If the user has any technical questions, please contact the authorized person or the RWD for support. Risk of electric shock: Laypeople are prohibited from removing the cover or panel of the equipment and removing the built-in rechargeable battery. - Page 10 If the equipment that has been returned for repair has been dismantled without the authorization of RWD before arriving at RWD, the company does not provide after-sales service such as warranty, free maintenance or parts replacement. The warranty statement (including its restrictions) is exclusively issued by RWD and covers ...
-
Page 11: 3-Unpacking And Assembly
3-Unpacking and Assembly Inspect the packing for any signs of damage that may have occurred during shipping, if damage has occurred, make a damage claim to the carrier and contact with RWD or your local dealer immediately. Remove all components from the shipping carton. Save all boxes and packing materials for future shipments. - Page 12 of the bellows disc (top of the bellows), lift it up and down, and repeat several times to smooth out the ripples on the bellows. Then replace the bellows cover and gently press and rotate the bellows cover clockwise until it snaps into the bayonet at the base. The bellows and bellows cover are now installed.
- Page 13 Fig 5 Connect the ventilator to the anesthesia system. Remove the breathing bag from the anesthesia machine and connect the 22mm port on the bellows base to the breathing bag interface of the anesthesia machine with a threaded pipe; Fig 6 Connect the ventilator to the gas recovery system.
-
Page 14: 4-Operating Instruction
2) Connect the breathing circuit according to Section 3.2, open the anesthesia machine flowmeter, and adjust the flow rate to about 1 L/min. When the folded bag of R419 Smart Veterinary Ventilator bellows rises to the top of the transparent cover, press and hold the power switch for 1 second to start the equipment. -
Page 15: Leakage Detecting
After the R419 Smart Veterinary Ventilator enters the main interface, users can set the breathing parameters such as the inspiration/ expiration ratio and airway pressure upper limit alarm. Press to enter sub-main interface for setting the system parameters, such as adjusting the brightness of the LCD screen. -
Page 16: Weight Setting
Fig 11 Volume Control Mode (VCV): With tidal volume (VT) as the reference standard, the inspiration process is complete when the volume of gas inhaled by the animal reaches the set tidal volume; Pressure Control Mode (PIP-CV): With peak inspiratory pressure (PIP) as the reference standard, the inspiration process is complete when the gas inhaled by the animal reaches the set peak inspiration pressure;... -
Page 17: Setting Of Breathing Parameters
Fig 12 4.5 Setting of Breathing Parameters Users can also enter other parameters according to need: VT: During ventilation, the inspiratory volume is controlled in real time with reference to the set tidal volume (VCV). When the tidal volume setting is reached, the inspiration is over. The adjustment range of tidal volume is 20 ~1500 mL. -
Page 18: Add, Call, Delete And Adjust Parameters
APNEA mode, to the start of the next inhalation, referring to the time point when the trigger pressure is reached by the last spontaneous breath. After the set waiting time is reached, the ventilation control will start, and the waiting time adjustment range is 15~30 seconds. The real waiting time must be greater than or equal to the set waiting time. -
Page 19: Delete Parameters
2) If other parameters are selected when the equipment is in the process of ventilation, the current breathing cycle will not be forcibly interrupted. The selected procedures are performed after the current breathing cycle ends; 4.6.3 Delete Parameters 1) Click a parameter number in the naming area of the [Parameter List] interface to pre-select this parameter group. -
Page 20: System Setting
3) After adjusting the parameters during ventilation, the newly adjusted parameters will be executed during the next inspiration phase, and the current breathing cycle will not forcibly interrupted. 4.7 System Setting Fig 16 4.7.1 Brightness Control 1) Click & to adjust the backlight brightness. 2) When the device is powered by the internal battery, the current display brightness will be 80% of the set brightness;... -
Page 21: Alarm Information And Processing
Fig 17 Fig 18 4.8 Alarm Information and Processing 4.8.1 Alarm Prompt of High Airway Pressure... -
Page 22: Alarm Prompt Of "High / Low Gas Source Pressure
Fig 19 The information bar shows "High Airway Pressure!" indicating that the airway pressure is excessive. A continuous auditory alarm "beep" will sound. At this point, the ventilator will automatically end ventilation, keeping the airway pressure value within the set value range, and it will then enter the ventilation cycle. When the airway pressure returns to the set value range, this alarm message and status will be automatically cancelled. -
Page 23: Alarm Prompt Of "Low Flow
Fig 20 The information bar displays “Low Gas Source Pressure!” and “High Gas Source Pressure!”, accompanied by a continuous alarm sound, indicating that the air supply pressure is too low/high! Please check the oxygen cylinder or the central air supply source immediately, confirm that the air supply connection is properly connected, and the joint is not loose or leaking, and adjust the output pressure of the oxygen cylinder relief valve or the central air supply source to 41 ~87psi, and make sure the cylinder pressure is... -
Page 24: Alarm Prompt Of Is Low Battery
forcibly compress the folded bag of bellows to output gas, which is abnormal. The ventilator will be automatically held now, please check the breathing circuit immediately, and confirm that the breathing circuit is connected correctly, including if it is falling off or loose. Check whether the anesthesia breathing pipe is blocked or bent, and if the flow meter of anesthesia machine correctly adjusts the output of gas flow. - Page 25 Fig 21 During normal operation (VCV/PIP-CV mode), if you need to perform an inspiration hold, press and hold the INSP.HOLD button. After the ventilator completes the current breathing cycle, it will hold the inspiration in the next breathing cycle. At this time, the folded bag of ventilator bellows will stop at the set tidal volume/PIP output position, allowing the animal to fill the chest to the desired pressure and maintain pressure without exhaling, until the button is released.
-
Page 26: 5-Cleaning And Maintenance
5-Cleaning and Maintenance 5.1 Product Cleaning The majority of the ventilator is not in direct contact with anesthetic gases, so only a dry cloth is required for cleaning. Cleaning the surface of the ventilator: The surface can be wiped with a clean, soft, damp cloth. Neutral cleaning agents can be used to remove stubborn stains. Warning! Use only water and a neutral detergent to clean the bellows and bellows cover. - Page 27 Warning! Do not disassemble the battery, put it into fire, or short-circuit it. Burning, exploding, or leaking batteries can cause personal injury.
-
Page 28: 6-Troubleshooting
6-Troubleshooting If there are other malfunctions in the ventilator, please refer to the “Troubleshooting Table” for potential solutions. If the fault still cannot be eliminated, please contact the relevant RWD personnel. Fault description Possible cause Methods for Troubleshooting a. Check if the air supply line is folded or 1)No gas supply pressure... -
Page 29: 7-Return To Factory For Repair
7-Return to factory for repair It is forbidden to return the ventilator or related components to the company without authorization. Please contact RWD personnel to obtain the authorization before returning equipment or components. If the equipment needs to be returned to the factory, please prepare and provide the... -
Page 30: 8-After-Sale Service
8-After-sale service RWD Life Science Co., Ltd is headquartered in Nanshan District High-tech Park, Shenzhen. Since its establishment in 2002, it has always been committed to providing customers with high- quality services. Pursuing customer satisfaction is our consistent goal. The company has a strong after- sales service team and insists on providing customers with 24/7 service. -
Page 31: 9-Technical Parameters
9-Technical parameters Appendix 1. PIP-CV Parameter Setting Reference Max airway WEIGHT Freq Trig Recommended pressure (Kg) (bpm) (cmH20) flow (cmH2O) - Page 32 Max airway WEIGHT Freq Trig Recommended pressure (Kg) (bpm) (cmH20) flow (cmH2O)
- Page 33 Max airway WEIGHT Freq Trig Recommended pressure (Kg) (bpm) (cmH20) flow (cmH2O)
- Page 34 Appendix 2. VCV Mode Breathing Parameter Setting Reference airway WEIGHT Freq Trig standard measured pressure limit I:E ratio ( bpm) ( cmH20) (Kg) (cmH2O) 14.3 1:2 1:2 14.3 14.3 1:2 14.3 1:2 14.3 1:2 14.3 1:2 14.3 1:2 14.3 1:2.2 14.3 1:2.2 1:2.2...
- Page 35 airway WEIGHT Freq Trig standard measured pressure limit I:E ratio (Kg) ( bpm) ( cmH20) (cmH2O) 14.3 1:2.2 1:2.2 14.3 14.3 1:2.2 14.3 1:2.5 14.3 1:2.5 14.3 1:2.5 1:2.5 14.3 1:2.5 14.3 14.3 1:2.5 14.3 1:2.5 1:2.5 14.3 1:2.5 14.3 1:2.5 14.3 1:2.5...
- Page 36 airway WEIGHT Freq Trig standard measured pressure limit I:E ratio (Kg) ( bpm) ( cmH20) (cmH2O) 1:2.5 1:2.5 1:2.5 1:2.5 1:2.5 1:2.5 1:2.5 1:2.5 1:2.5 1:2.5 1:2.5 1:2.5 1:2.5 1:2.5 1:2.5 1007 1:2.5 1018 1:2.5 1029 1:2.5 1040 1:2.5 1051 1:2.5 1062 1:2.5...
- Page 37 airway WEIGHT Freq Trig standard measured pressure limit I:E ratio (Kg) ( bpm) ( cmH20) (cmH2O) 1205 1:2.5 1216 1:2.5 1227 1:2.5 1238 1:2.5 1249 1:2.5 1260 1:2.5...
- Page 38 Appendix 3. APNEA mode breathing parameter setting reference apnea airway WEIGHT Freq Trig measured time pressure limit standard VT (Kg) ( bpm) ( cmH20) ratio (s) (cmH2O) 1:2 14.3 1:2 14.3 1:2 14.3 1:2 14.3 1:2 14.3 1:2 14.3 1:2 14.3 1:2.2 14.3...
- Page 39 apnea airway WEIGHT Freq Trig measured time pressure limit standard VT (Kg) ( bpm) ( cmH20) ratio (s) (cmH2O) 1:2.5 14.3 1:2.5 14.3 1:2.5 14.3 1:2.5 14.3 1:2.5 14.3 1:2.5 14.3 1:2.5 14.3 1:2.5 14.3 1:2.5 14.3 1:2.5 14.3 1:2.5 14.3 1:2.5 14.3...
- Page 40 apnea airway WEIGHT Freq Trig measured time pressure limit standard VT (Kg) ( bpm) ( cmH20) ratio (s) (cmH2O) 1:2.5 1:2.5 1:2.5 1:2.5 1:2.5 1:2.5 1:2.5 1007 1:2.5 1018 1:2.5 1029 1:2.5 1040 1:2.5 1051 1:2.5 1062 1:2.5 1073 1:2.5 1084 1:2.5 1095...
- Page 41 RWD Life Science Web: www.rwdstco.com Add: 6540 Lusk Blvd, San Diego, CA 92121,USA Add: Room201, Robeta Building, No.11 High Tech North 4th Road, Nanshan District, Shenzhen City, Guangdong Province, 518057, China Tel: +001-858-900-6602 +86-755-86111286 After-sales Service: +86-755-86111281 After-sales E-mail: service@rwdstco.com...
Need help?
Do you have a question about the R419 and is the answer not in the manual?
Questions and answers