Table of Contents
Advertisement
Advertisement
Table of Contents

Related Manuals for SenHaiX 8800

Summary of Contents for SenHaiX 8800
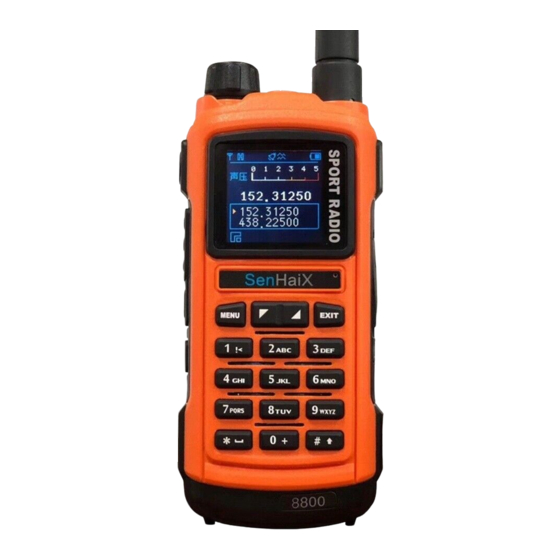
- Page 1 8800...
- Page 2 PREFACE Thank you for purchasing our dual band portable two way radio. This easy-to-use radio will deliver you secure, instant and reliable communications at peak efficiency. Please read this manual carefully before use. The information presented herein will help you to derive maximum performance from your radio.
-
Page 3: Table Of Contents
Contents Unpacking And Checking Equipment Unpacking and Checking Equipment Carefully unpack the transceiver. We recommend that you identify the items listed in the following table before discarding the packing Product Overview material. If any items are missing or have been damaged during Function Keypad shipment, please contact the carrier or the dealers immediately. -
Page 4: Product Overview
Product Overview Function Keypad Function 【MENU】 Menu/Enter Key Exit/Delete Key 【EXIT】 Switch A/B Band in standby mode NFOV FYJU Press for 2 Seconds to up rapidly 【UP】 Change the Scan direction in scan status No. Part Name No. Part Name No. -
Page 5: Before Use
Function Keypad Before Use Charging the Battery Pack 3.The indicator light turns to red, the charging begins. Use only the charger and battery specified by the 4.The indicator light turns to green, the charging is Function manufacturer. The charger LED indicates the completed. -
Page 6: Usb Charging
Before Use Preparation USB Charging Battery LED Indicator and battery status Installing/Removing the Belt Clip Installing/Removing the Antenna Use only the USB charging cable specified by the LED indication Charging status Screw the antenna into 1.Attach the belt clip manufacturer. Charger LED can indicate the the connector on the top above the correspond- Constant Red... -
Page 7: Installing The Optional Speaker/Microphone(Or Headset)
Preparation Status Indication LCD Icons Installing the Optional LED Indicator Icon Radio status Speaker/Microphone(or Headset) Uif!upq!MFE!joejdbups!xjmm!ifmq!zpv!fbtjmz!jefoujgz! Signal Strength Level dvssfou!sbejp!tubuvt/ Low Power Insert the Radio Status LED Indicator speaker/micro- High Power phone (or headset) Transmitting LED glows red DTMF activated plugs into the Receiving LED glows green... -
Page 8: Basic Operations
Basic Operations Basic Operations Powering On/Off VFO/Channel Switch Operation: Menu-- Setting- Dual Standby not send out signals to others. Turn the 【Power/Volume knob】 clockwise to In standby, long Press 【MENU】 Key to switch Send Sound: Transmit the alarm sound through switch the transceiver power ON till a click is between VFO and channel mode. -
Page 9: Menu Functions
Basic Operations Menu Functions Search Operation(SE): Scanning will stop after it Menu Function/Description Available settings detects an active signal. SQL(Squelch Level) Level 0/1/2/3/4/5 Note: In channel mode, scanning the channel numbers in the channel list. In frequency mode, Transmit Power High/Low scanning in frequency steps. -
Page 10: Troubleshooting
Troubleshooting Menu Functions If the solutions below cannot fix the problems for you, or you may have some other queries, please contact Menu Function/Description Available settings us or your local dealer for more technical support. Receive DCS OFF/D023N...D754I Phenomena Analysis Solution Transmit CTCSS OFF/67.0HZ...241.HZ... - Page 11 Troubleshooting Care and Cleaning To guarantee optimal performance as well as a long service life of the product, Phenomena Analysis Solution please follow the tips below. Unable to You may be too far away from the communicate with Move towards other members. Do not puncture or scratch the product with hard objects.
-
Page 12: Antenna
Care and Cleaning NOTE: This equipment has been tested and found to comply with the limits for a Class B digital, pursuant to part 15 of the FCC Rules. These limits are designed to provide reasonable protection against harmful interference in a residential installation. This equipment generates uses and can radiate radio frequency energy and, if not installed and used in accordance with the instructions, may cause harmful interference to radio communications.
Need help?
Do you have a question about the 8800 and is the answer not in the manual?
Questions and answers