Table of Contents
Advertisement
Advertisement
Table of Contents

Related Manuals for Fitness Avenue FA-7967

Summary of Contents for Fitness Avenue FA-7967
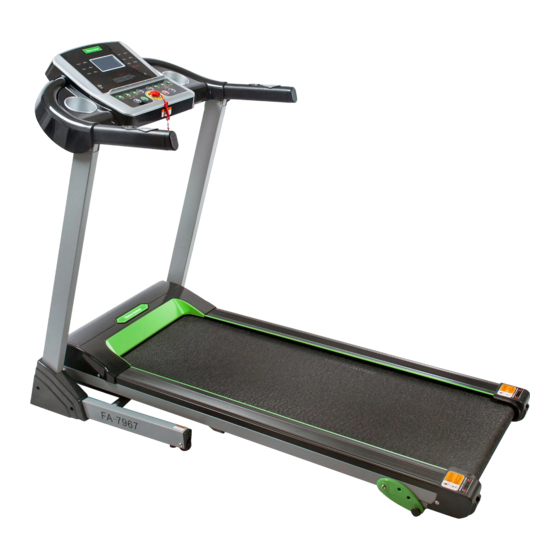
- Page 1 TREADMILL WITH MANUAL INCLINE FA-7967 USER MANUAL IMPORTANT! Please retain owner’s manual for maintenance and adjustment instructions. Your satisfaction is very important to us, PLEASE DO NOT RETURN UNTIL YOU HAVE CONTACTED support@sunnyhealthfitness.com or 1- 877 - 90SUNNY (877-907-8669).
-
Page 2: Important Safety Information
IMPORTANT SAFETY INFORMATION We thank you for choosing our product. To ensure your safety and health, please use this equipment correctly. It is important to read this entire manual before assembling and using the equipment. Safe and effective use can only be achieved if the equipment is assembled, maintained and used properly. It is your responsibility to ensure that all users of the equipment are informed of all warnings and precautions. -
Page 3: Exploded Diagram
EXPLODED DIAGRAM... -
Page 4: Parts List
PARTS LIST Description Specification Qty. Description Specification Qty. Base Frame Allen Bolt M8X25 Main Frame Allen Bolt M8X15 3L/R Upright Tube 1 pr Hex Bolt M8X35 Console Frame Hex Bolt M8X45 Front Roller Hex Socket Head Bolt M8X65 Rear Roller Hex Socket Head Bolt M8X18 Cylinder... -
Page 5: Hardware Package
Description Specification Qty. Description Specification Qty. Safety Key USB Socket DC Motor Bluetooth Filter Connecting Spanner S=13,14,15 Board Filter Allen Wrench Loudspeaker HARDWARE PACKAGE #32 M8X45 2PCS #35 M8X15 6PCS 8x1.2 8PCS #74 S=13,14,15 1PC Φ #75 S=5 1PC Ordering Replacement Parts (U.S. and Canadian Customers only) Please provide the following information in order for us to accurately identify the part(s) needed: ✓... -
Page 6: Assembly Instruction
ASSEMBLY INSTRUCTION We value your experience using Sunny Health and Fitness products. For assistance with parts or troubleshooting, please contact us at support@sunnyhealthfitness.com or 1-877-90SUNNY (877-907- 8669). STEP 1: We recommend having two people to do the assembly. Open the carton and remove contents. Place the Main Frame (No. -
Page 7: Important Note
ASSEMBLY INSTRUCTIONS We value your experience using Sunny Health and Fitness products. For assistance with parts or troubleshooting, please contact us at support@sunnyhealthfitness.com or 1-877-90SUNNY (877-907- 8669). STEP 3: Remove 4 Cross Pan Head Screws (No. 47) from the Base Frame (No. 1) using Spanner (No. -
Page 8: Lubricating The Treadmill
LUBRICATING THE TREADMILL *IMPORTANT NOTE: You will need to lubricate your treadmill before the first use. Lubricating the Running Board (No.16) and Running Belt (No. 17) is essential as the friction between the two affects the life span and function of the treadmill. Inspect the Running Board (No. 16) and Running Belt (No. -
Page 9: Maintenance And Care
MAINTENANCE & CARE General cleaning will help prolong the life and performance of your treadmill. Keep the unit clean and maintained by dusting the components on a regular basis. Clean both sides of the Running Belt (No. 17) to prevent dust from accumulating underneath the Running Belt (No. 17). Keep your running shoes clean so that dirt from your shoes does not wear out the Running Board (No. -
Page 10: Folding Instructions
FOLDING INSTRUCTIONS FOLDING Turn off the power before folding. Restore the incline to flat position (Incline Level 0). Place your hand at position “A” and lift up on the Main Frame (No. 2) to push top of the running board forward until Cylinder (No. -
Page 11: How To Move The Machine
HOW TO MOVE THE MACHINE Before attempting to move the treadmill, make sure that it has been properly folded. Unplug the power cord. To tilt, start by placing one hand at position “P” to support the top end of the treadmill. Next, place one foot at position “M”... -
Page 12: Adjusting The Incline
ADJUSTING THE INCLINE ATTENTION: For your safety and convenience, always fold the treadmill (as shown below) before attempting to adjust the incline. There are three holes located on the Adjustable Cushion (No. 27). To adjust the level of incline, remove the 2 Adjustable Bolts (No. 8) from the left and right side. Align the holes of the Adjustable Cushion (No. -
Page 13: Important Electrical Information
IMPORTANT ELECTRICAL INFORMATION WARNING: This treadmill requires a power source of 10 amps (100-120V) in order to properly operate. For your safety, as well as the safety of others, please verify that the power source is correct before plugging the equipment. Any power source above or below this level could cause significant damage to the equipment and or user. -
Page 14: Exercise Instructions
EXERCISE INSTRUCTIONS GETTING STARTED: Before starting any exercise program, you should consult with your physician to determine if you have any medical or physical conditions that could put your health and safety at risk or prevent you from using the equipment properly. Be aware of your body’s signals. -
Page 15: The Display Console
THE DISPLAY CONSOLE DISPLAYS 1. Start Normal startup after 3 seconds countdown. 2. Number of programs Manual modes,12 Preset programs (P1-P12),3 User setting programs (U1-U3), 3 HRC and FAT. 3. Safe lock function Remove the safety key in any mode, and the treadmill will slow down rapidly till it stops. The console will beep continuously and “---”... - Page 16 pause the motor, and “PAUSE” will show on the display. Time, distance and calorie data will be automatically saved. The speed will go to zero. Press “PAUSE/ STOP” again to stop the motor, and all date will be cleared. If you press “START” within 5 minutes, the data of time, distance and calorie will be accumulated, and the starting speed will be the same as previous speed prior to pressing “PAUSE”.
-
Page 17: Program Mode
SET UP COUNTDOWN MODE 1. Turn on the treadmill. The treadmill is in standby mode. Press “MODE” to select time countdown mode, calorie countdown mode or distance countdown mode. Press START to start the treadmill. 2. To set countdown mode: a. -
Page 18: Program Parameters
PROGRAM PARAMETERS time Setup time / 20 = each segment of the running time program SPEED SPEED SPEED SPEED SPEED SPEED SPEED SPEED SPEED SPEED SPEED SPEED USER PROGRAM Treadmill has 3 user modes: U1, U2, and U3 for you to set your own training program. Each program will have 20 segments. - Page 19 BODY FAT TEST a. In standby state, press “PROG” to enter FAT (Physical fitness test) program. b. Press “MODE” to enter the program of F—1, F—2, F—3, F—4, F—5(F—1:gender, F—2:age, F— 3:height, F—4:weight, and F—5:physical test), c. Press “SPEED +/-” to set the parameter of F—1-F—4 (see below detailed table), then press “MODE”...
-
Page 20: Troubleshooting
TROUBLESHOOTING Problem Potential reasons Solutions 1. Place back the safety key back. ------- Safety key falls down 2. Replace safety key switch or magnetic sensor in the electronic meter; if the problem still occur, replace the electronic meter. 1. Check whether the connecting joint between the electronic meter and the core wire of the controller is loose, whether wires are damaged, After powering on, the or whether the core wires are in correct connecting order. - Page 21 3. Check whether lifting power cords are damaged. 4. Check whether lifting power cord terminals and the controller’s lifting terminals are firmly connected. 1. Check whether the over-load protector has tripped off. If yes, press 2. Check the power supply switch, over-load protector, the controller’s power cord and transformer to ensure well connection.
Need help?
Do you have a question about the FA-7967 and is the answer not in the manual?
Questions and answers
I have gotten an oil can image on my display but other than lubricating the belt I can't find anything else that says anything about oiling anything. How do I get that image and the accompanying alarm sounds to go away?
Does the FA 7967 fold completely flat or does it need to be taken apart to do so? We are moving and have to bring it down the stairs
how do i order replacement safety key? for 7967?