Table of Contents
Advertisement
Quick Links
Advertisement
Table of Contents

Subscribe to Our Youtube Channel
Related Manuals for RICHTECH V2 PRO

Summary of Contents for RICHTECH V2 PRO
- Page 2 Copyright© 2020 – RICHTECH SYSTEM LTD All rights reserved. Document NO:RICHTECHV2PRO001 Document revision:First edition, June, 2020. Operation Guidelines Notice Please follow the recommendations listed below for optimal performance. Please make sure that the system is deployed in a well-lit area...
- Page 3 Certifications CE inspection test, certificate number BKC200507AC, in line with the following standards: EN 55032:2015 EN IEC 61000-3-2:2019, EN 61000-3-3:2013+A1:2019 EN 55035:2017 FCC inspection test, certificate number BKC200508AC, in line with the following standards: FCC PART 15 Subpart B RoHS test, certificate number BKC200509AC, in line with the following standards: IEC 62321-4:2013+A1:2017 IEC 62321-5:2013 IEC 62321-6:2015...
-
Page 4: Table Of Contents
3.2.10 Integration.........................- 20 - 3.2.11 Error Message.........................- 21 - 3.2.12 Volume..........................- 21 - 3.2.13 V2 pro connected to pc directly by ethernet cable..........- 22 - 4. Desktop Management Terminal....................- 23 - 4.1 Setup............................- 23 - 4.2 Main interface..........................- 25 - 4.2.1 Support.......................... - Page 5 4.3.1 Live............................- 27 - 4.3.2 Add user..........................- 28 - 4.3.3 User management......................- 28 - 4.3.4 Records query........................- 29 - 4.4 Settings............................- 29 - 4.4.1 Net config..........................- 29 - 4.4.2 System Config........................- 30 - 5. Maintenance............................ - 31 - 6.
-
Page 6: Introduction
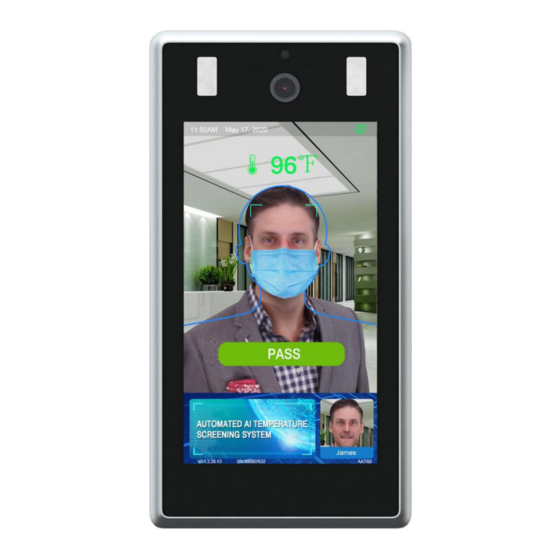
Both the CDC and FDA recommend having routine temperature screening for employees upon arriving at work. When deployed as part of a multilayered preventative response to COVID-19, the AATSS V2 Pro will protect your employees and facilitate the re-opening of your business. -
Page 7: Setup
Internet Explorer: Version 10 or above Please follow the network setup tutorial on our website: https://www.richtech-ai.com/tutorial-videos Once the system is setup on your network, simply open IE 10+ and navigate to the static IP address you assigned to the system to access its settings. -
Page 8: Screen And Icon
Note: we recommend using Window 10 when managing the AATSS V2 pro. 2.1 V2 pro connect to the network If you need to manage the V2 pro through a network, please connect the base to your router through an ethernet cable, see below example... - Page 9 If there is more than one network interface card (NIC) in your pc, please choose the same network that connected to V2 pro, and disable the other NIC, see below. The default mode of V2 pro to connect to Internet is DHCP (Dynamic Host Configuration Protocol). Device will be obtained the IP address automatically.
-
Page 10: Setting Of V2 Pro Ip Address
In Network- LAN, please close the enabling of DHCP. Then click the Save button to save the settings V2 pro will reboot again, the IP address will be adjusted to static IP address, e.g. 192.168.0.25. Gateway is 192.168.0.1 - 5 -... -
Page 11: Management Terminal(Web)
3. Management terminal(web) 3.1 Login interface When you open the management terminal (web) first time, please input the device IP address, e.g. http://192.168.0.8 There is note to recommend you to install the extension, please click” install ” to make the installation as follow. - 6 -... - Page 12 - 7 -...
- Page 13 Default username: admin Password:123456 Camera life feed - real-time monitoring screen - 8 -...
-
Page 14: Settings
3.2 Settings 3.2.1 Account You may change the username and password, and add a user that only have access to browse date, no permission to change settings. 3.2.2 System a. System Info. You can change the device name here. - 9 -... -
Page 15: Maintenance
b. System time. You can change the time zone and set time preferences. 3.2.3 Maintenance a. Upgrade Step 1: Click “Browse” and select the firmware update file(s), then client upgrade button to upgrade. Step 2: Click “client upgrade” to update the system Step 3: Then perform a Factory Reset to restarted the system and finished the upgrade. -
Page 16: Screen
b. System log 3.2.4 Screen Screen Parameter Options: Auto mode, Always bright, Time. - 11 -... -
Page 17: Network
3.2.5 Network - 12 -... -
Page 18: Advanced
3.2.6 Advanced a. Email– An alert will be set to the recipient email addresses when an abnormal temperature is detected. SMS alerts can also send using this function by using your wireless carrier’s email- to-SMS function. Please see chart below for how to format the SMS email address. (Not all carriers are listed) Carrier Email Format... - Page 19 b. FTP –Can be used to transfer files from the device to your pc c. RTSP – Full camera feed streaming, provides easy integration into existing security camera systems - 14 -...
-
Page 20: Storage
3.2.7 Storage You can see the device’s available storage here. 3.2.8 AI settings - 15 -... - Page 21 Basic Default Options Face Recognition Enable Enable Disable Face matching Enable Enable Disable (You must enable face matching in order to see this option under Integration) Sensitivity 0-100 (The lower the setting, the faster the system can recognize faces. However, it may recognize other objects as faces if the setting is too low) Snapshot pixels...
-
Page 22: Face Library
Mask Detection Enable Enable: Detect face masks Disable Temperature Screening Enable Enable: Disable: Temp.Unit Celsius or Fahrenheit Temp.Alert range:(98.6-99.5°F)(37.0-37.5°c) Other Config FTP Upload Enable Face Tracking Enable Enable: Green square will be shown on the screen to display face tracking Disable 3.2.9 Face library You can import pictures from your PC, or use a snapshot directly. - Page 23 You can preview the image here - 18 -...
- Page 24 You can change the similarity range from 0(easier to recognize) to 100(difficult to detect). The default setting at 85 provides strong security while allowing reliable and consistent recognition. You can check all the saved records here. - 19 -...
-
Page 25: Integration
3.2.10 Integration Basic Configurations Default Description Integration Mode Door Mode UI Refresh Delay (2-10s) User info Display Disable Option to display user’s info Temperature display Show Option to display the temperature Save Snapshot Enable Option to save snapshot Save Temperature Record Enable Option to save temperature Entry Control... -
Page 26: Error Message
3.2.11 Error Message You can set error message as you will. 3.2.12 Volume Here you can adjust the volume settings, enable audio, or disable it. - 21 -... -
Page 27: V2 Pro Connected To Pc Directly By Ethernet Cable
3.2.13 V2 pro connected to pc directly by ethernet cable How to connect v2 pro directly to your pc, in case of no network or emergency. please see below steps: 1. Use ethernet cable to connect v2 pro and pc. -
Page 28: Desktop Management Terminal
4. Desktop Management Terminal 4.1 Setup please install the ConfigTool for AATSS V2 pro on your pc. Installation steps: Download the ConfigTool, then install it as below - 23 -... - Page 29 - 24 -...
-
Page 30: Main Interface
4.2 Main interface Here you can see a list of all your AATSS V2 Pro devices, IP addresses, firmware versions and other details. You can apply updates to multiple devices through this terminal, as well as view data and adjust settings for individual devices. -
Page 31: Support
4.2.1 Support Click “support”, it appears software information 4.2.2Setting Click “settings”, if there is more than one NIC, and devices couldn’t be showed on list, you need to change the IP address by Select Network Adapter, see below. - 26 -... -
Page 32: User
4.3 User 4.3.1 Live This screen provides a live feed of all temperature screenings currently being conducted. If an abnormal temperature is detected, the system will provide an audible alarm to notify the person viewing the screen. - 27 -... -
Page 33: Add User
4.3.2 Add user Here you may add users to the whitelist, blacklist and uncategorized databases. 4.3.3 User management Here you can edit user information. - 28 -... -
Page 34: Records Query
4.3.4 Records query You can find all records here. 4.4 Settings 4.4.1 Net config You can set the IP address here, please use a static IP address. - 29 -... -
Page 35: System Config
4.4.2 System Config You may adjust system settings and reboot the device here. You may change the photo right below the screen, format:24 bit BMP, resolution: 285x179 see below. - 30 -... -
Page 36: Maintenance
5. Maintenance Thermal infrared detection works best indoors. The AATSS V2 Pro is resistant to sunlight interference and can be used outdoors, however, please avoid direct sunlight on the device or the face of the person being screened when possible. We recommend a well shaded area for best performance. - Page 37 Fill Light Dual fill light INTERFACE Operating System Linux Network Module Network Module Ethernet (Wi-Fi coming soon) Audio Audio 2.5W / 4R Speakers Serial Communication Serial Communication 1 RS232 serial port Relay Output 1 open door signal output (Dry contact) Wiegand One Wiegand 26/34 output, one Wiegand 26/34 input (Dry contact)
-
Page 38: Warranty
7. Warranty Full 1-year manufacturer warranty. (Extendable up to 3 years) More information. Return within 14 days of receiving shipment for a full refund minus return shipping. If return is due to manufacturing defect all shipping costs will be covered. - 33 -... - Page 39 +1-866-204-2158 - 1 -...
Need help?
Do you have a question about the V2 PRO and is the answer not in the manual?
Questions and answers