
Related Manuals for Simulab PacerMan

Summary of Contents for Simulab PacerMan
- Page 1 USER GUIDE v1.0 PacerMan System Set Up Software Installation Troubleshooting www.simulab.com...
-
Page 2: Table Of Contents
Connect Body Form to USB ....... . 16 Connect PacerMan to your Pacing Generator ....16 System Set Up Checklist . -
Page 3: Overview
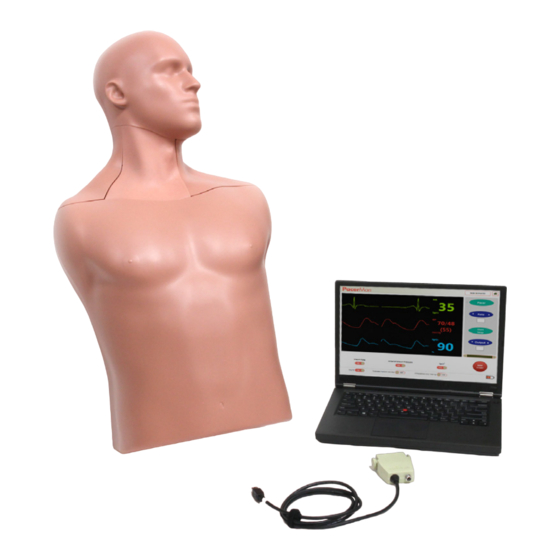
Simulated Arterial Blood Simulated Extension System Fill Port with Funnel Body Form to USB Cable Arterial Hand Pump Wall Power Supply Fill Line Battery Charger Carrying Case Battery Pack PacerMan requires your own pacing generator and kit. PacerMan System Overview... -
Page 4: System Components
System Components BODY FORM Arterial Line Head Cover Replaceable Tissue Torso Cover Tissue Cradle Serial Number Label Battery Well Vessel Channel Cover Fluid Reservoir and Cap System Components Simulab Corporation... - Page 5 In Use Valve Drain Connection Power Cord Connection: Wall Power Supply Battery Pack COMMUNICATION PANEL Accessory Port: Simulated Extension System OEM Extension Universal Extension Cable Cable Body Form to USB Port: Body Form to USB Cable PacerMan System System Components...
- Page 6 System Components (continued) REPLACEABLE TISSUE Arterial Line Venous Line PACERMAN SOFTWARE FLUID ACCESSORIES Simulated Arterial Blood SimuSensor Venous Blood Concentrate Venous Fluid Mixing Bottle Fill Port with Funnel Drain Tube with Stop Clip Arterial Hand Pump Fill line System Components...
-
Page 7: Quick Start Guide
Quick Start Guide Load the PacerMan software onto your PC or laptop. Insert the replaceable tissue and fill up the fluid reservoir. Connect body form to computer and power source. Connect the body form to the pacing generator using the Simulated Extension System. -
Page 8: System Set Up
System Set Up Make sure your computer has an Internet connection. The software requires USB and Bluetooth drivers to be installed when you use the PacerMan System for the first time. REQUIREMENTS FOR SOFTWARE INSTALLATION Ð Ð Window 7 or higher Ð... - Page 9 Software installation will begin. Note: if you click “Cancel” on this screen it will end the installation. Once your software is successfully installed, the “Installation Complete” screen will appear. Click “Close” and now the PacerMan set-up CD can be removed from the disk drive. Please restart your computer before proceeding. PacerMan System...
-
Page 10: Bluetooth
Body Form is turned on, and the USB cord is not connected to the body form. Connection may take up to 30 seconds after PacerMan has been turned on and discoverable. - Page 11 In Windows 7 1. Turn on your PacerMan System 2. Select the Windows Start button > Devices and Printers. 3. Select Add a device > select the PacerMan > Next. 4. Follow any other instructions that might appear. In Windows 8.1 1.
-
Page 12: Unpack And Inspect
UNPACK AND INSPECT Check to make sure all of the parts listed in the System Components section are in the case. Contact Simulab for assistance if anything is missing or damaged. INSTALL TISSUE Remove the torso and head covers from the body form. Then take off the black vessel channel cover by using the finger clips to gently lift off. - Page 13 Make sure it’s snapped securely into both ends. Replace the vessel channel cover, ensuring it snaps into place. Lay the arterial line into the channel in the head area and replace the head cover. PacerMan System System Set Up...
-
Page 14: Prepare Fluid System
Fill up the fluid reservoir using the funnel and be sure to keep an eye on the fluid level. Then replace the reservoir cap. NOTE: The fluid reservoir holds approximately 24 oz when it’s empty. System Set Up Simulab Corporation... -
Page 15: Connect To Power
Prepare Fluid System (continued) Replace the head and torso cover. CONNECT TO POWER PacerMan is powered by battery or wall power. To connect the battery, place it in the battery well that’s located under the torso cover. Put the torso cover back on and the... -
Page 16: Connect Pacerman To Your Pacing Generator
CONNECT PACERMAN TO YOUR PACING GENERATOR The Simulated Extension System connects your pacing generator with the PacerMan Body Form. It has one cable to fit most Medtronic pacing generators and another universal cable for those with only distal and proximal plug-ins. -
Page 17: System Set Up Checklist
Tissue: Ensure tissue is connected properly. See “Install Tissue” on page: 12. Fluid: Ensure tank is filled. See “Prepare Fluid System” page: 14. Extension System: Ensure the Extension System is connected. See “Connect PacerMan to your Pacing Generator” on page: 16. PacerMan System System Set Up... -
Page 18: Software Guide
PacerMan Software Guide LAUNCHING PACERMAN SOFTWARE The first time you connect the PacerMan body form to the PC a driver will install. This requires a connection to the Internet and will happen in the background. Launch the PacerMan software by... - Page 19 PacerMan System Home Page From the home page, choose to operate PacerMan in the Instructor Mode or Student Mode. Instructor Mode: Allows you to select a scenario set up by choosing multiple outcomes for transvenous or transcutaneous pacing (see page 20).
-
Page 20: Instructor Mode Scenario Setup
Capture Threshold: Decide what a successful mA output will be to gain capture. Outcome: What outcome will the first pass of the catheter present? Click Begin. The system will calibrate and the monitor screen will open. Software Guide Simulab Corporation... -
Page 21: Calibration
If any status items respond with “No”, you’ll need to check to see if the item was installed correctly. Calibration Troubleshooting If “Tissue Installed” says no go to page: 12. If “Fluid Filled” says no go to page: 14. If “Accessory Connected” says no go to page: 16. PacerMan System Software Guide... -
Page 22: Monitor Page
Next, the Monitor Page will open. Choose your vital options and monitor views. Monitor Page Guide Patient Vitals: Patient Monitor Heart Rate, Arterial Blood Pressure, , NIBP New Scenario and Home Buttons Additional Functionality Bar: Sound, Extended Patient Monitor, Transcutaneous Pacing Panel Intracardiac ECG Tracing Software Guide Simulab Corporation... -
Page 23: New Scenario
Press the Home button to return to the home page. NOTE: Ensure the pacing lead is not in the system when you start a new scenario. Home Button New Scenario button PacerMan System Software Guide... -
Page 24: Additional Functionality Bar
PC. Go to Control Panel » Display » Screen Resolution or Screen Appearance and set to “Extend this display”. Intracardiac ECG Tracing Toggle: The PacerMan software will display an Intracardiac ECG Tracing on the Monitor Page. The ECG tracing responds to proper clinical interaction with the pacing catheter pins and extension system. -
Page 25: Defibrillator Interface Options
If you choose Transcutaneous Pacing, you’ll see the Main Interface Page will open and display the patient monitor with a simulated defibrillator window. Pacer: Turn on Rate: Adjust rate (displayed in field) Current: Adjust current (displayed in field) Pause: Momentarily stop pacing Scroll: Adjust defibrillator display PacerMan System Software Guide... - Page 26 Choose Your Procedural Option: Transcutaneous Pacing Blind Approach ECG-Guided Approach Software Guide Simulab Corporation...
-
Page 27: Battery Charging
Indicator Light charging, and a green light means the battery is fully charged. REFILLING THE PULSE BULB To refill the pulse bulb, connect the fill line to the bulb and slowly add more red fluid. PacerMan System Maintenance and Storage... -
Page 28: Refilling The Pulse Bulb
Attach the drain tube to the drain port on the Power and Drain Interface Panel; make sure the clamp is closed. NOTE: Insert the drain tube into the mixing container, relock clamp and remove drain tube. Maintenance and Storage Simulab Corporation... -
Page 29: Draining The System
Finally, remove the drain line; seal the mixing container for storage. POWER DOWN THE SYSTEM Turn System Power button to the “OFF” position and disconnect from battery or wall power. PacerMan System Maintenance and Storage... -
Page 30: Power Down The System
To store the system, check to make sure all the system components are in the carrying case. When repacking the body form, make sure the base is positioned opposite from the case’s handle. This protects the body form’s electronics from damage. Maintenance and Storage Simulab Corporation... -
Page 31: Packing And Storing
Packing and Storing (continued) Store replaceable tissues in a plastic zip lock bag. This will contain any excess fluid released and prevent evaporation of fluid. PacerMan System Maintenance and Storage... -
Page 32: Troubleshooting
The Simulated Extension System accessory port? Cable plugs into the accessory port on the communication interface panel. How do I connect PacerMan PacerMan connects to the pacing to my pacing generator? generator via the Simulated Extension System. Should I use the OEM... - Page 33 Troubleshooting (continued) BLUETOOTH Inquiry Solution Page How do I connect PacerMan Pair the PacerMan Bluetooth with to Bluetooth? your PC according to your PC instructions. PacerMan is not Check to see if the USB cable is discoverable. plugged into the body form and unplug it.
- Page 34 Home Page or pressing the New Scenario Button to fill the tissue. Tissue does not fill during Ensure the In Use Valve is in the calibration? “IN USE” position. Press the New Scenario button and initiate a new calibration. Troubleshooting Simulab Corporation...
- Page 35 SOFTWARE Inquiry Solution Page I’m not able to get capture. Make sure the proximal pin (+) and distal (-) pins are inserted into the appropriate ports on the Simulated Extension System PacerMan System Troubleshooting...
- Page 36 Ensure that the pacing lead is NOT IN THE BODY FORM during any recalibration. That didn’t work and there Ensure the vessel channel is are still no ECG Rhythms on properly locked into place. Intracardiac ECG Tracing. Troubleshooting Simulab Corporation...
- Page 37 The Body Form will not Unplug or disconnect the 10 & connect to the PC. PacerMan body form from your PC. Close the application. Before opening the software application, plug the USB cord into the body form and into your PC. Or connect via Bluetooth, then once connected, open the software.
- Page 38 The PacerMan System should be shipped in its original packaging or an equivalent box and its soft-sided carrying case with foam. Shipping PacerMan in the soft sided bag only is not advised, and may void the maintenance agreement. For annual refurbishment, Simulab will provide to the customer a shipping box at no charge.
- Page 39 If any portion of the system is showing wear and tear, Simulab will refurbish it annually as a part of this program. Refurbishment under this agreement will be completed at Simulab’...
-
Page 40: Replacement Parts Catalog
Replacement Parts Catalog To reorder replacement parts go to www.simulab.com. Carrying Case (PMP-1001) PacerMan Replaceable Tissue (PMT-10) Head Cover (PMP-1003) Torso Cover (PMP-1002) Fluid Reservoir Cap (PMP-1004) Vessel Channel Cover (PMP-1005) Replacement Parts Catalog Simulab Corporation... - Page 41 Replacement Parts Catalog (continued) Body form to USB Cable (PMP-1007) Simulated Extension System PMP-1006 Wall Power Supply (PMP-1008) Battery Pack (PMP-1009) Battery Charger (PMP-1010) OEM Extension Cable (PMP-1012) PacerMan System Replacement Parts Catalog...
- Page 42 Replacement Parts Catalog (continued) Drain Tube with Stop Clip (PMP-1011) Universal Extension Cable (PMP-1013) Venous Fluid Mixing Bottle SimuSensor Venous Blood (PMP-1014) Concentrate (SSV-16) Simulated Arterial Blood - 8 oz Fill Port with Funnel (CLP-1004) (MA-8) Replacement Parts Catalog Simulab Corporation...
- Page 43 Replacement Parts Catalog (continued) Fill Line (CLP-1003) Arterial Hand Pump (CLP-1008) PacerMan Software Kit (PMP-1015) User Guide (PMP-1015) PacerMan System Replacement Parts Catalog...
- Page 44 T: (206) 297-1260 | (866) 400-1260 | F: (253) 681-7667 E: info@simulab.com www.simulab.com Copyright © Simulab Corporation 2017. All rights reserved. PMP-1015...
Need help?
Do you have a question about the PacerMan and is the answer not in the manual?
Questions and answers