Table of Contents
Advertisement
Quick Links
Advertisement
Table of Contents

Subscribe to Our Youtube Channel
Summary of Contents for SynScan V2
- Page 1 240406V2...
-
Page 2: Table Of Contents
SynScan Hand Control HAND CONTROL OPERATION Initial Setup Star Alignment Pointing Accuracy Enhancement (PAE) OBJECT CATALOG Object database in the SynScan Selecting an Object OTHER FEATURES Utility Functions Setup Functions Using the User Defined Database Identifying an Unknown Object Linking with a Computer... -
Page 3: The Synscan
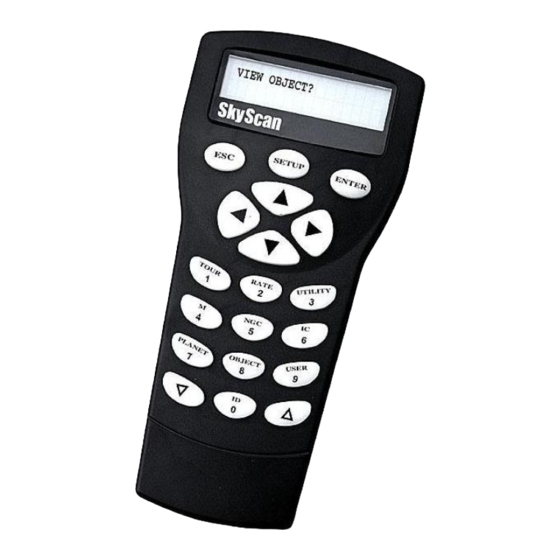
“Linking with a Computer” for details.) The DC power port allows independent use of the SynScan hand To connect the SynScan to a PC, use only the control for users who wish to browse the database RS-232 cable provided with the mount. - Page 4 Setup submenu. Directional keys The directional keys allow complete control of the telescope at almost any step in the SynScan's operation. These controls are locked out when the telescope is slewing to an object. They are normally used to initially align, center objects in the eyepiece, and manual guiding. The left and right directional keys can also be used to move the text curser when entering data to the hand control.
-
Page 5: Hand Control Operation
"DAYLIGHT SAVING?". Use the scroll keys to make the selection and press ENTER to confirm. If the date is out of the range between March and November, the SynScan will skip the daylight saving setting and proceed to the next step. -
Page 6: Star Alignment
Choose a star from the list and press ENTER. Once again, repeat the centering procedure for the third alignment star. If appropriate stars have been chosen and aligned to, the SynScan hand control will display "Alignment Successful". -
Page 7: Pointing Accuracy Enhancement (Pae)
Make sure that the reference object is still in the center of the view and press ENTER. If you do not wish to record the result, press ESC to abort the operation. After pressing ENTER, the SynScan will record the amount of pointing inaccuracy and recalculate the model of the sky. Now the pointing accuracy of this particular part of the sky should be greatly improved. -
Page 8: Object Catalog
The database contains the following catalogs: Solar System - The other 8 planets of our solar system, plus the Moon. Named Star - A list of 212 best known stars from the SynScan database. -
Page 9: Other Features
Utility Functions are useful tools that provide simple, one-step processes to your SynScan Show Position - This displays the coordinates of the location where the telescope is currently pointed. Display Time - This displays the local time and local Sidereal time. -
Page 10: Identifying An Unknown Object
Use the RIGHT or LEFT directional keys to move the cursor to the next or previous digit. Press ENTER to save. If the R.A./Dec coordinate entered does not exist, the SynScan hand control will not respond when the ENTER key is pressed. -
Page 11: Linking With A Computer
PEC (Periodic Error Correction) function provides a manual correcting method to reduce the amplitude of the worm errors. By recording a full cycle of guiding actions versus motor shaft angle, SynScan work to compensate for the drifting in the RA sidereal tracking caused by the periodic errors. Below... - Page 12 The Guide star drifts guide star back to the center away from the center For 8 minutes (10 minutes and 30 seconds for HEQ5), the EQ6 SynScan hand control records the manual guiding actions in order to characterize the periodic errors. Pressing ESC will stop the recording immediately and exit from the PEC training function.
-
Page 13: Tm Firmware
Once it is saved on your computer, only the firmware data file is needed for future updates. Download and save the firmware data file named SynScanVXXXX.ssf to the SynScan folder. (The XXXX indicates the version number of the firmware.) - Page 14 It may take longer if you are using a USB-to-RS232 converter. If the error message "Can not connect to a SynScan hand control" is shown, check the cable connection and the PC link cable itself. Make sure it is all in good working condition. Close all applications that may be occupying the RS-232 port and try again.
- Page 15 MAIN MENU TOUR SETUP MODE UTILITY FUNC. IDENTIFY Date Solar System Show Position Time Display Time Mercury Venus Observ. Site Park Scope Mars Daylight Saving Inquire Version Jupiter Alignment PEC Training Saturn Uranus 1-Star Align. LCD/LED Tuning Neptune 2-Star Align. Pluto 3-Star Align.
-
Page 16: Technical Specifications
SynScan SPECIFICATIONS 11 to 15 V DC 2Amp (Tip positive) Power Supply: Microstep driven 1.8° stepper motors. Motor type and resolution: Resolution: 0.144 arc sec (or 9,024,000 steps/rev.) Slew speeds: Rate 0 = 0.5X Rate 1 = 1X Rate 2 = 8X... - Page 17 "Cone" error is a common inaccuracy found on all German equatorial mounts. It is a result from the optical axis not being aligned to the R.A. axis of the mount. This affects the pointing accuracy of the SynScan Three-Star Alignment automatically compensates for the "Cone" error. If you choose One-Star or Two-Star Alignment method, you will need to perform manual mount calibration to eliminate the "cone"...
- Page 18 Loosen the R.A. lock knob and rotate the telescope around the R.A. axis until the counterweight shaft is parallel to the ground. (Fig.A-2) Using the Dec direction key on the hand control, adjust the telescope in Dec so Polaris sits on the R.A.
- Page 19 Carefully nudge the telescope in horizontal motion using only one finger while observing the movement of Polaris through the eyepiece Fig.A-7 (Fig.A-7). This is to determine which direction (left or right) moves Polaris closer to the center of the eyepiece. Next step is to adjust the adjustment screws on the mounting plate according to your finding from step 12.
- Page 20 The SynScan telescopes are designed to receive control commands sent from a computer via the RS-232 port and RS-232 cable. Once connected, the SynScan can be controlled by most popular planetarium software program. The SynScan will communicate with the personal computer at 9600 bits/sec, no parity and stop bit.
- Page 21 Physical Connection Diagram RJ-11 Connector RJ-11 1= NC RD = 2 2= RD GND = 5 3= GND 4= NC 5= TD TD = 3 6= NC The Back of the DB9 Pinout Sending a track rate through RS232 to the hand control Multiply the desired tracking rate (arc seconds /second) by 4.
- Page 23 NEVER USE YOUR TELESCOPE TO LOOK DIRECTLY AT THE SUN. PERMANENT EYE DAMAGE WILL RESULT. USE A PROPER SOLAR FILTER FIRMLY MOUNTED ON THE FRONT OF THE TELESCOPE FOR VIEWING THE SUN. WHEN OBSERVING THE SUN, PLACE A DUST CAP OVER YOUR FINDERSCOPE OR REMOVE IT TO PROTECT YOU FROM ACCIDENTAL EXPOSURE.
Need help?
Do you have a question about the V2 and is the answer not in the manual?
Questions and answers