Table of Contents
Advertisement
Quick Links
Manual del propietario • Manuel du propriétaire
IS0215ESF_02
Read all instructions BEFORE
assembly and USE of product.
KEEP INSTRUCTIONS FOR
FUTURE USE.
Steam Sterilizer
Esterilizador a vapor
Stérilisateur à vapeur
Owner's Manual
Lea todas las instrucciones
ANTES de armar y USAR este
producto. CONSERVE LAS
INSTRUCCIONES PARA USO
FUTURO.
Lire les instructions AVANT ď
assembler et ď UTILISER
le produit. GARDER CES
INSTRUCTIONS POUR S'Y
RÉFÉRER AU BESOIN.
ChiccoUSA.com
©2022 Artsana USA, INC. 1/22
Advertisement
Table of Contents

Related Manuals for Chicco 06951 SU


Summary of Contents for Chicco 06951 SU
- Page 1 Read all instructions BEFORE Lea todas las instrucciones assembly and USE of product. ANTES de armar y USAR este KEEP INSTRUCTIONS FOR producto. CONSERVE LAS FUTURE USE. INSTRUCCIONES PARA USO FUTURO. Lire les instructions AVANT ď assembler et ď UTILISER le produit.
- Page 2 Do • The use of accessory attachments is not not attempt to modify the plug in any way. recommended by Chicco and could cause • Remove plug from outlet when the injuries or damage.
- Page 3 • Ne PAS utiliser cet appareil à d’autres fins fonctionne toujours pas, communiquer avec • Chicco no recomienda el uso de accesorios ya que piezas, y antes de la limpieza. Déjelo enfriar antes que celles pour lesquelles il a été conçu.
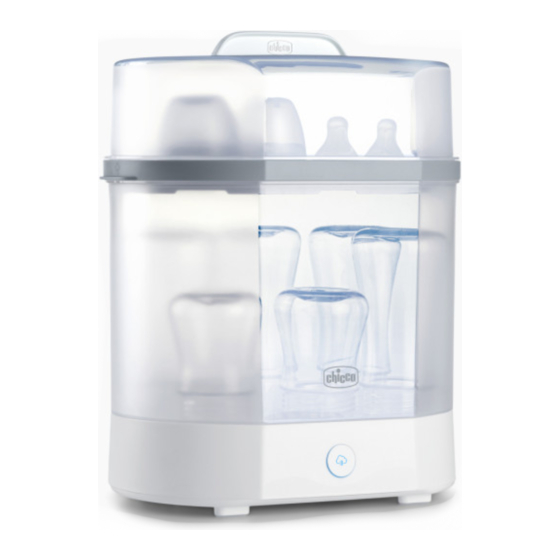
- Page 4 Parts List Configurations Lista de piezas Ajustes Liste des pièces Configurations FULL SIZE: Can be used to sterilize up to (6) Bottles and Nipples. (2) 11 oz (330 ml) feeding bottles OR COMPACT SIZE: Can be used to sterilize up to accessories and other small items like pacifiers.
- Page 5 Before First Use Step 1 • Paso 1 • Étape 1 Antes del primer uso Make sure Sterilizer is unplugged and Avant la première utilisation placed on a flat, stable, heat resistant surface. Remove the Sterilizer Lid (A), Remove Microwave Base (F) from Upper Rack (B) and Lower Rack (C).
- Page 6 Step 2 • Paso 2 • Étape 2 Step 3A • Paso 3A • Étape 3A WATER FOR FULL SIZE: Measure out FOR FULL SIZE: 4.5 oz (130 ml) of water into a separate container. Pour directly into Always clean and rinse bottles and the Sterilizer Tank (D).
- Page 7 Step 3B • Paso 3B • Étape 3B Step 4 • Paso 4 • Étape 4 FOR COMPACT SIZE: Attach the Power Cord (E) into the back of the Sterilizer Tank (D). Always attach Always clean and rinse bottles and plug to appliance first, then plug cord accessories before placing them in the into the wall outlet.
- Page 8 Microwave Step 1 Step 5 • Paso 5 • Étape 5 Paso 1 para microondas Sterilization times may vary. When the Micro-ondes, étape 1 cycle is complete, the “CYCLE” button light will turn off. Remove Lower Rack (C) and the If there is a power outage during use of Sterilizer Tank (D) from the assembly.
- Page 9 Microwave Step 2 Microwave Step 3 Paso 2 para microondas CAUTION: To prevent damage to bottles or other items, only use on a microwave Micro-ondes, étape 2 turntable set to rotate. Reference bottle manual for any additional requirements. Place the Sterilizer into the Measure out 2.75 oz (80 ml) of water into MICROWAVE WATTS TIME...
-
Page 10: Care And Maintenance
Care and Maintenance Microwave Step 4 : Make sure the Sterilizer is unplugged and the power cord is disconnected before When sterilization is complete, remove from the microwave. The components are CLEANING cleaning. Clean Sterilizer regularly. After each use allow to cool down completely, pour out very hot. -
Page 11: Cuidado Y Mantenimiento
Cuidado y mantenimiento Entretien et nettoyage : Asegúrese de que el esterilizador esté desenchufado y que el cable de : S’assurer que le cordon du stérilisateur est débranché de l’appareil et de la LIMPIEZA NETTOYAGE alimentación esté desconectado antes de limpiar. Limpie el esterilizador con frecuencia. Luego prise murale avant le nettoyage. -
Page 12: Troubleshooting And Repair
Trouble Shooting and Repair Solución de problemas y reparación PROBLEM POSSIBLE CAUSE SOLUTION PROBLEMA CAUSA POSIBLE SOLUCIÓN There is no power. The Sterilizer does not Check that there is power in the No hay corriente. El esterilizador no se Verifique que haya corriente en el turn ON. -
Page 13: Dépannage Et Réparation
For More Information Dépannage et réparation Más información PROBLÈME CAUSE POSSIBLE SOLUTION Pour plus d’information Le stérilisateur ne se met Il est hors tension. Vérifier s’il y a du courant dans la pas en marche. prise électrique murale. Please do not return this product to the store. If you have any questions or comments about (877)-424-4226 L’interrupteur «... - Page 14 www.chiccousa.com...
Need help?
Do you have a question about the 06951 SU and is the answer not in the manual?
Questions and answers