
Subscribe to Our Youtube Channel
Related Manuals for Dräger Medical Vapor 2000


Summary of Contents for Dräger Medical Vapor 2000
- Page 1 ® Dräger Vapor 2000 Anaesthetic Vaporiser Instructions for Use Because you care Emergency Care · Perioperative Care · Critical Care · Perinatal Care · Home Care...
-
Page 2: Table Of Contents
Contents In order to make it very clear which Instructions for Use is to be Instructions for Use without such a number are issued purely used with each Vapor, the serial number of the Vapor assigned for information purposes and not for actual use with a Vapor. is specified on the back of these Instructions for Use. -
Page 3: For Your Safety And That Of Your Patients
For Your Safety and that of Your Patients For Your Safety and that of Your Patients Strictly follow the Instructions for Use Any use of the apparatus requires full understanding and strict observation of these instructions. The apparatus is only to be used for purposes specified here. -
Page 4: Intended Use
— Selectatec The Vapor 2000 is suitable for use in strong magnetic fields is a registered trademark of Datex-Ohmeda. (MRI equipment) when used in accordance with the operating instructions on page 24. -
Page 5: Method Of Operation
Method of Operation Method of Operation Handle Vapor with care. Be careful not to tilt or drop. Do not carry by the control dial, control dial caps or locking lever for the plug-in adapter. Risk of injury. Do not use Vapor if it has been dropped. Damage may result in incorrect output concentration. -
Page 6: Connecting And Interlock Systems
Method of Operation »T« – Transport: Only set to »T« when Vapor is being disconnected from the anaesthesia delivery system or is connected to the parking holder. 1 Press »0« button and 2 turn control dial clockwise to »T« transport setting – »0«... - Page 7 Method of Operation Plug-in DW-2000 adapter with Interlock 2 For connecting to Dräger plug-in connectors. DW-2000 is not compatible with the Dräger Auto Exclusion System. For anaesthesia delivery systems with two plug-in connectors combined with Interlock 2. The locking bar, which can only be engaged in the control dial when at »0«...
- Page 8 Method of Operation Plug-in S-2000 adapter with Interlock S ® For connecting to Selectatec -compatible plug-in connectors. For anaesthesia delivery systems with several plug-in connectors combined with Interlock S. When a vaporiser is switched on, two pins on the side of the relevant plug-in adapter are pushed out.
-
Page 9: Filling Systems
Method of Operation Conical connector, 23 mm for anaesthesia delivery systems with 23 mm conical connectors conforming to ISO 5356-1 on the fresh-gas line. 1 Conical connector on Vapor. Filling systems For filling Vapor with the specified anaesthetic agent and draining. - Page 10 Method of Operation Dräger Fill filling system consisting of 1 the anaesthetic-agent-specific filling system on the Vapor, 2 the anaesthetic-agent-specific Dräger filling adapter on the bottle. Quik Fil filling system consisting of 3 the anaesthetic-agent-specific filling system on the Vapor 4 the anaesthetic-agent-specific adapter firmly mounted on the bottle.
-
Page 11: Preparation
Preparation Preparation Fitting connectors Use only authentic Dräger parts. Only selected materials may be used with anaesthetic agents in breathing gas. Connectors may only be fitted by trained service personnel, because they must be dismantled and checked. Risk of incorrect output concentration or escape of anaesthetic agent otherwise. -
Page 12: Before Using For The First Time
(on each type of anaesthesia delivery system). The technical data for Vapor 2000 and the anaesthesia delivery system must be adhered to. Any deviations might result in incorrect concentrations being delivered. -
Page 13: Filling Vapor
Preparation Filling Vapor Take care not to spill anaesthetic agent. Do not inhale anaesthetic agent vapour. Danger to health. Recommendation: ensure adequate ventilation when filling Vapor when not connected to anaesthesia delivery system. Only fill Vapor with the anaesthetic agent specified on it. Observe use-by date for anaesthetic agent. -
Page 14: Vapor With Keyed Filling System
Preparation Vapor with keyed filling system Note warnings on page 13. If Vapor is connected to anaesthesia delivery system: control dial remains engaged at »0«. When filling during operation: ● Fresh-gas flow can remain as set. 1 Set control dial to »0« Wait for 5 seconds for pressure to equalise, as fresh gas and anaesthetic agent vapour may escape otherwise. - Page 15 Preparation 1 Swing lever slowly so that pressure in Vapor can escape slowly. 2 Pull sealing block out completely and fold down. ● Hold anaesthetic agent bottle below Vapor. The holes on the adapter must be on the underside. 3 Push filling adapter into the opening of the filling system until it engages.
- Page 16 Preparation To finish filling process: 1 Swing anaesthetic agent bottle down. 2 Check filling level on sight glass – Vapor must be hanging vertical during this check or standing upright. Filling level must be visible and must not exceed maximum mark. If maximum mark has been exceeded there is a risk of incorrect output concentration, so max.
-
Page 17: Vapor With Dräger Fill Filling System
Preparation Vapor with Dräger Fill filling system Note warnings on page 13. If Vapor is connected to anaesthesia delivery system: control dial remains engaged at »0«. Filling during operation: ● Fresh-gas flow can remain as set. 1 Set control dial to »0«. Wait for 5 seconds for pressure to equalise, as fresh gas and anaesthetic agent vapour may escape otherwise. - Page 18 Preparation 1 Unscrew locking cap on filling system slowly so that any pressure in Vapor can escape slowly. 2 Insert bottle with filling adapter into filling opening. Turn the bottle clockwise until the coded area of the filling opening has engaged. Do not turn the bottle anticlockwise.
-
Page 19: Vapor With Quik Fil Filling System
Preparation Vapor with Quik Fil filling system Note warnings on page 13. If Vapor is connected to anaesthesia delivery system: control dial remains engaged at »0«. When filling during operation: ● Fresh-gas flow can remain as set. 1 Set control dial to »0« Wait for 5 seconds for pressure to equalise, as fresh gas and anaesthetic agent vapour may escape otherwise. - Page 20 Preparation 1 Unscrew locking cap on filling system slowly so that any pressure in Vapor can escape slowly. 2 Insert bottle with the flanges going into the matching slots on the filling connector. Only use bottles with correct flanges. Take care over colour coding on bottle and Vapor. 3 Push bottle into filling connector to the stop and keep pushed in.
-
Page 21: Vapor With Filling Spout
Preparation Vapor with filling spout Note warnings on page 13. If Vapor is connected to anaesthesia delivery system: Control dial remains engaged at »0«. Filling during operation: ● Fresh-gas flow can remain as set. 1 Set control dial to »0« Wait for 5 seconds for pressure to equalise as fresh gas and anaesthetic agent vapour may escape. -
Page 22: Connecting Vapor
Risk of injury by trapping finger. For multiple Dräger Auto Exclusion plug-in connectors: ● Vapor 2000 with Auto Exclusion plug-in adapter can be connected to any free Dräger Auto Exclusion slot. The plug-in adapter must be level and stable on the sealing rings. -
Page 23: Vapor With Conical Connectors Without Interlock System
Preparation Vapor with conical connectors without Interlock system ● Insert Vapor in fresh-gas line. 1 For anaesthesia delivery systems with rigid conical connectors, adjustment plates may be used for alignment: Between connecting piece and connecting plate and/or connecting plate and anaesthesia delivery system. Ensure adequate screw length –... -
Page 24: Operation
Operation Operation Checklist – checks before each use Conditions: ● Operating parameters (e.g. temperature) as specified for the application – otherwise, wait for temperature to equalise with ambient temperature (see page 30). High temperatures at low atmospheric pressures (high altitudes) may result in an uncontrolled excessive dosage, see page 54. - Page 25 Operation Setting/checking: — Filling level in sight glass between minimum and maximum mark – must not exceed maximum mark. — Filling system: — Keyed filling system: locking lever fully in place and lever locked. ® — Quik Fil or funnel filling system: screw cap in place and securely tightened.
-
Page 26: Adjusting Concentration Of Anaesthetic Agent
Operation Adjusting concentration of anaesthetic agent ● First set flow of fresh gas on anaesthesia delivery system, If control dial is set to »T«: ● press »0« button, set control dial to »0«, wait 5 seconds for pressure to equalise. 1 Press »0«... -
Page 27: Ending Administration Of Anaesthetic Agent
Operation Two Vapors with Interlock 2: 1 Slide latch on Interlock 2 into the control dial on the Vapor which has been used until it engages. On Vapor to be used: 2 Press »0« button and set control dial to anaesthetic agent concentration required. -
Page 28: Disconnecting Vapor
Operation Disconnecting Vapor Take care not to drop Vapor. Do not re-use Vapor if it has been dropped. Damage may cause incorrect output concentration. Do not carry by the control dial, control dial caps or locking lever for the plug-in adapter. Risk of injury. -
Page 29: For Conical Connectors
Operation For conical connectors 1 Press »0« button and turn control dial clockwise to »T« until it engages. 2 Detach gas supply and gas delivery line from Vapor. ● The Vapor can now be disconnected. The fresh-gas line is now disconnected. Fresh gas and anaesthetic agent vapour may escape. -
Page 30: Fault - Cause - Remedy
Leak at connector, e.g. Vapor connected Have modification carried out by to SA2 or Titus which are not modified for DrägerService Vapor 2000, see page 12 Valves in plug-in connector damaged Repair* Vapor temperature outside specified Allow Vapor to reach normal temperature, application range, e.g. - Page 31 Leak on connector, e.g. Vapor connected Have modification carried out by to SA2 or Titus which are not modified for DrägerService Vapor 2000, see page 12 Locking device on filling system not Tighten locking device on filling system, tightened, or defective seals...
- Page 32 Fault – Cause – Remedy Fault Cause Remedy Filling level cannot be read in sight Vapor completely empty Refill Vapor glass Vapor overfilled Drain Vapor to maximum mark. Check concentration Sight glass display faulty Repair* Anaesthetic agent is obscured in sight Halothane contains thymol, which has Drain discoloured substance completely;...
- Page 33 Fault – Cause – Remedy Fault Cause Remedy Draining and filling Vapor: Anaesthetic agent is leaking from Drain valve not closed Close drain valve drainage outlet Vapor accidentally filled with incorrect Drain Vapor completely and blow off, anaesthetic agent see pages 41 to 46; repair* Anaesthetic agent does not flow into Filling adapter being used without check Use filling adapter with check valve or...
- Page 34 Fault – Cause – Remedy Fault Cause Remedy Plug-in adapter: Locking lever does not engage in control Control dial still set at »0« Set control dial to »T« and engage dial when disconnected Control dial to »0« or ≥0.2 vol.%. Locking lever cannot be swung out of the Set control dial to »T«...
-
Page 35: Care
Care Care Do not immerse Vapor and filling adapter in detergents. Detergents must not be allowed to get under the control dial. Do not allow detergents to get into the gas inlet or gas outlet, or the filling system. If liquids other than the anaesthetic agents specified for the Vapor get into the Vapor, the patient may be harmed. -
Page 36: Checking Readiness For Operation
Checking Readiness for Operation Checking Readiness for Operation Test after care and service of anaesthesia delivery system or Vapor, after prolonged shutdown and at least every six months. ● Previous inspection less than 6 months ago. ● Accompanying documents/Instructions for Use present. ●... - Page 37 Checking Readiness for Operation Plug-in adapter DW-2000: Only use white plug-in adapter for Vapor 2000. (Vapor 19.n plug-in adapters, which are silver in colour, must never be used on Vapor 2000). 1 Drop-in pin on locking lever secure and straight.
- Page 38 Checking Readiness for Operation Conical connector: ● Male cone connected to Vapor inlet. ● Female cone connected to Vapor outlet. ● Cones and sealing surfaces undamaged. Permanent connection: ● Vapor fixed securely to connector. Keyed filling system and Quik Fil: ●...
-
Page 39: Checking Concentration
Checking Readiness for Operation Checking concentration Weekly, when continuous monitoring is not available. Preparation ● Fill Vapor – at least half full between minimum and maximum mark. ● Allow the filled Vapor to warm up to room temperature of 20 to 24 °C. Wait long enough for the temperature to equalise –... - Page 40 Checking Readiness for Operation Display on monitor – in % partial pressure: no correction. – in vol.%: convert to partial pressure: Measured value [vol.%] x atmospheric pressure [hPa] Concentration = 1013 hPa [% partial pressure] Determining permissible range See Accuracy Data ("Technical Data", page 48) for permissible range of output concentration.
-
Page 41: Shut-Down
Shut-down Shut-down Draining Vapor Take care not to spill anaesthetic agent. Do not inhale anaesthetic agent vapour. Danger to health. Recommendation: Drain Vapor under suitable scavenging as small amounts of anaesthetic agent vapour will always escape. Whilst draining, avoid contamination. Anaesthetic agent which has been drained off must be handled, stored and disposed of as medicament. -
Page 42: Vapor With Dräger Fill Filling System
Shut-down 1 Turn drainage valve clockwise to close. 2 Push sealing block in fully. 3 Close lever, as fresh gas and anaesthetic agent vapour may escape when Vapor is switched on again, otherwise. If the lever cannot be closed completely, release lever and push sealing block in fully, otherwise the sealing block will not function properly and may damage the seal. -
Page 43: Vapor With Quik Fil Filling System
Shut-down ● Close anaesthetic agent bottle. Anaesthetic agent may otherwise be released. Mark bottle "Used anaesthetic agent". Recommendation: Do not re-use. Vapor with Quik Fil filling system Note warnings on page 41. If Vapor is connected to anaesthesia delivery system: 1 Control dial must be engaged at »0«. - Page 44 Shut-down 1 Push drain adapter into the slot on the filling system to the stop and keep holding bottle in this position during drain- ing. 2 As well as setting control dial to »T«, open locking cap on the filling device. 3 Use 2.5 mm Allen key to turn one or two times anti- clockwise taking care that no anaesthetic agent overflows from the drain adapter.
-
Page 45: Vapor With Filling Spout
Shut-down Vapor with filling spout Note warnings on page 41. If Vapor is connected to anaesthesia delivery system: 1 Control dial must be engaged at »0«. If Vapor is not connected to anaesthesia delivery system: 2 Control dial remains engaged at »T«. 3 Hold correct bottle for the anaesthetic agent concerned below the drainage outlet. -
Page 46: Blowing Off Vapor
Shut-down Blowing off Vapor If anaesthetic agent has also to be removed from the wick after draining: ● Set control dial to 5 vol.% and flush for about 5 hours at 5 L/min Air or 1 hour at 15 L/min Air. ●... -
Page 47: Maintenance Intervals
The Vapor 2000 inspection and maintenance schedule is specified in the "DrägerService Test Certificate for the Vapor 2000". The following wear parts must be replaced if any non-conformities with the specified values are found during maintenance and inspections or during routine checks by the user. -
Page 48: Technical Data
Technical Data Technical Data Classification Class II b as per EC Directive 93/42/EEC Annex IX UMDNS-Code 10-144 Universal Medical Device Nomenclature System – Nomenclature for medical products Operating range Ambient and Vapor Temperature during operation 10 to 40 °C; but Halothane and Isoflurane Vapors may only be operated between 35 and 40 °C if atmospheric pressures is between 850 and 1100 hPa during shut-down (filled, control dial at »T«) - Page 49 Flow resistance (without connector) at 10 L/min Air in mbar (1 mbar = 100 Pa) 10 °C 22 °C 40 °C Vapor set at »0« or »T« <40 <35 <30 Vapor switched on <150 <70 <35 Materials Vapor 2000 contains no latex.
- Page 50 Technical Data 2) 3) 4) Vapor conforms to Standards EN 740 ASTM F1161 CSA-Z168.3 ISO 5358 2) 3) 4) ISO 8835 (1997) 93/42/EEC Medical Device Directive Dräger Fill filling system with Dräger filling adapter EN 1280 Quik Fil filling system EN 1280 Keyed filling system with Dräger filling adapter EN 1280, ISO 5360...
-
Page 51: What's What
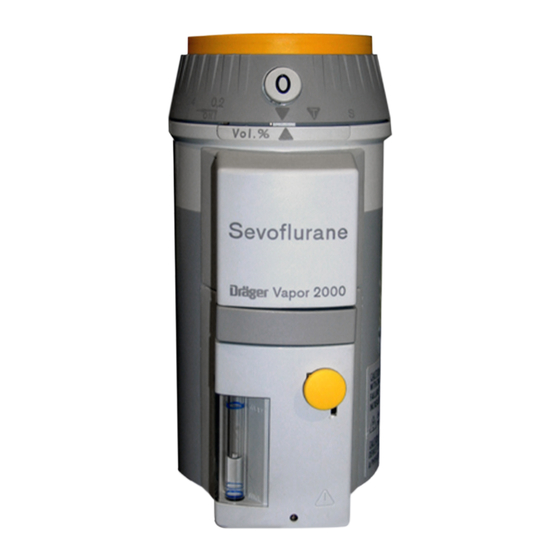
What's What What's What Front view 1 Control dial with concentration scale and letter for anaesthetic agent 2 Cover plate colour coded for anaesthetic agent with Interlock coding 3 »0« button for setting »0« and »T« 4 Indication of concentration units 5 Indication of anaesthetic agent and Vapor type 6 Sight glass for filling level 7 Drainage valve... -
Page 52: Description
Description Description Operating principle Control dial at »0« (switched off) Fresh gas (arrow) flows from Vapor inlet 1 to the vaporising chamber-bypass 2 and then passes from the outside to the inside through this gap. In parallel, some of the fresh-gas flows via an additional bypass 3 and flow control cone 4 to Vapor outlet 5. -
Page 53: Calibration
Description Control dial above »ON« (switched on) Fresh gas (arrow) is routed through valves 7a and 7b, linked to the control dial 8 and through the vaporising chamber 6. Valve 7c closes off bypass 3. Some of the fresh gas is enriched with anaesthetic-agent vapour (arrow with dot) in the saturated wick 9. -
Page 54: Influence Of Temperature
Description Influence of temperature Vapor compensates for changes in temperature. The Output concentration saturation concentration of the anaesthetic agent, which rises Halothane concentration [vol.%] as temperature rises, is automatically balanced by routing a [vol.%] higher proportion of the gas flow through the vaporising chamber-bypass (see page 53). -
Page 55: Influence Of Flow
Description Influence of flow Within the specified flow range, the concentration delivered by Output Halothane Vapor is only slightly dependent on the fresh-gas flow. concentration concentration [vol.%] [vol.%] The output concentration is reduced slightly when high concentrations are set at the same time as a high fresh- gas flow. -
Page 56: Influence Of Gas Composition
Description Influence of gas composition The concentration delivered is dependent on the composition of the fresh gas since the viscosity and density of the gas changes from one gas to another. Vapor is calibrated with Air because the concentration delivered is then exactly in the middle of the range for the anaesthetic gas mixtures which are available. -
Page 57: Influence Of Atmospheric Pressure
Description Influence of atmospheric pressure The anaesthetic agent partial pressure delivered by Vapor (see "Calibration", page 53) is all but independent of atmospheric pressure, so that weather-based fluctuations do not need to be taken into account and altitude-based pressure changes in the range 700 to 1100 hPa will only lead to small deviations within the accuracy specified. -
Page 58: Influence Of Fluctuations In Pressure
Description Influence of fluctuations in pressure during ventilation When ventilation is being carried out or when the O flush is operated without fresh-gas de-coupling, pressure fluctuations on the anaesthetic vaporiser can cause a higher concentration to be delivered than is shown on the control dial setting. The vapour in the vaporising chamber is compressed when pressure rises, and it expands when pressure falls. -
Page 59: Influence Of Running Time
Description Influence of running time Evaporation of the anaesthetic agent during operation cools Concentration Halothane delivered Vapor slowly. [vol.%] The saturation concentration of the anaesthetic agent in Vapor decreases more rapidly the longer the duration of operation, the higher the concentration set and the higher the fresh-gas flow selected, i.e. -
Page 60: Order List
Order List Order List Name and description Order no. Filling adapter s for Sevoflurane M 35 322 Filling adapter i for Isoflurane M 35 323 Filling adapter e Enflurane M 35 321 Filling adapter h Halothane M 35 320 Dräger Fill filling adapter for: Halothane M 36 090 Isoflurane... -
Page 61: Abbreviations And Symbols
Vapor H, E, I, S on control dial or on DW-2000 plug-in adapter. Code letter for anaesthetic agent for which Vapor 2000 has been calibrated, or for which plug-in adapter is coded. min. minimum permissible filling level on sight glass max. -
Page 62: Index
Index Index Abbreviations ........61 Filling . - Page 63 Index Method of Operation ....... . 5 T position - »T« transport setting ..... . . 5 Minimal Flow .
-
Page 65: Quality Inspection Certificate
......................................................................that the product Vapor 2000 with Serial no........has been inspected and complies with the technical specifications. Vapor units bearing the CE mark fulfil the requirements of Annex I to Directive 93/42/EEC (Medical Products). Dräger Medical AG & Co. KGaA Anaesthesia Division Vapor Production –... - Page 68 These Instructions for Use apply only to Vapor 2000 with Serial No.: If no Serial No. has been filled in by Dräger these Instructions for Use are provided for general information only and are not intended for use with any specific machine or device.
Need help?
Do you have a question about the Vapor 2000 and is the answer not in the manual?
Questions and answers