Advertisement
Quick Links
Advertisement

Subscribe to Our Youtube Channel
Related Manuals for Bridge City HP-6FX


Summary of Contents for Bridge City HP-6FX
- Page 1 Bridge City HP-6FX Mini Multi-Plane HP-6FX 异形刨...
-
Page 2: English Version
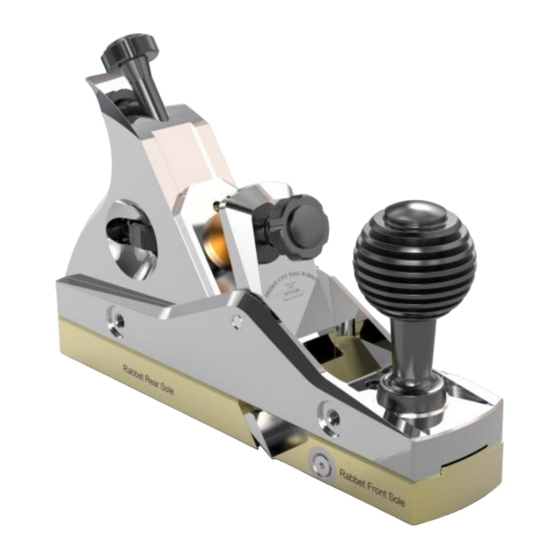
English Version... - Page 3 With this HP-6FX Mini Multi-Plane, you can achieve a smooth profile surface without any tear-out, burr, or other defects. The profile shape made by HP-6FX Mini Multi-Plane depends on the type of iron used and the depth of cut. The four types of irons as listed below are available for HP-6FX Mini Multi-Plane, among which, the Rabbet Plane Iron is the standard iron, whereas the rest are optional ones.
- Page 4 CNC machined aluminum alloy. The anodized surface not only provides good anti-friction and increased hardness, but also an exquisite look. HP-6FX Mini Multi-Plane is a hand tool that can provide you great pleasure and comfort on the many projects to come.
- Page 5 Irons The irons of HP-6FX Mini Multi-Plane are all made of tool steel, which is hardened to a hardness of RC60-62. They are suitable for cutting all kinds of hardwood and softwood. As shown in Fig. 2, all the irons must be installed on the 55° bevel of the plane body with iron bevel downwards and locked by the Iron Clamping Mechanism.
- Page 6 Continued table: Name Cutting Parameters Diagram Remark HP-6FX 2mm Radius Crown Iron With Hone HP-6FX 3mm Radius Crown Iron With Hone HP-6FX 4mm Radius Crown Iron With Hone HP-6FX 5mm Radius Crown Iron With Hone HP-6FX 6mm Radius Crown Iron With Hone HP-6FX 30mm Dia.
- Page 7 Continued table: Name Cutting Parameters Diagram Remark With Scoring HP-6FX 6mm Dado Groove Iron Cutter With Scoring HP-6FX 8mm Dado Groove Iron Cutter With Scoring HP-6FX 10mm Dado Groove Iron Cutter With Scoring HP-6FX 12mm Dado Groove Iron Cutter Note:...
- Page 8 DO NOT ATTEMPT TO HONE OR REPAIR THE SCORING CUTTER. Please reach out to Bridge City Tool Works customer service to purchase replacement parts. 3. The Hone is utilized for the V-Groove Irons and the Crown Irons. It is machined from CNC aluminum alloy to produce a specific sized V-shape angle and arc.
- Page 9 Dia. Crown Iron and Hone Radius Crown Iron and Hone Fig. 5 Honing Guide Diagram Multi-Plane Mechanisms Introduction Iron Clamping Mechanism: The HP-6FX Mini Multi-Plane follows a Iron Cap Clamp Pad unique Iron Clamping Mechanism by Iron Cap Knob Bridge City Tool Works, which consists of the Iron Cap, the Iron Cap Knob and the Clamp Pad.
- Page 10 Sole Locking Mechanism: Multiple soles can be used on the Rear Sole HP-6FX Mini Multi-Plane, each sole is Locking Wheel Front Tote fixed to the plane body with the Sole Locking Mechanism. The Sole Locking Mechanism consists of the Front Tote,...
-
Page 11: Operation And Adjustment
Operation and Adjustment Removing and Installing Iron and Sole Note: 1. The iron is very sharp, please handle with care to prevent accidental injury. 2. While replacing, pay attention to the specifications and names that are laser carved onto the iron and sole to ensure that they are corresponding/matching. Iron and Sole Removal: Refer to Fig. - Page 12 Iron and Sole Installation Refer to Fig. 10 (below) to install the iron and sole as follows: ① Installing the rear sole: Loosen the rear sole locking wheel, install the rear sole onto the rear sole dovetail nut, which is located underneath the plane body. Slide the rear sole in the direction indicated by arrow ①...
- Page 13 ③ Rear Sole Locking Wheel Front Tote ④ Iron ① ⑥ ⑤ Thumb Nut ② Fig. 10 Sequence of Installing the Sole and Iron Note: Different irons correspond to different mounting surfaces, as shown in Fig.11. Incorrect installation position of irons not only fails to lock the irons firmly, but also may cause personal injury and damage to the plane and workpiece.
- Page 14 Iron Adjustment Adjusting cutting depth The cutting depth of the iron is adjusted Semi-circular by rotating the lead screw. One full Lead Screw revolution clockwise will increase the Thumb Nut depth of cut by 0.57mm (0.022”). Vice versa, decrease the cutting depth by rotating lead screw...
- Page 15 Fig. 13 Mouth Adjustment Depth Skids The HP-6FX Mini Multi-Plane has a set of Depth Skids. These allow you to create accurate small pieces of wood that are the same thickness. When used with the rabbet iron, the thickest piece of wood you could plane is about 7/8”(22mm).
- Page 16 Simply plane your stock until the plane quits cutting. Fence The HP-6FX Mini Multi-Plane Fence has a square face and a 45-degree face. This allows you to plane edges that are either square or 45 degrees to the reference face of your stock.
- Page 17 Wipe off the abrasive paste, water stains and fingerprints with a soft cloth after each sharpening. Store: If you plan to store the HP-6FX Mini Multi-Plane for long periods, we recommend you wipe out the dust from the plane, lubricate all the moving parts and rub off the finger prints and spilled oil with a clean cloth.
- Page 19 中文版本...
- Page 20 HP-6FX 异形刨 恭喜您购买了 HP-6FX 异形刨。在使用此款新异形刨之前,请阅读以下使用方法和设置说明。 综述 HP6-FX 异形刨是一款用于对木料进行异形加工的手工工具,可加工肩槽,直槽,V 型槽,圆弧等线性 工件外表面的特殊形状。 正确使用 HP-6FX 异形刨可以加工出无撕裂、无毛边、无震纹等瑕疵的光滑的线性异形表面。 HP6-FX 异形刨加工的异形表面类型依赖于所配刀具的刃口形状和加工深度。 HP-6FX 异形刨适用的刨刀品种有四大类,其中槽口刨刀为标准配件,其余均为选配件: 1. 槽口刨刀 3. 圆弧刨刀 2. V 型刨刀 4. 开槽刨刀 注意: 每款刨刀均配备专用的前、后刨底; 槽口刨刀前刨底配置了 2 只蝶形划线刀,开槽刨刀前刨底配置 1 只对应规格的开槽划线刀; V 型刨刀和圆弧刨刀配置了对应规格的专用磨刀器; 刨底、刨刀、磨刀器、划线刀必须对应规格配套使用,不可混用。 HP-6FX 异形刨由刨体、刨刀压紧机构、刨刀调节机构、刨底锁紧机构、刨刀组件、深度导向板组件和 靠山组件构成,如图 1 所示。其中刨刀组件为可替换组件,可根据加工需求,成组替换。...
- Page 21 深度导向板组件 刨刀调节机构 刨刀压紧机构 后刨底锁紧旋钮 锁紧把手 深度导向板组件 刨体 刨底锁紧机构 靠山组件 刨刀组件 图 1: HP-6FX 异形刨结构组成图示 刨刀 HP-6FX 异形刨的刀具均采用工具钢材料,通过硬化处理达到洛氏硬度 60-62。适合刨削各种硬木和软 木。 如图 2 所示,HP-6FX 异形刨的所有刨刀必须斜面向下安装在刨体 55°的斜面上,通过刨刀压紧机构锁 紧。刨刀的实际刨削角度为 55°。 图 2: 刨刀安装方向图示...
- Page 22 备注 HP-6FX 槽口刨刀 标配刀具 HP-6FX Rabbet Iron 配划线刀 HP-6FX 60°V 型槽刨刀 配磨刀器 HP-6FX 60° Degree V Groove Iron HP-6FX 90°V 型槽刨刀 配磨刀器 HP-6FX 90° Degree V Groove Iron HP-6FX R2mm 圆弧刨刀 配磨刀器 HP-6FX 2mm Radius Crown Iron HP-6FX R3mm 圆弧刨刀...
- Page 23 续表: 序号 名称 切割参数简图 备注 HP-6FX 3mm 开槽刨刀 配划线刀 HP-6FX 3mm Dado Groove Iron HP-6FX 4mm 开槽刨刀 配划线刀 HP-6FX 4mm Dado Groove Iron HP-6FX 6mm 开槽刨刀 配划线刀 HP-6FX 6mm Dado Groove Iron HP-6FX 8mm 开槽刨刀 配划线刀 HP-6FX 8mm Dado Groove Iron HP-6FX 10mm 开槽刨刀...
- Page 24 开槽划线刀(图 4)——2mm~12mm 开 槽刨刀专配件,并与开槽刨刀规格一一对 应。开槽划线刀安装在对应规格的前刨底 卡槽内,螺钉锁紧,如图 4 所示。调节划 微调螺钉 线切深时,需拧松螺钉,根据切深需求, 上下移动划线刀的位置,刨体上的微调螺 锁紧螺钉 钉可辅助调整,调整好后锁紧螺钉,一般 建议划线切深不超过 0.25mm。 切深 图 4: 开槽划线刀的安装 注意:划线刀为特殊工件,划线刀在磨损后,需更换新的划线刀,不可自行修磨,以避免人身伤害。 3. 磨刀器:V 型和圆弧形刨刀均配置专用的磨刀器,磨刀器材质为铝合金,通过 CNC 加工中心制作特定 尺寸的 V 型夹角和圆弧,表面喷砂、阳极氧化处理,具有较高的表面硬度。配合 6000 目或 6000 目以 上的研磨膏使用,可研磨出锋利的刃口。研磨过程中需保证刃口斜面与磨刀器表面完全贴合(如图 5 所 示),避免因研磨角度和研磨方向不正确而损伤磨刀器和刨刀。 注意:磨刀器必须与研磨膏配合使用。 小圆弧刨刀和磨刀器 大圆弧刨刀和磨刀器 V 型刨刀和磨刀器 图...
- Page 25 异形刨机构介绍 刨刀压板 刨刀压紧机构: 磁铁压块 压紧旋钮 HP-6FX 异形刨使用 Bridge City 传统 的刨刀压紧设计结构,由刨刀压板、压紧 旋钮和磁铁压块组成。旋转压紧旋钮,将 刨刀牢牢压紧在刨子本体 55°斜面上。 图 6: 锁紧状态下的刨刀压紧机构 刨刀调节机构: HP-6FX 异形刨的刨刀调节机构是用 调节螺杆 于调节刨刀刨削深度的机构。安装在刨体 调节螺母 的斜 55°长孔内,由调节螺杆、调节螺母及 刨刀 螺母 配套螺母构成。刨刀上的安装孔套在调节 螺母上的小圆柱凸台上,旋转调节螺杆, 调节螺母可以带动刨刀移动,调节刨刀的 切深。 图 7: 刨刀调节机构 刨底锁紧机构: HP-6FX 异形刨可适用多款刨底, 每款 后刨底锁紧旋钮 锁紧把手...
- Page 26 深度导向板组件和靠山组件: 深度导向板组件是 HP-6FX 异形刨标配的辅助部件,用于定深刨削,由一对深度导向板及其安装标准件 构成。 靠山组件是 HP-6FX 异形刨标配的辅助部件,用于刨削侧边距的定位,由靠山及其锁紧部件构成。 以上两种辅助部件的具体使用方法详见第 28-29 页的操作具体介绍。 操作与调试 刨刀、刨底的拆除与安装 注意: 1. 刨刀非常锋利,小心拿放,防止出现意外伤害。 2. 更换时需注意刨刀与刨底上镭雕的规格名称,刨刀与刨底对应规格需一致。 拆除刨刀和刨底:如图 9 所示,按照如下方法拆除刨底和刨刀: ① 移除前刨底:旋松锁紧把手,向前滑动前刨底,直至前刨底与刨体完全分离; ② 旋松压紧旋钮; ③ 手动移除磁铁压块; ④ 移除刨刀:用拇指和食指抓住刀片两侧(靠近安装孔的位置),轻轻向上推动抬起,使刨刀与刀片 调节螺母脱离,将刨刀与从刨体下方取出; ⑤ 旋松后刨底缩紧旋钮,将后刨底向前移动,直至完全脱离刨体,移除后刨底。 注意:开槽刨刀、V 型槽刨刀和小圆弧刨刀是双刃口刨刀,在抓拿刨刀时,注意避免与刃口接触。 ③ ② 后刨底锁紧旋钮 锁紧把手 ① ⑤...
- Page 27 安装刨刀和刨底:如图 10 所示,按照如下方法安装刨刀和刨底: ① 安装后刨底:旋松后刨底锁紧旋钮,将后刨底安装在刨子本体下面的后刨底燕尾锁紧块上,沿图 10 中①号箭头指示方向滑向刨体后部,直至滑不动,位置如图 10 中虚线后刨底指示位置,预锁紧后刨底 锁紧旋钮; ② 安装刨刀:将刨刀斜面向下安装(安装角度参看第 20 页的图 2)。从刨体下方沿刨体 55°斜面方向 插入刨体刀具安装槽,选择刨刀上适合的圆孔套在刀片调节螺母上的小圆柱凸台上; ③ 将磁铁压块放在刨刀上,接近压紧旋钮的球头位置; ④ 旋转压紧旋钮,使球头部分压入磁铁压块的凹孔内,锁紧刨刀; ⑤ 复位后刨底:旋松后刨底锁紧旋钮,将后刨底沿图 10 中⑤号箭头指示方向滑向刨体前部,直至与刨 刀贴紧,位置如图 10 中实线后刨底指示位置,再锁紧后刨底锁紧旋钮; ⑥ 安装前刨底:旋松锁紧把手,将前刨底与前刨底燕尾锁紧块配合,沿图 10 中⑥号箭头指示方向滑向 刨体后部,接近刨刀刃口的位置时旋紧锁紧把手。 ③ 后刨底锁紧旋钮 ④ 锁紧把手 刨刀 ① ⑥ ⑤...
- Page 28 刀具安装面 刀具安装面 图 11: 刨刀安装位置示意图 V 型槽刨刀、开槽刨刀和小圆弧刨刀安装在图示安装面的凹槽内; 槽口刨刀和大圆弧刨刀安装在图示安装面两侧平台上。 刨刀的调节 调节刨刀刨削深度 调节螺杆 刨刀的刨削深度通过旋转调节螺杆进 行调节,顺时针转动,刨削深度减小,逆时 调节螺母 针旋转, 刨削深度增大。 调节螺杆旋转一圈, 刨刀刨削深度变化 0.57mm (0.022”)。 调节螺杆的旋钮上加工了滚花和圆弧 凹槽,将圆周分隔成 10 个区域,可以此为 标记,完成精细调节。例如将滚花中心旋转 至 相 邻 的 圆 弧 凹 槽 处 , 可 以 增 加 或 减 少 0.05mm 的刨削深度。...
- Page 29 图 13: 刨口调节 深度导向板的安装与使用 HP-6FX 异形刨配有一对深度导向板。可以满足定厚加工和定深加工。配合槽口刨刀使用时,最大定厚 22mm(大约 7/8”)。 按图 14 所示装配顺序安装深度导向板(所需标准件在标准件盒内)。 按图 15 所示方式,设置深度导向板的位置。 量块 图 14: 安装深度导向板 图 15: HP-6FX 深度导向板调节图示 使用一套增量为 0.001”或 0.02mm 的量块设置刨削厚度是最简单的方法。 示例: 设置刨削深度为 0.004”(或 0.1mm),先刨削木料的一面。如果想制作 1/4”(或 6mm)厚的木料, 取出 0.255”(或 6.12mm)和 0.256”或 6.10mm)的量块,并且放置在干净平整的工作台表面上。将较 低的量块放在前刨底下方,注意避开划线刀,将较高的量块放在后刨底下方。调节深度导向板并将他们完全 落在工作台面上,锁紧安装螺钉。当深度导向板设置正确时,取下量块后刨子平稳,无法摇动。刨削工件直 到没有刨花出现后,即可获得 1/4”(或 6mm)厚的木料。...
- Page 30 靠山的安装与使用 HP-6FX 异形刨的靠山一面为直角,一 面为 45°角。可以进行直角边定位或 45°斜 面定位的刨削加工。 靠山柱塞螺母 如图 16 所示安装靠山: 1. 将靠山柱塞螺母旋入靠山连接杆, 然后将 靠山连接杆 靠山连接杆旋入刨体侧边的螺纹孔旋紧;反 向旋转靠山柱塞螺母锁紧连接杆。 2. 将靠山滑入靠山连接杆, 并且根据刨削需 靠山 求定位靠山,锁紧靠山上的定位锁紧螺母。 定位锁紧螺母 图 16: 靠山安装 靠山可以安装在刨身的任何一侧。你可以选择安装靠山的直角边进行完美的直角边刨削,也可以选择安 装 45°角边用于木料倒角,常用的安装使用方式如下图所示。 图 17: 靠山使用实例...
- Page 31 刀具研磨 HP-6FX 异形刨的刨刀均经过精密研磨,因此刨刀背面的平面度可达到 0.012RMS,不再需要研磨刨刀 背面。 HP-6FX 异形刨所配的平口类刨刀(槽口刨刀和开槽刨刀)的研磨方式与常规刨刀相同,如果你不具备 高超的手工磨刀技能,使用 Bridge City 的另一款产品 HG-4 磨刀器是非常好的选择。 推荐使用磨刀石和 HG-4 磨刀器配合进行研磨,或在表面喷砂阳极氧化处理后的铝合金平板上,配合使 用 6000 目或 6000 目以上的研磨膏和 HG-4 磨刀器进行研磨,注意铝合金平板平面要足够平。 注意:研磨时需保持刃口与两侧边的垂直。 对于有两端刃口的刀具,在磨刀时必须将不修磨端的刨刀刃口防护起来,避免出现意外伤害。 HP-6FX 异形刨所配的异型类刨刀(V 型和圆弧型刨刀)的研磨参见第 23 页磨刀器的介绍说明。 我们推荐使用皮磨板去除研磨时产生的卷刃。 维护、保养和质保 维护 每次使用后需及时清理干净 HP-6FX 异形刨,将刨刀收进刨底,并在调节螺杆上滴入一滴轻质机油防止 出现过度磨损。在每一次磨刀后及时用干净的软布擦除研磨膏、水渍和指纹。 储存 如果需要长时间储存 HP-6FX 异形刨,我们推荐清除异形刨上的木屑与灰尘,润滑所有运动零件并且擦...
-
Page 32: Warranty
If there is a defect on the workmanship of the tool ( with no fault of the customer) within one year from the original date of purchase, please contact with the distributor ’ s customer service organization and they will determine whether to repair or replace the tool. 保修 所有退货、换货、技术服务和支持均由经销商的客户服务机构负责。 如果在原始购买日期后一年内发现工具存在工艺缺陷(客户无过失),请与经销商客户服务机构取得 联系,并由该服务机构决定是否对工具进行修理或更换。 Bridge City Tool Works www.bridgecitytools.com...
Need help?
Do you have a question about the HP-6FX and is the answer not in the manual?
Questions and answers