Table of Contents
Advertisement
Quick Links
Advertisement
Table of Contents

Related Manuals for AV-Box VWC-46S

Summary of Contents for AV-Box VWC-46S
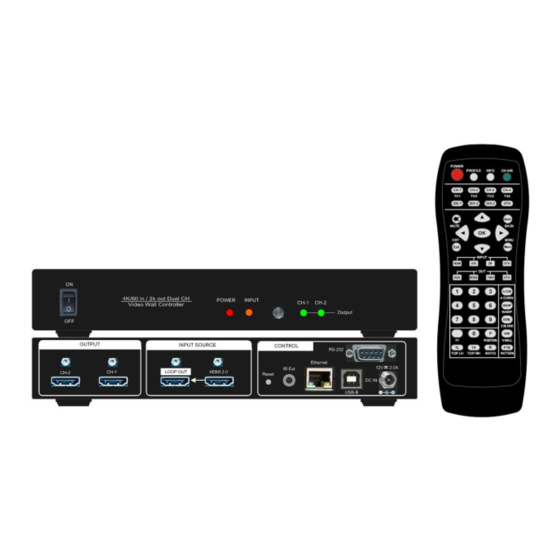
- Page 1 AV-BOX VWC-46S Quick User Guide 2 Channel 4K/60 video wall controller...
-
Page 2: Table Of Contents
Table of Contents Disclaimer/Copyright statement......................Warranty/RMA and FCC/CE statement....................Introduction……………………………………………………………………………........Feature................................ Quick User Guide....................……........Content in the packing box........................How to use IR Remote Controller......................System Setup procedures........................Step 1 – Connecting The Inputs..………………………………………….…......... Step 2 – Connecting the Outputs............…………........Step 3 –... -
Page 3: Disclaimer/Copyright Statement
This information contained in this document is protected by copyright. All rights are reserved by AV-BOX. AV-BOX reserves the right to modify this document without any obligation to notify any person or entity of such revision. Copying, duplicating, selling, or otherwise distributing any part of this document without signing a non-disclosure agreement with an authorized representative of AV-BOX is prohibited. -
Page 4: Introduction
Introduction AV-BOX VWC-46S is dual channel 4k/60 fps Video Wall controller. It is simplified version of VWC-46L with 1x HDMI 2.0 input, 1x HDMI 2.0 loop-out port for daisy chain connection and 2 synchronized HDMI outputs. Each output has independent image rotation/flip, scaling, cropping and color adjustment to allow great freedom in creating video wall with variable display scales and styles. -
Page 5: Quick User Guide
IR receiver is on Front Panel. One 3.5ø mm audio connector for IR extender is located at Back Panel of VWC-46S. 1.8m IR extension cable is equipped in the packing. User can add audio cable to extend the control distance up to 20 meters. -
Page 6: System Setup Procedures
System Setup Procedures Step 1 – Connecting The Inputs Please connect signal source to HDMI input port. User can also apply DVI-D signal but DVI to HDMI adapter is required. Raw signal Loop Out HDMI Input source from HDMI input source connector Step 2 –... - Page 7 User can connect any Loop Out signal to any HDMI input port in the next processing module or other devices. User can connect up to10 units of AV-BOX through daisy chain connection. The daisy chain connection number is related to source resolution and the quality of HDMI connection cables—poor cable will have less connection number and good cable can connect more units in daisy chain connection.
-
Page 8: Step 4 - System Connection And Power On
When VWC-46S power is switched on, the booting time is about 19 seconds and the Input & Output LEDs on front panel will stay “Lighted” while VWC-46S has correct input source and output monitor connections. -
Page 9: Step 6 - Input Source / Output Resolution Selection & Led Indicators
LED will light up Power on, Flashing: OSD Lock VWC-46S has only one HDMI input port. System default input is HDMI. No need to change. The output resolution selection will apply to two output channels at the same time. -
Page 10: Step 7 - Conventional Video Wall Settings
User can also get into OSD menu to do output resolution settings: [Image Properties] [ Output Mode] Select output resolution Input green LED will light up when VWC-46S has detected input signal. Output Green LED will light up when VWC-46S has detected the monitor in each output. Power LED: ... -
Page 11: Pan] - Assign Image Position
For 3x1 video wall displays Horizontal Zoom= 3, Vertical Zoom = 1 For 3x3 video wall displays Horizontal Zoom = 3, Vertical Zoom =3 [Pan] [Pan] will assign the location of each split image in the display in both horizontal and vertical directions. Horizontal direction is counted from Left to Right and Vertical direction is counted from Top to Bottom. -
Page 12: 3X3 Video Wall Setup
3x3 Video wall Setup User can use one VWC-48+ one VWC-46S to create 3x3 video wall as below. Signal source needs to be fed into all processors through loop out daisy chain connection. All the rest setup is the same as... -
Page 13: Bezel Compensation
Irregular / Asymmetric Video Wall Settings Introduction Asymmetric video wall can be created by rotating monitor installation direction or position. User can crop different area image for each monitor, rotate image direction and adjust image position through VWC-46S to achieve it. -
Page 14: Wind-Mill Asymmetric Video Wall Setup Procedures
AV-BOX video wall settings. VWC-46S can only rotate the image at 90/180/270 degrees. The monitors need to be installed at landscape or portrait position. If users want to install monitor at other rotation angle, VWC-43 model should be used. - Page 15 Test pattern applied to video wall Test pattern downloaded from AV-BOX website Split the content by [Zoom] Set [Horizontal Zoom] = 2, [Vertical Zoom] = 2 in all channels. If TV2 & TV3 dimension is smaller, user can set TV2 & TV3 [Horizontal Zoom]=4 and [Horizontal Pan]: TV2=3, TV3=2, so that user can reduce the image position adjustment range.
- Page 16 Before TV2 & TV3 After TV2 & TV3 image 90 degrees image 90 degrees rotation. rotation. Video wall Max. video wall center line display borders Set standard position as reference in horizontal and vertical directions User should determine Horizontal & Vertical image sizes and reference position so that all monitors have criteria for image position adjustment.
-
Page 17: Square Asymmetric Video Wall Setup Procedures
Square Asymmetric Video Wall Setup Procedures User can use two VWC-46S for square asymmetric video wall. Source signal should be applied to two VWC-46S through loop out port by daisy chain connection. No special connection sequence is required. The LCD can be installed at landscape or portrait direction. - Page 18 Step 1: Video Wall settings for all channels [Zoom]: H=2, V=2 [Pan]: TV1: H=1, V=1, TV2: H=2, V=1, TV3: H=1, V=2, TV4: H=2, V=2 Step 2: Apply Test Pattern and Rotate TV1 & TV4 images at 90 degrees ...
- Page 19 Original Image after applied test pattern Image after image rotation in TV1 & TV4 Step 3: Determined image center, marked with paper tape. Step 4: Set standard Position Reference in horizontal and vertical directions Horizontal Position Reference is determined by TV2 &...
- Page 20 Step 5: Individual monitor position adjustment based on Horizontal and Vertical Position Reference resulting from Step 4. TV1: increase [Overlap] value in Left Edge and decrease [Overlap] value in Right Edge to align Vertical lines to match TV3 TV2: increase [Overlap] value in Top Edge and decrease [Overlap] value in Bottom Edge to align Horizontal lines to match TV1 TV3: increase [Overlap] value in Bottom Edge and decrease [Overlap] value in Top Edge to align Horizontal lines to match TV4...
-
Page 21: Split Image For Projector Edge Blending Application
RS232 or Ethernet. 5 Profiles settings can be stored in the system. 10 Split Image for projector edge blending application VWC-46S can split 4k/2k 60Hz signal source and set overlap pixels for high resolution projector edge blending application. - Page 22 1. The adjustment range 900 pixels is calculated based on signal source resolution. 2. When user adjusts Overlap value in one monitor, it will also change the scaling factor. User needs to adjust the Overlap value in other monitors in the video wall to let all monitors has the same scaling factor. 3.
-
Page 23: Step 8 - Save System Settings Through Remote Controller
Draw the image into video wall and keep some blanking borders at some edges. 14.2 If the signal is from PC, user can set customized EDID in AV-BOX to let PC output the right output resolution. Some PC may not follow AV-BOX EDID resolution and require customized output setting from display card. -
Page 24: Easy Settings In Multiple Unit Application
15 Easy Setting In Multiple Unit Application 15.1 Setup by Remote Controller 1.1.1 If multiple units are used, user can set different [Box ID] (#1 - #99) to each AV-BOX in control system. For IR control, the number range is #1 - #9. -
Page 25: Uhdwall Manager Pc Tool
UWM Manager is a PC tool executed through PC. User needs to download this tool from AV- BOX website. Once user connects VWC-46S with PC through Ethernet or USB and open UWM Manager, user can access UWM and execute all operation similar to OSD menu through PC... -
Page 26: System Structure And Control
User can also backup system setting in PC and restore/copy to other units. UWM PC tool is designed for 40 series product. If user connects with VWC-46S, user will see 2 channels for selection instead of 4 channels. -
Page 27: Hdmi Vs. Dvi Output Signal
If set [Standby Time] at 60, the system will get into Standby Mode after 60 seconds when no input signal is detected. The output signals from VWC-46S will also be terminated at the same time. If VWC-46S detects input signal again, it will automatically turn on the system again. -
Page 28: Ethernet Setting (Please See More Details In Section 14.2)
Ethernet control: Ethernet is integrated in VWC-46S via RJ45 connector. User can controller VWC-46S through Ethernet or WiFi via PC or mobile devices. A WebGui with keypad icons will be showed in control devices for user to control VWC-46S by keyboard, mouse or touch screen. -
Page 29: Trouble Shooting
HDCP compliant issues: If the input source or the monitors are not HDCP compliant, it is possible to stop VWC-46S from negotiating HDCP link and show intermittent, abnormal or no image. Bit Rate or resolution issues: check if signal source and connecting cables can provide right resolution and data rate supported by VWC-46S. -
Page 30: Safety Precaution And Maintenance
Apart from what is detailed in User Guide, maintenance should be carried out by competent technician assigned by AV-BOX. If VWC-46S is physically damaged, it should be returned for repair using AV- BOX RMA procedures. If the unit is opened by user, it will lose the right for warranty protection. -
Page 31: Specifications
Specifications 10-bit processor, frame rate conversion. Input: 1x HDMI 2.0b, HDCP: 2.2/1.4. 3D motion adaptive de-interlace. Output: 2x HDMI up to 1080P & WUXGA. Frame lock for synchronized outputs. 1x HDMI 2.0 loop out ports from HDMI input ... -
Page 32: Revision History
Revision History Revision Date Originator Comments AV-BOX V1.0 2018-04-04 First version AV-BOX V1.1 2018-12-28 Add information about system synchronization...
Need help?
Do you have a question about the VWC-46S and is the answer not in the manual?
Questions and answers