
Related Manuals for GERMANICA KF16WG


Summary of Contents for GERMANICA KF16WG
- Page 1 40CM PEDESTAL WI-FI FAN KF16WG INSTRUCTION MANUAL Please read this manual carefully before using, and keep it for future reference.
-
Page 3: Table Of Contents
CONTENTS General Safety Before first use Product Overview Pedestal Fan Control Panel Remote Control Getting Started Remote Control Fan Parts Assembling the Fan Modes Swing / Timer App / Wi-Fi Control Add to Google Home App Add to Amazon Alexa App FAQs Specifcations Customer Support... -
Page 4: General Safety
GENERAL SAFETY Read this manual thoroughly before you start using the Fan. Store this manual, the completed warranty card, your receipt and the product packaging. The safety precautions instructions reduces the risk of fire, electric shock and injury when correctly complied to. Please follow all instructions and take notice of all warnings. - Page 5 GENERAL SAFETY (CONT.) • If you notice any unusual odors or smoke around the unit, immediately disconnect the unit from the outlet and contact the service center. Failure to do so may result in fire or electric shock. • When not using the unit for long periods of time or when you are moving the unit.
-
Page 6: Before First Use
GENERAL SAFETY (CONT.) Before first use • Unpack the fan and accessories and ensure all parts of the product are undamaged and in good working order. • Plastic wrapping can be a suffocation hazard for babies and young children, so ensure all packaging materials are out of their reach and disposed of safely. -
Page 7: Product Overview
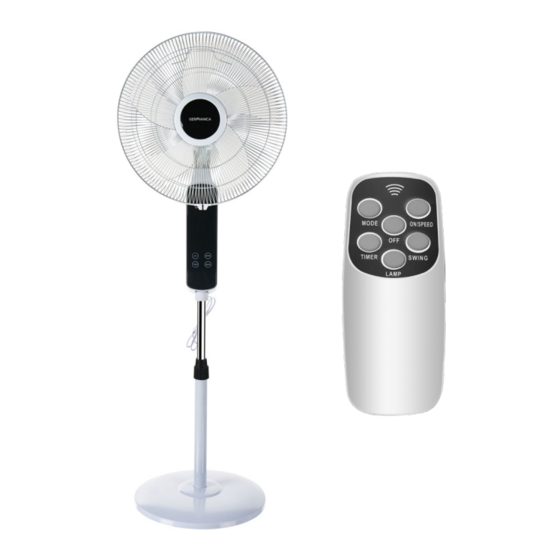
PRODUCT OVERVIEW 1 of 3 Pedestal Fan Front/Rear Grill Motor (back) Fan Blade Control Panel Extension Pole Height Adjustment Ring Base Tube Base... -
Page 8: Control Panel
PRODUCT OVERVIEW (Cont.) 2 of 3 Control Panel Swing indicator Mode Indicators Speed Indicators Time Indicators Power Off Timer Power On / Speed Swing 3 of 3 Remote Contorl Mode button Timer button ON/Speed button Power OFF button Swing button Lamp - Turn on Control Display LED... -
Page 9: Getting Started
Getting Started Remote Control • The fan comes with a remote control, which is powered by two AAA batteries (not supplied). Removing battery cover by sliding the cover outwards with your thumb. Insert new AAA batteries into the compartment and make sure they are placed correctly following the polarity symbols ( + / - ) and place battery cover back on. -
Page 10: Fan Parts
Getting Started (Cont.) Fan Parts... -
Page 11: Assembling The Fan
Getting Started (Cont.) Assembling the Fan. NOTE - use the illustration of FAN PARTS while following instructions. Unscrew the L-shaped screw and remove it and the clamping washer from the end of the base tube. (bottom of Fan base) 2. Loosen the height adjustment ring at the top of the base tube and pull out the extension pole to the desired height, or all the way to the top for maximum height (you may have to push it up from the bottom if it is tight or stuck). -
Page 12: Modes
Getting Started (Cont.) MODES Press the mode button on remote control to change the fan breeze modes. Normal - The fan operates at a constant speed (mode indicator off) Natural - Simulates a natural breeze by cycling on and off. (palm tree indicator) Sleep - Simulates soft and natural breeze suitable for night time. -
Page 13: App / Wi-Fi Control
APP / Wi-Fi Control Working with your mobile device, using your home Wi-Fi network router to communicate with the portable air conditioner and control it. Controlling the portable air conditioner remotely is very easy. You will need: - Android smartphone or tablet, or an Apple iPhone or iPad - Internet connection at your home - Wi-Fi network router set up at home. - Page 14 APP / Wi-Fi Control (Cont.) Before you log in, please press REGISTER and register your account using an email address. (3 and 4) Once entered email address, tap GET VERIFICATION CODE and an email will be sent your email address with a verification code. Enter this code. Now you can enter a password for your account.
- Page 15 APP / Wi-Fi Control (Cont.) IMPORTANT Before you can control your fan remotely, you must reset the Wi-Fi mod- ule. To do so please follow instructions: Unplug the fan from the power outlet for 10 seconds. 2. On the control panel, press and hold SWING for 5 seconds to reset. When the Wi-Fi Indicator on the control is blinking rapidly, the Fan is now ready to configure with your smart device.
- Page 16 APP / Wi-Fi Control (Cont.) You will now enter device list. Tap the plus ( + ) or ADD DEVICE to add your device. (7). 2. Select the type of product which in this case is: FAN. (8) 3. Select Wi-Fi network then enter in the password to connect. (9) Note: Make sure to select 2.4GHz NOT a 5GHz Wi-Fi network.
- Page 17 Now that the device is being added, progress screen will now appear as to below: (11, 12, 13). Once completed, it will show your product is now added. click DONE. Click on the device name and you can now start navigating the controls of the app. (14, 15) GERMANICA...
-
Page 18: Add To Google Home App
APP / Wi-Fi Control (Cont.) Add the Tuya Smart app to your Google Home app. Open your Google home app. (Before you link your app to your Google Home app, you will have to have a Google Home account already set up. 2. -
Page 19: Faqs
FAQs Problem Possible cause and solution Check that you have internet reception and your smart device and the fan are connected to the same Wi-Fi network. Make sure your Wi-Fi password is correct. During the set-up, the fan Make sure that no firewalls or other restrictions cannot be configured are set. -
Page 20: Specifcations
SPECIFICATIONS Power 220-240V ~ 50/60Hz 45W Remote control 2 x AAA batteries (not included) CUSTOMER HELPLINE: info@ayonz.com DISTRIBUTED BY: Ayonz Pty Ltd...
Need help?
Do you have a question about the KF16WG and is the answer not in the manual?
Questions and answers