
Related Manuals for The Singing Machine SMC4TV


Summary of Contents for The Singing Machine SMC4TV
- Page 1 SMC TV INSTRUCTION MANUAL www.singingmachine.com The Singing Machine® is a registered trademark or The Singing Machine Co., Inc.
-
Page 2: Important Safety Information
Important Safety Information CAUTION CAUTION: TO PREVENT ELECTRIC SHOCK, MATCH WIDE BLADE OF PLUG TO WIDE SLOT AND FULLY INSERT. RISK OF ELECTRIC SHOCK DO NOT OPEN WARNING: TO PREVENT FIRE OR SHOCK HAZARD, DO NOT EXPOSE THIS UNIT TO RAIN OR MOISTURE. CAUTION: TO REDUCE THE RISK OF ELECTRIC SHOCK, DO NOT FCC WARNING: This equipment may generate or use radio REMOVE COVER (OR BACK). - Page 3 Important Safety Information Read these Instructions. Keep these Instructions. Heed all Warnings. Follow all Instructions. Do not use this apparatus near water. Clean only with a dry cloth. Do not block any of the ventilation openings. Install in accordance with the Manufacturer’s instructions. Do not install near any heat sources such as radiators, heat registers, stoves, or other apparatus (including amplifiers) that produce heat.
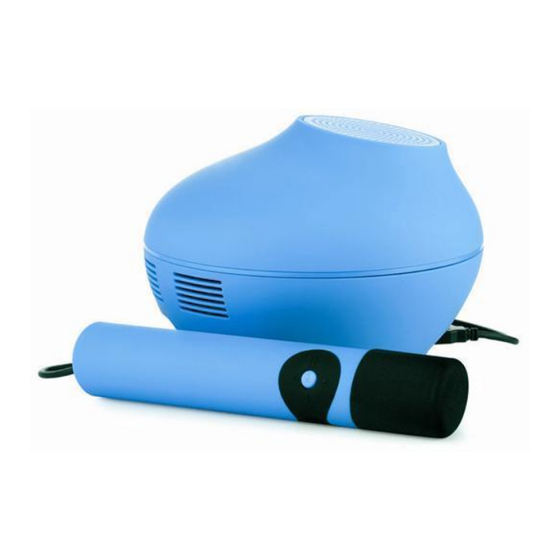
- Page 4 Included Please make sure the following items are included. Microphone SMC4TV Audio/Video Cable Manual AC Adapter...
-
Page 5: Location Of Controls
Location of Controls 1. USB Jack 2. MIC 1 Jack 3. MIC 2 Jack 4. CD Compartment 5. Speaker 6. AUX IN Jack 7. AV Jack 8. POWER IN Jack 9. ON/OFF Button 10. Skip Back 7/-10 u v w x Track Button 11. -
Page 6: Installation
Installation Connecting The Unit Connect the single end of the Audio/ Video cable to the AV jack on this unit. Connect the Audio/ Video cable’s yellow plug to the yellow Video In jack on the TV. Connect the Audio/ Video cable’s red and white plugs to the red and white Audio In jacks on the TV. - Page 7 Installation Connecting The Unit Connect the USB Microphone’s plug to the Mic1 or Mic2 jack. Insert the small end of the AC adapter into the POWER IN jack on the rear of the unit. Insert the other end (with the 2 blades) into a conveniently located AC outlet having 110-240V AC, 50/60Hz.
-
Page 8: Operation
Operation Playing a CD or CD+G Connect the unit as described previously. Press the ON/OFF button to the In (ON) position to turn the unit on. Rotate the top of the unit counter- clockwise to expose the CD compartment. Insert a CD (with standard or MP3+G files) or a CD+G by gently pressing it on the center spindle. - Page 9 Operation Playing a CD or CD+G Press the MENU/Mic On-Off button; the Menu will appear. Select the Media Source option using the Skip Forward 8/Skip Back 7 buttons. Select CD using the Navigation 6/ 5 buttons. Press the Play/Pause 4 ;/ Stop button;...
- Page 10 Operation Playing a CD or CD+G Adjust the volume of the TV using its own volume control. To set the Mic Volume, press the MENU/Mic On-Off button; the Menu will appear. Select MIC VOLUME using the Navigation 6/ 5 buttons. Set the Mic’s Volume using the Skip Forward 8/Skip Back 7 buttons, then press the MENU/Mic On-Off...
- Page 11 Operation Playing a CD or CD+G Set the Effects as shown on page 18. SKIP: Advance or go back one track by pressing the Skip Back 7/-10 Track/Skip Forward 8/ +10 Track button. Press and hold the Play/ Pause 4 ;/ Stop button to stop playback.
- Page 12 Operation Playing Files on a USB Drive Connect the unit as described previously. Press the ON/OFF button to the In (ON) position to turn the unit on. Insert a USB drive with MP3 and/or MP3+G files into the USB jack on the 4TV. Press the MENU/Mic On-Off button;...
- Page 13 Operation Playing Files on a USB Drive Select USB using the Navigation 6/ 5 buttons. Press the Play/Pause 4 ;/Stop button; the USB Menu will appear. Select a desired file to play using the Navigation 6/ 5 buttons. Press the Play/Pause4 ;/Stop button to start playback.
- Page 14 Operation Playing Files on a USB Drive Adjust the volume of the TV using its own volume control. To set the Mic Volume, press the MENU/Mic On-Off button; the Menu will appear. Select MIC VOLUME using the Navigation 6/5 buttons. Set the Mic’s Volume using the Skip Forward 8/Skip Back 7 buttons, then press the MENU/Mic On-Off...
- Page 15 Operation Playing Files on a USB Drive SKIP: Advance or go back one track by pressing the Skip Back 7/-10 Track/Skip Forward 8/ +10 Track button. Advance or go back ten tracks by pressing and holding the Skip Back 7/-10 Track/Skip Forward 8/ +10 Track button.
- Page 16 Operation Using the AUX Jack Connect the unit as described previously. Press the ON/OFF button to the In (ON) position to turn the unit on. Insert one end of an audio cable (not included) into the AUX/LINE OUT jack on your external audio unit and the other end into the AUX IN jack on this unit.
- Page 17 Operation Using the AUX Jack Select AUX using the Navigation 6/ 5 buttons. Press the Play/Pause4 ;/Stop button; the default SMC screen will appear. Start playback of the external device. Adjust the volume on the 4TV using the Navigation/Volume Up 5/ Down 6 button.
- Page 18 Operation Using the AUX Jack To set the Mic Volume, press the MENU/Mic On-Off button; the Menu will appear. Select MIC VOLUME using the Navigation 6/ 5 buttons. Set the Mic’s Volume using the Skip Forward 8/Skip Back 7 buttons, then press the MENU/ Mic On-Off button to close the menu.
- Page 19 Operation Karaoke Effects Menu Insert and select a source (CD, USB Drive or AUX) as shown on the previous pages. Press the MENU/Mic On-Off button; the Menu will appear. Select the FX option using the Skip Forward 8/Skip Back 7 buttons. Select a desired option using the Navigation 6/ 5 buttons.
- Page 20 • Where can I get additional help with the Insert the USB flash drive as shown file formats? on page 11 and enjoy! While on the Singing Machine Store’s web page, simply click FILE FORMATS at the lower left. Note: Your downloaded songs can also be •...
-
Page 21: Care And Maintenance
Care and Maintenance Care for Compact Discs Treat the compact disc carefully. Handle the compact disc only by its edges. Never allow your fingers to come in contact with the shiny, unprinted side of the compact disc. Do not attach adhesive tape, stickers, etc. to the compact disc label. -
Page 22: Cleaning The Unit
Care and Maintenance Compact Discs should be stored in their cases after each use to avoid damage. Do not expose compact discs to direct sunlight, high humidity, high temperatures or dust, etc. Prolonged exposure or extreme temperatures can warp the compact disc. -
Page 23: Troubleshooting Guide
Troubleshooting Guide Should this unit exhibit a problem, check the following before seeking service: No Power • Power is not on; press the ON/OFF button turn power on. • Make sure unit is connected to AC power. • Make sure the AC plug is connected to this unit’s POWER IN jack. No Sound –... - Page 24 Troubleshooting Guide No sound from the microphone • Make sure it is firmly connected to the MIC1 or MIC2 jack. • Make sure it is turned on, see page 9 (Information column). • Make sure the MIC VOLUME Menu option is not on the lowest setting. File(s) on USB jack not playing •...
-
Page 25: Specifications
Specifications AUDIO Output Power...........................5 Watts (RMS) Output Impedance ..........................8 Ohms CD PLAYER Frequency Response ......................100Hz-20KHz Signal to Noise Ratio..........................50dB Sampling System .......................8 Times Oversampling Disc Diameter ........................4.72” (120mm) 3.15” (80mm) Single CD JACKS Headphone Jack ....................3.5mm Stereo Headphones Microphone ..........-54db 600 Ohm Impedance with Dynamic Microphone GENERAL Power..................DC 12V 1.5A, Positive Center AC Adapter Dimensions ..............7.1 X 7.1 X 5.2 inches (18.0 x 18.0 x 13.3 cm) - Page 26 The Singing Machine Company, Inc. 280 Machlin Court City of Industry, CA 91789 USA www.singingmachine.com Visit Our Website: PRINTED IN CHINA...
Need help?
Do you have a question about the SMC4TV and is the answer not in the manual?
Questions and answers