Table of Contents
Advertisement
Quick Links
Advertisement
Table of Contents

Subscribe to Our Youtube Channel
Related Manuals for DELTA DORE SystecTherm Tycam 1100


Summary of Contents for DELTA DORE SystecTherm Tycam 1100
- Page 1 Tycam 1100 - Tycam 2100 Guide d’installation Installation guide Installationsanleitung Guida di installazione Manual de instalación Instrukcja instalacji Installatiegids Bruksanvisning Asennusopas Tycam 1100 Indoor Tycam 2100 Outdoor...
- Page 2 IP architecture on data processing being carried out. which it operates. These changes may DELTA DORE uses a cloud platform to involve (the list is not exhaustive) a provide the data processing service. change in hardware, software update...
-
Page 3: Table Of Contents
1 - Installation recommendations 2 - Camera operation 3 - Operation of motion detection in one or several zoness 4 - Operation of image analysis (SMART DETECT) 4.1 Selecting the detection mode 5 - Tycam 1100 Indoor 5.1 Contents 5.2 Description 5.3 Support assembly 5.4 Mounting 5.5 Setting... - Page 4 The Tycam 1100 Indoor and Tycam 2100 Outdoor cameras feature a new generation of high resolution sensors providing a great quality image whatever the lighting conditions. Connected to your wireless router, the camera enables you to view your home on your smartphone and record videos and photos vial the Tydom application. Remotely, you can: - Observe and listen (*).
-
Page 5: Installation Recommendations
1 - Installation recommendations To achieve optimum operation: • Avoid installing the camera in • Electromagnetic radiation can an area with strong changes in affect video data transmission brightness (backlighting) or one that and image quality. Do not install is too dark. the camera near a source of electromagnetic radiation. -
Page 6: Operation Of Image Analysis (Smart Detect)
3 - Operation of motion detection in one or several zoness Tycam 1100/2100 cameras monitor the zone or zones via video analysis to detect any motion. Tycam 1100 also features heat detection by a passive infrared sensor (PIR). Materialize the zone or zones to be excluded according to a grid in the Tydom application. -
Page 7: Selecting The Detection Mode
4.1 Selecting the detection mode Using the Tydom application, select the detection mode suited to the monitored zone. 4.1.1 Crossing zone detection This mode is recommended for external cameras. Direct and position the camera at the recommended height to ensure reliable crossing detection. -
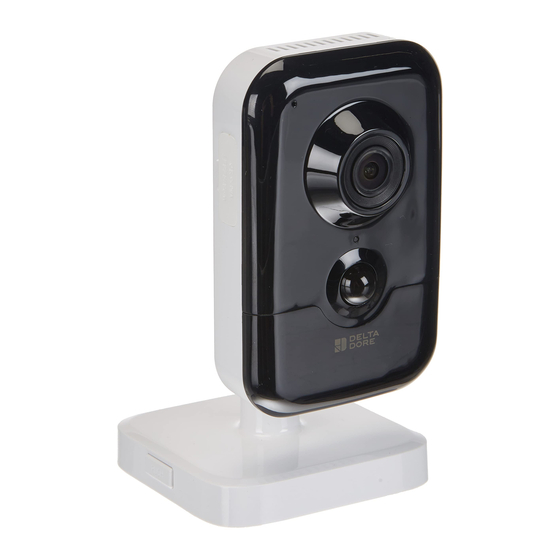
Page 8: Tycam 1100 Indoor
5 - Tycam 1100 Indoor 5.1 Contents 1- Camera 2- Support 3- EU plug 4- UK plug 5- Mains adaptor (1m50) 6- Installation guide Regulatory documents 7- RJ 45 cable (1m50) 5.2 Description 1- Memory card location 2- RESET/WPS button (Open the protective cover). 3- RJ45 Network Connector 4- Power supply socket 5- Loudspeaker... -
Page 9: Mounting
5.4 Mounting You can mount the camera on a wall or ceiling. - Press the ‘PUSH’ button to separate the support from the base. - Drill the base mounting holes. - Mount the base with suitable screws for the support. - Clip the support onto the base by aligning the 3 stops. -
Page 10: Tycam 2100 Outdoor
6 - Tycam 2100 Outdoor 6.1 Contents 1- Camera 2- Connectors 3- EU plug 4- UK plug 5- Mains adaptor (1m50) 6- Memory card cover key 7- Antenna socket plug 8- Drill template Drill Template 9- Impervious sheath for RJ 45 cable 10- Installation guide Regulatory documents 11- RJ 45 cable (1m50) -
Page 11: Mounting
6.3 Mounting - Drill the mounting holes using the drill template. - Mount the base with suitable screws for the support. Drill Template 0°/360° 6.4 Setting - Loosen nut A, - Point the camera correctly then tighten nut. 0°/360° 0°/90° For installations that require wiring for outdoor sockets, a external connection box is available as an option. -
Page 12: Impervious Sheath For Rj 45 Cable
6.7 Impervious sheath for RJ 45 cable If necessary, you can fit the sealing accessory for the 1- Camera network interface socket RJ 45 cable. 2- Seal 3- Network plug ① ② ③ ④ ⑤ ⑥ ⑦ 4- Seal plug 5- Rubber seal 6- Clamping nut 7- Network cable from... -
Page 13: Camera Connection
7 - Camera connection Select your connection mode: The RJ45 cable is briefly required for this mode. WiFi Connection modes by Wi-Fi link (2.4 Ghz). The local Wi-Fi network must be secure. WPS connection: Check the compatibility of your Wireless router. RJ45 Ethernet RJ45... -
Page 14: Tydom Application
Bitrate The resolution of the camera is automatically adjusted according to the available bit rate. If you have difficulty connecting remotely, you can change the resolution of your camera in the app. This setting can only be accessed remotely. The router requires 100 kbit/s for Setting the Upstream rate its own operation. -
Page 15: Technical Characteristics
10 - Technical characteristics Tycam 1100 Indoor Tycam 2100 Outdoor Power supply INPUT : 100-240V~ 50-60 Hz 0,3A OUTPUT : 12V Or PoE (802.3af Class3) Consumption RJ45 Network Ethernet 10/100 Mbps Wi-Fi network Wi-Fi IEEE 802.11 b/g/n 2.4 Ghz (5Ghz not compatible) Optical sensor/ 1/2.8”... - Page 16 e.com Systec Therm AG · Letzistrasse 35 · CH-9015 San Gallo Telefono +41 71 274 00 50 · www.systectherm.ch...
Need help?
Do you have a question about the SystecTherm Tycam 1100 and is the answer not in the manual?
Questions and answers