
Related Manuals for NASA electric NS-3082


Summary of Contents for NASA electric NS-3082
- Page 1 NS-3082 زود پز .لطفـا ً قبل از کار بار دستــگاه دستـــورالعمـل هــا را با دقت مطالعه نمایید...
- Page 3 کارکرد و کاربرد محصول :ویژگی محصول زودپز فشار برقی- نوعی جدید از لوازم آشپزخانه است که بر مبنای فناوری .جدید طراحی شده و مزایای زودپز، اجاق برقی و پلوپز تلفیق می نماید ،مشخصه این دستگاه کنترل درجه حرارت و پخت، ساختار نوین و طراحی زیبا ایمنی...
- Page 4 ایمن خاموش و روشن می گردد. اگر تماس درپوش قابلمه و قابلمه داخلی ضعیف باشد، قابلمه داخلی فشاری باال ایجاد نمی نماید؛ تحت فشار باال قادر .به باز نمودن درپوش قابلمه نیست . تنظیم کننده فشار؛ در صورت نقص در مدار کنترل( درجه حرارت) فشار و نیز تجاوز...
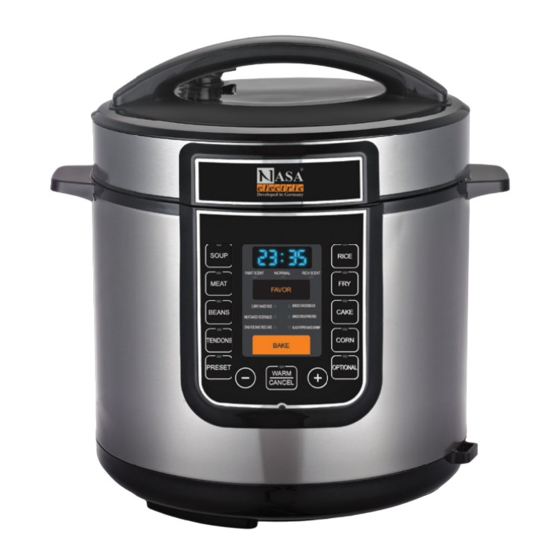
- Page 5 ساختار محصول :دستور العمل های استفاده .1.درپوش قابلمه را باز کنید دستگیره را نگاه داشته، به صورت پادساعتگرد چرخانده تا متوقف گردد، و )1 سپس درپوش قابلمه را بردارید.( مطابق شکل...
- Page 6 .2. پیش از استفاده، از آب گرم برای تمیز نمودن قابلمه درونی استفاده کنید حجم کل غذا و آب در قابلمه نمی بایست از 5/3 ارتفاع قابلمه درونی تجاوز نماید. برای غذاهای سفتر، ( مرغ یا گوسفند) با آب کمتر، حجم کل نمی بایست...
- Page 7 . درپوش را قرار داده، پاد ساعتگرد چرخانده تا صدای بسته شدن آن را )4 بشنوید. ( شکل 5. برچسب نقره ای قرار گرفته بر روی دریچه فشار را پاره کنید تا اطمینان ( .حاصل نمایید که دریچه به طرف قرار گیرد و قادر به حرکت آزادانه باشد )5 شکل...
- Page 8 :کارکرد :عایق حرارت/ لغو در زمان کار دستگاه، این دکمه را فشار دهید تا فشار دستگاه را در وضعیت استندبای قرار دهد. در حالت استندبای، این دکمه را به حالت عایق حرارتی فشار داده که به مدت 42 ساعت باقی می ماند. در .وضعیت...
- Page 9 مرغ( بخارپز): چراغ شاخص 5 مرتبه چشمک میزند، و دستگاه شروع به کار ،می کند. پس از رسیدن دما به 071 درجه سانتیگراد .به مدت 51 دقیقه تحت فشار آشپزی کنید 1)پس از اتمام آشپزی، دستگاه به مدت 5 مرتبه صدای باز داده و سپس وارد .حالت...
- Page 10 .4. آب درون قابلمه را تخلیه کرده و از آب گرم و کف دار استفاده نمایید 5. از یک برس نرم یا برس غیر فلزی برای تمیز نمودن قابلمه استفاده نمایید و .سپس با یک پارچه پاک نمایید 6. از یک برس نرم برای تمیز نمودن دریچه تخلیه فشار و تهویه هوا استفاده .نمایید...
- Page 12 :جودة المنتج سخان كهربائي عالي التقنية هو نوع جديد من أجهزة المطبخ التي تعتمد على التكنولوجيا الجديدة وتجمع بين مزايا الطباخ الكهربائي والطبخ في وقت مبكر على الطاير. إن خاصية التحكم في درجة الحرارة وآلة الخبز هذه هي التصميم الجديد والتصميم األنيق والسالمة واالعتمادية والطهي اللذيذ ، وهو جهاز .مثالي...
- Page 13 .عمر الخدمة 2 سنوات شريط التشكيل الكهربائي هيكل المنتج...
- Page 14 استخدام وصفات افتح غطاء الحاویة ، امسك المقبض ، قم بتدویر ساعة المعاکدة للتوقف ثم .).أخرج الوعاء (انظر شکل 2. قبل استخدام الماء الساخن لتنظيف القدر الداخلي ال تتجاوز الحجم الكلي للغذاء والماء في الوعاء 5/3 ارتفاع القدر الداخلي. من أجل تشديد األطعمة (الدجاج...
- Page 15 عندما ينضج األرز ، يجب أال تتجاوز كمية األرز المحمل 21 قطعة.في الظروف العادية ، عندما يتم طهي األرز ، يجب أن يصطحب كوب واحد من األرز بكوب .من الماء. هذه النسبة قابلة للتخصيص وفقا للرأي الشخصي - قبل طهي الوعاء الداخلي وتنظيف لوحة التسخين لمنع أي تلوث. تدوير الوعاء )3 الداخلي...
- Page 16 5. قم بإزالة العالمة الفضية على صمام تخفيف الضغط لضمان وضع الصمام .)5 جانبيا للتحرك بحرية (الشكل .6. ضع إمدادات المياه في المربع وفقا لشكل الصندوق 7. بعد تشغيل الجهاز ، سيتم سماع صوت الصفارة ، وستعرض الشاشة الساعة 00:00 باللون األحمر ، وفي هذه اللحظة ، سيتم وضع الجهاز بطريقة .رائعة...
- Page 17 :المطبخ :شوربة بعد الضغط على المفتاح مرتين ، يومض المؤشر الضوئي الخاص 170 مرات ، ويبدأ تشغيل الجهاز. بعد الوصول إلى درجة حرارةLED 5 بمؤشر .درجة مئوية ، طهي الطعام لمدة 15 دقيقة عند درجة الحرارة هذه :الکعکة يومض الكعكة خمس مرات عند الضغط على المفتاح ويبدأ الجهاز في...
- Page 18 مالحظة: ال تقم بتدوير صمام تصريف الضغط بعد الطهي عند طهي الحساء أو .الخضار أو السوائل. يجب عليك االنتظار لتقليل الضغط 5. بعد إفراغ كامل ، قم بتدوير وقبضة وعاء الوعاء بطريقة ذات اتجاه عقارب الساعة :طريقة التنظيف .1. قم بإخراج قابس التيار الكهربائي قبل التنظيف .2.
- Page 19 وضعية واضحة -4 قم بفك قابس الطاقة قبل تنظيف الجهاز. فقط قم بتنظيف الجهاز عند التنظيف ال تغمر الجهاز بالماء وال تضعه مع سوائل أخرى 5. بعد تبريد الجهاز ، ضعه في مكان آمن 6. يجب أن يكون دليل الجهاز آمن ً ا . يجب أن يكون دليل الجهاز آمن ً ا 7.
-
Page 20: Technical Features
Technical features : Power : 100 W The voltage of power supply : 110V Frequency : 60 Hz Volume : 6L The waste recovery of ecological security You can help to protect the environ- ment! Conform to the local laws. Please send the defec- tive electric pressure cooker to the related recycling center. - Page 21 help or contact with the manufacturer. 8.Do not allow children to play whit the electric pressure cooker. 9.The electric pressure cooker cannot be used in the external timer or separate remote control system. 10.It is only used indoor. 11.It is prohibited to splash the electric pressure cooker and to store in the damp place.
-
Page 22: Cleaning Method
Cleaning method 1.Before cleaning, pull out the plug from the socket. 2.Clean the pot cover, including gasket,discharge pressure valve, filter,venthole, ball float valve and floater, and use the duster cloth to wipe the pot cover. 3.Use a soft cloth to wipe the shell of the pressure cooker. It is prohibit to immerse the pressure cooker in the water or wash it. -
Page 23: Cooking Instruction
(as shown in figure 6) Notes : If cooking soup or cooking the vegetable with more liquid, do not turn the discharge pressure valve after the end of cooking. It is necessary to wait for the pressure falling. 4)After completely discharging the pressure, rotate clockwise and the lift the pot cover. - Page 24 Cake : after the baking function key, the indicator lamp flashes 5 times, and the pressure cooker starts to work. After the tem- perature reaches 140 , cook about 30 minutes under the pres- sure. (Steaming) Fish : the indicator lamp flashes 5 times, and the pressure cooker starts to work.
- Page 25 6.As shown in the figure, put the water storage box into the pressure cooker. 7.After switching the pressure cooker on, there is the beep sound. 5 indicator lights on the control panel flash. At this mo- ment, the electric pressure cooker is in standby state. Function : Thermal insulation /cancel: when working press this button to make the pressure cooker in the standby state.
- Page 26 3.Before cooking, clean up the inner pot and heating plate (as shown in figure 3). 4.Cover the lid •Ensure that the silicone gasket on the pressure cooker has no damage and ensure that internal aluminum plate can be rotate freely by hand. •Cover the lid, and turn the handle anticlockwise until you can hear the sound of jamming (as shown in figure 4).
- Page 27 Instructions for use 1.Open the pot cover Hold the handle, rotate clockwise to stop, and then lift the pot cover (as shown in figure 1). 2.Before using, use the warm water to clean the inner pot. The total volume of food and water in the pot should exceed 3/5 height of inner pot.
-
Page 28: Product Structure
Product structure... -
Page 29: Electric Schematic Diagram
•Nutrition is more health. 3. patent structure: compared with other types of products, the work is safer. •It is equipped with the protective device of the pot cover turned on and off safely. If the contact of the pot cover and the inner pot is poor,the inner pot will not from high pressure,under high pressure,unable to open the pot cover. -
Page 30: Product Feature
Content : Product feature Electric schematic diagram Product structure Instructions for use Cleaning method Safety caution Product function Product feature : The electric pressure cooker -------- a new type of kitchen appli- ance on the basis of a new technology combines the advantages of pressure cooker , electric solve and rice cooker . - Page 32 NS-3082 Pressure Cooker Read instruction carefully before using...
Need help?
Do you have a question about the NS-3082 and is the answer not in the manual?
Questions and answers