
Related Manuals for TheFibers OCPM-18

Summary of Contents for TheFibers OCPM-18
- Page 1 OCPM-18 User Manual Optical CWDM Power Meter OCPM-18 TheFibers Inc A-1109 Keumkang Penterium IT Tower, 282 Hagui-ro, Dongan-gu, Anyang-City, Korea Tel: +82-31-381-6108 Fax: +82-31-381-6109 Email: sales@thefibers.com Http://www.thefibers.com Page 1/16...
- Page 2 OCPM-18 1. Introduction OCPM-18 is developed to measure exact power and frequency adoptable to the various network conditions. This instrument is portable and made to be appropriate to the outside environment. 1.1 Main Functions - Works as a typical power meter...
- Page 3 OCPM-18 1.3 Optical Standards - Wavelength Parameter Unit Specification Range 1270-1610 Number of Channels 1270/1290/1310/1330/1350/1370/1390/1410/1430 Measuring Wavelengths 1450/1470/1490/1510/1530/1550/1570/1590/1610 Wavelength Resolution - Optical Power Parameter Unit Specification Range of display +10 ~ -40 ±0.5dB @ -20dBm Accuracy Resolvability 0.01 Measuring unit...
- Page 4 - Do not drop or give a shock to the battery. 1.6 Warranty OCPM-18 you bought is passed our all inspection and then is shipped to the customers. TheFibers give you a warranty for one year from the buying date. During the warranty period, the returned product by freight prepaid from the customer, TheFibers will provide repair and replacement for any defective product without additional charge which is needed to repair or replacement.
-
Page 5: Getting Started
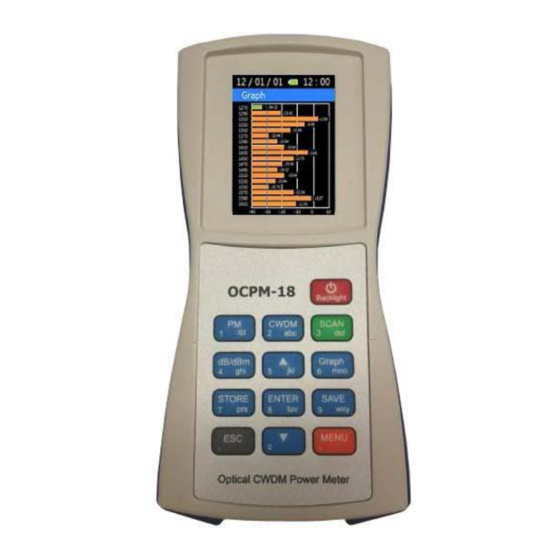
OCPM-18 2. Getting Started 2.1 Explanation of user interface and operating keys Function Backlight Power ON/OFF Power Display CWDM Scanned dB value of the wavelength is represented as a data. SCAN Wavelength is scanned and dB value is represented. dB/dBm Each time you press the key, dB and dBm are repeated. -
Page 6: Screen Information
OCPM-18 2.2 Screen Information 1) Power ON / OFF Is used to turn the instrument power on and off. If you press the (Backlight) button for more than 2 seconds, the logo shown below appears and it moves to ‘Power Meter’, which is the basic channel. - Page 7 OCPM-18 Use the arrow keys to different values can be found. 'Manual' is the wavelength of the desired user is used to determine the value of dBm. In the above screen , click (PM) button, will write the wavelength to be measured.
- Page 8 OCPM-18 4) SCAN - If you press the (SCAN) button, The selected wavelengths are scanned. 5) Graph - If you press the (Graph) button after scanning, a graph screen like the one on the right show. Page 8/16...
- Page 9 OCPM-18 - If you press the (Graph) button again it returns to text mode. 6) Recall - Press the (Recall) button to access the menu that calls the measured result of optical power for each channel in the form of text.
- Page 10 If you press the (Menu) button, it changes to a screen where you can configure the operating environment of OCPM-18. - The menu consists of ‘SCAN SET’, ‘Select Lambda’, ‘Off Set’, ‘Auto Power Off’, ‘Time Set’, ‘Data Delete’, ‘Data Format’, ‘System Info’, ‘Scan Display’, ‘SCAN Mode’ and ‘Threshold’.
- Page 11 OCPM-18 1) Scan Set If you press the (Enter) button after selecting ‘Scan Lambda Set’, a set up screen for ‘Scan Lambda Set’ shows up. As the channel values that users mainly use are provided in the above screen, it is easy to set up the channel value that the user wants.
- Page 12 OCPM-18 If you press the (Enter) button after selecting ‘Off Set’, you can set up dBm value and the optical power value on the screen. - You can set the ‘Off Set’ by pressing the ESC key and ENTER. 4) Auto Power Off - The power automatically goes off if the user does not input any key in the determined time.
- Page 13 OCPM-18 6) Data Delete If you press the (Enter) button after selecting ‘Delete Data’, you can delete the data. - If you press the (Enter) key after choosing the data you want to delete, message appears on the screen. If you press the (Enter) button, it is deleted from the memory.
- Page 14 OCPM-18 8) System Info Generates information about the equipment. 9) Scan Display - ‘Scan Display’ consists of ‘All’ and ‘Measured’. This can be selected using the arrow keys . - If you choose the ‘All’, from 1270nm to 1610nm values of 18 wavelengths are output.
- Page 15 OCPM-18 10) Scan Mode - The ‘Scan Mode’ consists of the ‘Auto’ and ‘Manual’. This can be selected using arrow keys. - If you choose the ‘Auto’, when selecting ‘CWDM’, shows the real time changing values. - If you choose the ‘Measured’, when ‘SCAN’ and selecting ‘CWDM’, shows the values.
- Page 16 OCPM-18 - You can change the baseline. - ‘– 30.00dBm’ is the default setting. If you press the (Enter) button after selecting ‘Threshold’, you can set the baseline. - Baseline changes can be found at the graph screen. Page 16/16...
Need help?
Do you have a question about the OCPM-18 and is the answer not in the manual?
Questions and answers