Table of Contents
Advertisement
Quick Links
NOTICE:
• This product is not intended for life safety applications.
• DO NOT install this product in hazardous or classified locations.
• The installer is responsible for conformance to all applicable codes.
• The device must be installed following the guidelines set forth in this installation guide,
or the inherent protection provided by the device may be compromised.
Product Application Limitation
• Obvius products are not intended for use in critical applications such as nuclear facilities,
human implantable devices or life support. Obvius is not liable, in whole or in part, for any
claims or damages arising from such uses.
• Obvius strongly believes in continuous improvement, therefore we must reserve the right
to change specifications and product offerings without notice. Where possible, we will
substitute products with equivalent functionality when necessary.
Overview
AcquiSuite is a family of data acquisition
systems that provides owners and managers of
commercial and industrial facilities with a cost-
effective means of gathering crucial information
in a timely manner.
The footprint and industrial temperature range
makes this a perfect solution for embedded
applications. Reduce development time
and speed up integration by collecting and
distributing energy and sensor data directly
from your equipment.
Power
24VDC, 500mA max
Degree 2
Pollution
Operating Temperature
-30°C to +70°C, 95% RH non-condensing
Communication Protocols
Modbus RTU, Modbus TCP, TCP/IP, HTTP, HTML, FTP
LAN
Dual (2x) RJ45, 10/100 Ethernet
USB
USB 2.0 Type A
Dual (2x) RS485 Modbus, each supporting up to 32 external
RS485
devices (64 total)
Torque Settings
Min = 4.4 in/lb (0.5 NM)
(Wiring Terminals)
Max = 5.3 in/lb (0.6 NM)
Installation Checklist
Hardware:
• A8820 AcquiSuite Data Acquisition Server (DAS)
• Laptop (not provided) with one RJ45 port (required for LAN or direct
laptop-to-DAS connection)
• Ethernet Cat 5 or better ethernet cable (not provided)
• Power Supply 24VDC, 500mA or greater (not provided)
Optional hardware:
• Additional Modbus
TM
Devices
• 2 wire, twisted pair with shield for Modbus/RS485 connection
(Belden
1120A or equivalent)
TM
• Termination resistors (120 ohm) for long RS485 runs over 200 ft
Mounting
DIN Rail: The A8820 is designed with integrated DIN rail mounting clips for a standard
35 mm DIN rail. The integrated clips on the back of the enclosure will snap directly on the rail.
Mounting Tabs: The enclosure provides mounting tabs in each corner of the enclosure. Use
the appropriate type #6 or smaller screw to attach the unit to the mounting surface.
Mounting Template
(Dimensions)
4.61 in.
3.76 in.
5.19 in.
4.87 in.
+
Mounting Installation
1.
Unpack materials.
2.
Mount the DAS using either the DIN rail mount, or with screws through the mounting tabs.
3.
Optional: Connect the Modbus network loop as shown in the diagram. Follow the
manufacturer's instructions for installing and powering the Modbus devices.
4.
Connect a PC to the DAS using a Cat 5 or better ethernet cable.
a. ENET 1 should be the "upstream" connection to the Internet. Connect it to your
firewall/router or Ethernet modem.
b. ENET 2 should be the "downstream" connection, for your PC and for Ethernet meters
and devices.
5.
Supply +24VDC to the DAS. Once power is applied, the Status LED will immediately turn
on and the LCD will show a series of progress messages as the system boots.
6.
Decide type of connection:
a. DHCP Mode (DHCP is the default and is recommended).
b. Static IP Mode.
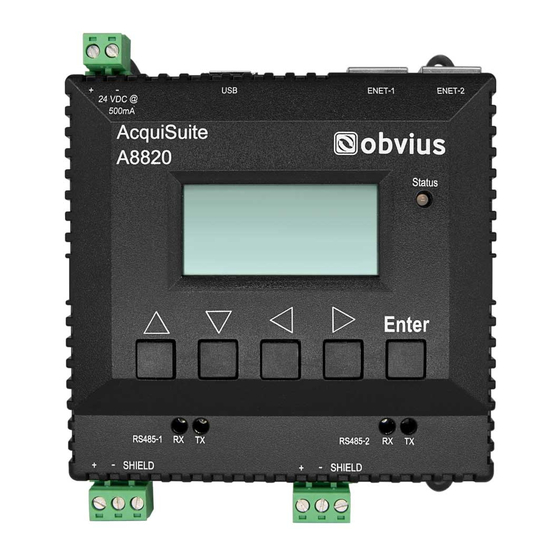
AcquiSuite
+
USB
-
24 VDC @
500mA
AcquiSuite
A8820
RS485-1
RX
TX
SHIELD
+
+
-
SPECIFICATIONS
-
Data Acquisition Server
TM
Cat. No. A8820
• When installed in an outdoor or harsh environment, the device must be mounted in an
appropriate listed outdoor or industrial rated enclosure (Type 4X / IP54 in Europe).
• Only copper wiring is to be used for all field wiring terminals.
INSTALLATION GUIDE
Single Ethernet and Modbus (RS485)
ENET-1
ENET-2
STATUS
Dual Ethernet and Modbus (RS485)
Internet
Enter
Computer
RS485-2
RX
TX
SHIELD
-
+ -
120 ohm
Modbus RTU Devices
(RS485-1)
DHCP Enabled Mode
Confirm the DAS is properly connected to the computer or a LAN, and that both are
powered ON.
1.
Confirm that DHCP is enabled on the computer. For most computers, this is the
default setting.
2.
From the device front panel, navigate to the Quick Start menu. The first screen in the
Quick Start will display the IP addresses for active Ethernet connections. Be sure to use
the IP address for the correct Ethernet port, if both ports are connected. The device must
be connected to the same network that the PC is connected to.
3.
Open a browser and type the IP address, as shown on the LCD display of the AcquiSuite,
in the address bar.
4.
This will open the web browser interface of the AcquiSuite.
5.
At initial setup, a password must be created. Select "Click here for Password Setup" to
create the admin user password.
3.76 in.
6.
Enter the desired admin user password in both boxes and select "Apply."
7.
A message confirming that the password was successfully set will display. Select the link
below it to proceed to the login screen.
Ethernet Router/Switch (Cat 5/Cat6)
Internet
Computer
Computer may also be directly
connected to the A8820
+ -
120 ohm
+ -
S
S
Modbus RTU Devices
(RS485-1)
Ethernet Router/Switch (Cat 5/Cat6)
24VDC, 500mA
USB
+
-
USB
ENET-1
24 VDC @
500mA
AcquiSuite
A8820
STATUS
Enter
Computer may also be directly
RS485-1
RX
TX
RS485-2
RX
TX
connected to the A8820
+
SHIELD
+
SHIELD
-
-
+
+
-
S
S
-
120 ohm
120 ohm
S
+ -
S
+
-
S
DI-602-A8820-00A
ENGLISH
Enet 1 preferred
Enet 2 optional
24VDC, 500mA
USB
+
-
USB
ENET-1
ENET-2
24 VDC @
500mA
AcquiSuite
A8820
STATUS
Enter
RS485-1
RX
TX
RS485-2
RX
TX
+
SHIELD
+
SHIELD
-
-
+ -
S
120 ohm
+ -
S
Ethernet Router/Switch (Cat 5/Cat6)
ENET-2
Ethernet Connected Meters & Devices
(Ethernet-2)
+
-
120 ohm
S
-
+
S
-
+
S
Modbus RTU Devices
(RS485-2)
Advertisement
Table of Contents

Related Manuals for Obvius AcquiSuite A8820


Summary of Contents for Obvius AcquiSuite A8820
- Page 1 Enet 1 preferred • Obvius products are not intended for use in critical applications such as nuclear facilities, Enet 2 optional human implantable devices or life support. Obvius is not liable, in whole or in part, for any 24VDC, 500mA Internet claims or damages arising from such uses.
- Page 2 years.
Need help?
Do you have a question about the AcquiSuite A8820 and is the answer not in the manual?
Questions and answers