Table of Contents
Advertisement
Quick Links
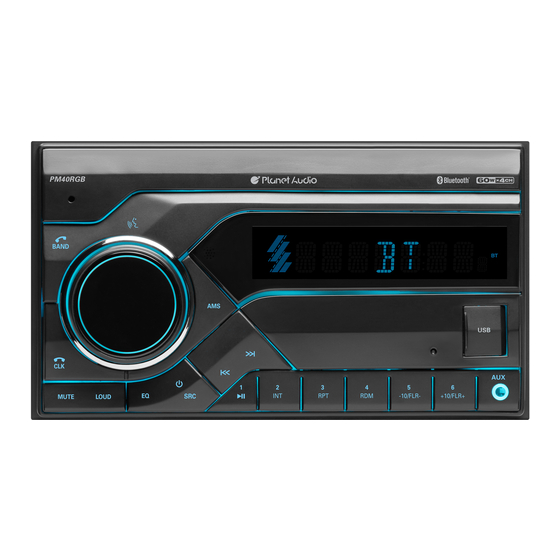
Overview of the Components
1.
(power) / SRC (source) button
2.
VOL (volume) knob,
(Push-To-Talk) button, SEL (select/menu) button
3.
BAND button,
(answer call) button
4.
AMS (automatic store station, preset station scan, automatic music search) button
5.
(pause/play), Preset station 1 button
6.
INT (intro), Preset station 2 button
7.
RPT (repeat), Preset station 3 button
8.
RDM (random), Preset station 4 button
9.
-10(previous 10 tracks), FLR-(previous folder), Preset station 5 button
10. +10(next 10 tracks), FLR+(next folder), Preset station 6 button
11. CLK (clock display/setting),
(end call) button
12.
(tune/seek down, previous track, fast reverse) button
13.
(tune/ seek up, next track, fast forward) button 14. MUTE button, 15. LOUD button
16. EQ (Equalizer),
17. IR remote sensor,
18. LCD Display,
20. AUX IN (aux audio input) jack
21. Hands-free Microphone
General Operation
Turn Unit on/off, Change the Source
• Press the
/SRC button to turn on the unit. Press and hold the
button to turn off the unit.
• Press the
/SRC button to select the different modes: Radio, USB(with
USB device inserted), BT(Bluetooth) and AUX-IN(auxiliary input) modes.
Adjust the volume
Rotate the volume knob to increase or decrease the volume level.
Push-To-Talk
Press the
button (volume knob) to access to smartphones voice
assistant capability via Bluetooth.
Installation
Installation Procedures
First complete the electrical connections and then check for correctness of
connection.
Installation Opening
This unit can be installed in any dashboard
which has an opening as shown below.
To Install the Car Radio
Be sure you test all connections first, and then follow these steps to install
this unit.
1. Make sure the ignition is turned off, and then disconnect the cable from
the vehicle battery's negative (-) terminal.
2. Disconnect the wire harness and the antenna.
3. Remove the plastic outer trim from the car receiver.
4. Attach the "L" brackets (2pcs) on the both sides of the car receiver with
screws(M5.5 x 7) as shown as the below figure. The others fixing screws that
fix the other terminal of the "L" metal bracket, please buy from your dealer
according to the drilling of holes size.
5. Consult with you nearest dealer if installation requires the drilling of holes
or other modifications of the vehicle.
6. Install this car receiver in the dashboard.
7. Make wiring connections, as illustrated in the "Wiring Connections."
8. Install the plastic outer trim ring onto the car receiver.
General Operation
Adjust Menu Options
• Press and hold the volume knob to enter into setting menu, then press the
volume knob repeatedly to select setting items:
- BASS/TREBLE:-7, -6, ~, 1, 0, +1,~, +6, +7
- BALANCE:L7, L6,~, L1, 0, R1,~,R6, R7
- FADER:R7, R6, ~, R1, 0, F1, ~ ,F6, F7
- Loudness: LOUD ON/OFF
- EQ(Equalizer) Setting: OFF, FLAT, CLASSIC, POP, ROCK, JAZZ
- Stereo/Mono: Switches between MONO and STEREO reception mode
for radio frequencies.
- DX/LOCAL: Enables or disables the local broadcast mode (LOCAL).
- CLOCK 12/24: Select between 12 hours and 24 hours display.
Note: If 12 hour display is selected , AM= Morning; PM= Afternoon
- AREA US/EU: This car radio is equipped the USA / Europe frequency.
Rotate the volume knob to switch between USA and Europe frequency.
The system will change the frequency setting in about 3 seconds.
- 7 color-changing illumination in buttons:
This car radio device is equipped 7 color-changing illumination in buttons.
The illumination color can be preset Auto(color automatically change one
by one), Blue, Red, Cyan, Green, Purple, Yellow, White.
• Rotate the volume knob to change values.
Mute On/Off
In power on mode, briefly press the MUTE button to toggle mute on or off.
Setting the Clock
Press and hold the CLK button to display time. Press and hold the CLK
19. USB Port,
button again. The hours digits start flashing on the display.
22. Reset button
Set hours by rotating the volume knob. Briefly press the CLK button.
The minute digits start flashing. Set minutes by rotating the volume knob.
USB Port
Connect to a USB storage device for audio play, or charging of a mobile
/SRC
phone.
Hands-free Microphone
To receive your voice when calling by using this bluetooth handsfree system.
Aux Audio Input Jack
Connect to the headphone jack on an external device (e.g. a mobile phone
or MP3 player) for audio play.
Wiring Connections
4.1 inches
7.2 inches
General Operation
Reset
Push the RESET button with a thin object with a pointed end to reset the unit.
This function may be used when the LCD does not display normally or sound
is distorted, or when any of controls are disabled.
Radio Operation
Switch Between USA area and Europe area Frequency
In radio mode, press and hold the volume knob to enter into setting menu,
then press the volume knob repeatedly to access the state of the USA and
Europe frequency, then rotate the volume knob to switch between USA and
europe frequency. The system will change the frequency setting in about 3
seconds.
Change Bands
In radio mode, shortly press the BAND button to switch between the
FM1(F1), FM2(F2), FM3(F3) and AM1(A1), AM2(A2) bands.
To Store / Recall Preset Stations
The radio can be stored 6 preset stations for each band (FM1, FM2, FM3,
AM1 and AM2) for a total of 30 preset stations.
- To memorize a station:
Press and hold the desired preset buttons (1-6) to save a radio station.
- To recall a preset station:
Briefly press the respective station button (1-6) to recall the corresponding
preset station.
Manual Tuning
In the radio mode:
Press and hold the
In manual tuning mode, briefly press the
or previous frequency step by step.
Seek Tuning
In radio mode, press the
will search upward or downward for the strong signal radio station within the
current band. The auto searching will stop until find a station.
Automatic Store Preset station (AMS)
Press and hold the AMS button to store 18 FM stations and 12 AM stations
automatically.
Briefly press the AMS button to recall each preset station that saved in the
memories in each band.
ACC + (Red)
GND - (Black)
ANT + (Blue)
Power B+ (Yellow)
White
Gray
Front Left
Speaker
White/Black
Gray/Black
Green
Purple
Rear Left
Speaker
Green/Black
Purple/Black
- +12V DC Negative Ground.
- Only support speakers of 4 ohms or above.
- The maximum current of the Amp remote trigger is 200mA.
- The equipment shall be protected by the circuit with max. 10
Amperes of the front end of DC source.
or
button to enter the manual tuning mode.
or
button to search the next
or
button, the automatic search will start, it
Front Right
Speaker
Rear Right
Speaker
Advertisement
Table of Contents

Related Manuals for Planet Audio PM40RGB


Summary of Contents for Planet Audio PM40RGB
- Page 1 Installation Wiring Connections Installation Procedures First complete the electrical connections and then check for correctness of connection. Installation Opening This unit can be installed in any dashboard 4.1 inches which has an opening as shown below. 7.2 inches To Install the Car Radio Be sure you test all connections first, and then follow these steps to install this unit.
- Page 2 Repeating the track 3. Choose the “PLANET AUDIO PM40RGB” from the device list to pair and press the SRC button to enter BT mode and the “BT AUDIO” will be shown Press the RPT button to toggle between RPT ONE (Continuously repeat connect with the car audio system.
Need help?
Do you have a question about the PM40RGB and is the answer not in the manual?
Questions and answers