
Related Manuals for ALT CIRCO 40729


Summary of Contents for ALT CIRCO 40729
- Page 1 CI R CO #4 0 729 WALLMOUNT LAVATORY FAUCET ROBINET DE LAVABO MURAL Installation & care guide Guide d’installation et d’entretien last revision: 18/01/2017...
- Page 2 Félicitations pour l’achat de purchase of your Alt product votre produit Alt By purchasing an Alt product, you are taking part in En achetant un produit Alt, vous prenez part au the global movement for better living. We take pride in mouvement global pour le mieux-vivre.
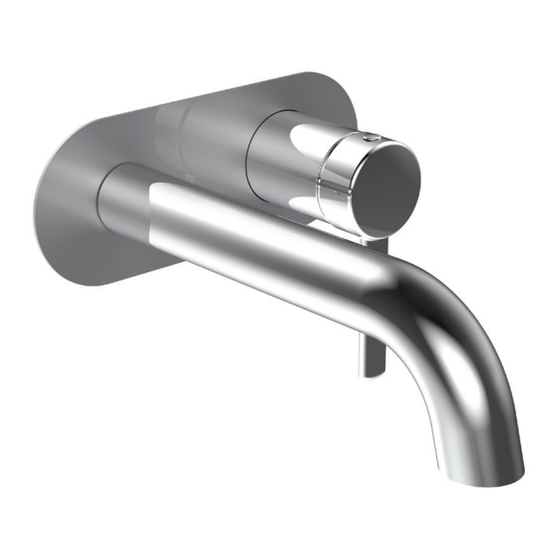
- Page 3 WALLMOUNT LAVATORY FAUCET COMPONENTS COMPOSANTES DU ROBINET DE LAVABO MURAL SPECS AT LARGE / SCHÉMA DES PIÈCES ALT75086200 : rough body / corps brut ALT75086301 : trim plate / plaque décorative ALT75086400 : cartridge / cartouche ALT75086501 : cartridge cover / capuchon de la cartouche ALT75086601 : cartridge dome / dome de la cartouche ALT75086701 : handle / poignée ABAE81590 : aerator / aérateur...
- Page 4 BEFORE YOU START AVANT DE COMMENCER CAUTION: FOR BEST RESULTS, WE STRONGLY MISE EN GARDE: POUR OBTENIR UN RÉSUL- RECOMMEND THE INSTALLATION OF THIS FAUCET TAT OPTIMAL, NOUS RECOMMANDONS FORTEMENT BE DONE BY A LICENSED PLUMBER. QUE L’INSTALLATION DE CE ROBINET SOIT FAITE PAR UN PLOMBIER ACCRÉDITÉ.
-
Page 5: Installation
INSTALLATION General dimensions Dimensions générales Mounting plate Plaque de montage Min. 1 ’’ 3/16 Max. 2 3/8’’ Prepare the valve Préparer la valve To carry out an optimal positioning, it is suggest to perform a test assembly before placing the valve in the wall. - Page 6 INSTALLATION Cutting hole Trou de coupe [133.00] 5” WE RECOMMEND DRILLING 5’’ X 2’’ HOLE FOR THE INSERTION OF THE FAUCET. NOUS RECOMMANDONS DE PERÇER UN TROU DE 5’’ X 2’’ POUR L’INSERTION DU ROBINET. [53.00] 2” Fig.2 Install the faucet Installer le robinet Place the plate (1), insert the spout (7) onto the male adapter, and screw it (5 &...
- Page 7 INSTALLATION Cartridge replacement Remplacement de la cartouche To replace the cartridge (5), unscrew the handle (1) by removing the set screw (2). Unscrew the dome cap (3) and the nut (4). Replace with new cartridge and reassemble by reversing steps. Pour remplacer la cartouche (1), retirer la poignée (4) en enlevant la vis de réglage (5).
- Page 8 INSTALLATION Aerator cleaning Nettoyage de l’aérateur Remove the aerator (1) from the spout. Then soak it in a vinagar and water solution to remove lime build-up. Once parts have been cleaned, reinsert the aerator. Dévisser l'aérateur (1). Ensuite, tremper le dans un mélange de vinaigre et d’eau, pour retirer le calcaire qui pourrait s’y être accumulé.
- Page 9 CARE SOIN To clean your ALT faucet or accessory, wash with a Pour nettoyer et conserver l’apparence de vos robinets wet nonabrasive soapy cloth. Then wipe dry with a soft ou accessoires ALT, utiliser un linge non-abrasif imbibé towel or cloth. We recommend this be done on a d'eau tiède et de savon doux, puis essuyer avec un linge...
-
Page 10: Warranty
Any labor or shipping charges, or damages whatsoever incurred in whole or in part from installation, removal, re-installation, repair or replacement of any Alt product or part, as well as any incidental or consequential damages, expenses, losses, direct or indirect, arising from any cause whatsoever. -
Page 11: Garantie
GARANTIE Alt offre une garantie à vie contre les défauts de matériel et de main d’œuvre dans des conditions normales d’utilisation et d’entretien du produit, et ce tant que l’acheteur d’origine est propriétaire de sa maison. La garantie est applicable seulement si le produit est acheté chez un détaillant Alt dûment autorisé.
Need help?
Do you have a question about the CIRCO 40729 and is the answer not in the manual?
Questions and answers