Table of Contents
Advertisement
Advertisement
Table of Contents

Related Manuals for North Star 49436

Summary of Contents for North Star 49436
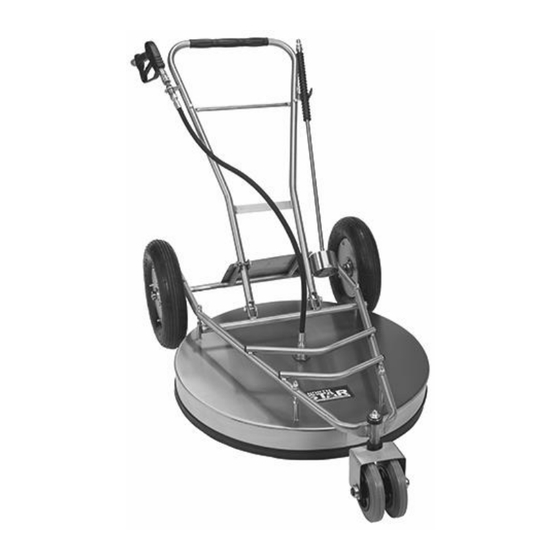
- Page 1 32 Inch Surface Cleaner Owner’s Manual WARNING: Read and understand all instructions, warnings, and cautions before using this product. Failure to follow the instructions, warnings, and cautions may result in serious personal injury and/or property damage. Item #49436 SAVE THESE INSTRUCTIONS...
- Page 2 Thank you very much for choosing a Northstar product! For future reference, please complete the owner’s record below: Serial Number/Lot Date Code: ________________________________ Purchase Date: ____________________________________________ Save the receipt, warranty, and this manual. This surface cleaner is designed for certain applications only Northern Tool and Equipment cannot be responsible for issues arising from modification or use of this product in applications for which it was not designed.
-
Page 3: Table Of Contents
Table of Contents Intended Use ............................4 Technical Specifications ........................4 Important Safety Information ....................... 4 Specific Operation Warnings ....................... 6 Assembly ............................... 7 Before Each Use ............................ 9 Operating Instructions .......................... 9 After Each Use ............................9 Maintenance ............................10 Replace the Hose ........................... -
Page 4: Intended Use
Intended Use This surface cleaner is designed for high-pressure cleaning of a variety of outdoor surfaces such as concrete, asphalt, paving stone walkways pool and boat decks etc. An included lance can be used to clean hard-to-reach areas. The cleaner connects to a pressure washer and is rated up to 5000 PSI with 8 GPM with fluid temperatures up to 200º... - Page 5 WORK AREA SAFETY Inspect the work area before each use. Keep work area clean, dry, free of clutter, and well lit. Cluttered, wet, or dark work areas can result in injury. Using the product in confined work areas may put you dangerously close to other cutting tools and rotating parts. ...
-
Page 6: Specific Operation Warnings
CLEANER USE AND CARE Do not force the cleaner. Tools do a better and safer job when used in the manner for which they are designed. Plan your work, and use the correct tool for the job. Check for damaged parts before each use and before connecting the cleaner to a pressure washer. -
Page 7: Assembly
Assembly 1. Check the contents of the shipping carton against the parts list to ensure all parts are present. 2. Attach the twin front casters to the housing as shown below. After tightening the bolts check that the casters swivel and the wheels turn smoothly. 3. - Page 8 5. Insert the handlebar into the frame and secure it using the bolts (18) and spring clips (13). 6. Connect the bottom of the hose to the swivel piping (shown below, left) and the top to the connection at the gun (17). Release the quick coupling between the gun...
-
Page 9: Before Each Use
Before Each Use Perform the following inspections before each to ensure the cleaner is working properly. Check for any worn or damaged parts. Replace any such part before using the cleaner. Check that all the parts are tightly fastened. Tighten any that are loose. ... -
Page 10: Maintenance
Maintenance Disconnect the surface cleaner from a pressure washer and ensure that the cleaner is not pressurized before performing any inspections, maintenance or adjustments to avoid any wildly spraying fluid that may cause personal injury and property damage. Maintain your tool in good repair by adopting a program of conscientious repair and maintenance in accordance with the recommended procedures found in this manual. -
Page 11: Replace The Swivel Complete Fixture
Replace the Swivel Complete Fixture 1. Remove the hose bottom connection (shown below, left)) then remove the swivel piping from the top of the housing (below right). 2. Support the swivel fixture from below the housing with a rolled up cloth to avoid the fixture dropping onto the floor, possibly damaging it. -
Page 12: Replace The Swivel Filter
Replace the Swivel Filter 1. Remove the swivel piping from the cleaner: a. Disconnect the hose connection from the top of the swivel. b. Remove the swivel piping from the fixture in the housing. 2. Remove the bottom piece of the swivel piping. 3. -
Page 13: Parts Diagram
Parts Diagram Page 13 of 16... -
Page 14: Parts List
Parts List Item # Part # Description Quantity 49436.1 Handle 49436.2 Hose 49436.3 Housing 49436.4 Wheel complete component 49436.5 Twin caster 49436.6 Easy repair kit 49436.7 High pressure filter 49436.8 Swivel complete 49436.9 Cap nut 49436.10 Washer 49436.11 Bearing 49436.12 2 x nozzles 49436.13... -
Page 15: Troubleshooting
Troubleshooting Please check the list below before addressing the problems to servicing personnel including the local dealer. If the problem continues after the following troubleshooting, please call your local dealer for future assistance. Problem Possible Cause Solution Twist the nozzle off and Nozzle blocked (not spraying) Dirty nozzle clean by needle or paperclip... - Page 16 Distributed by: Northern Tool & Equipment Company, Inc. Burnsville, Minnesota 55306 www.northerntool.com Made in Germany Page 16 of 16...
Need help?
Do you have a question about the 49436 and is the answer not in the manual?
Questions and answers